Creating Complex InfoPath Controls in C#
One of the problems with InfoPath controls is their limited availability. For example, there is no such control like the NumericUpDown control in WinForms. Or you may have a predefined complex UI, which you want use multiple times.
In these circumstances, what we need is a mechanism for control extensibility. Today, InfoPath provides two different control extensibility mechanism: Template parts and ActiveX controls.
Basically, template parts are predesigned InfoPath form templates, that can be imported into other templates. This mechanism provides a good way of reusing the same controls again and again, but on the dark side, you are still restricted with the control set of InfoPath.
Other mechanism, which is extensibility via ActiveX controls lets you go beyond the control set of InfoPath and use whichever ActiveX control you want. In this blog, we will drill down into using a Windows control in InfoPath forms, and more importantly provide a way of binding data to these controls. This blog will give details of using WinForm controls that are registered for COM Interop, inside InfoPath forms. Two mainly used types for binding ActiveX controls to InfoPath data sources are 'Simple Binding', ‘Stream Binding’ and 'Node Binding'. In this article we will cover node binding. You can find more information about types of binding between ActiveX controls and InfoPath data source here:
http://blogs.msdn.com/ajma/archive/2004/07/07/175568.aspx
http://blogs.msdn.com/ajma/archive/2004/07/08/177512.aspx
http://blogs.msdn.com/ajma/archive/2004/07/09/178857.aspx
Simple Binding
If your external control needs to be bound to a single field in InfoPath main data source, then you can use single binding between your ActiveX control and data source. An excellent simple binding example by InfoPath team can be found here: Creating an InfoPath Custom Control using C# and .NET. I highly recommend you to read this article first both to understand how to register our Windows Forms controls for Com Interop, and how simple binding is done for a primitively typed single field. Rest of the article will assume you read and applied the principles told in this article.
Node Binding
When binding to a single field or attribute is not enough, or you need your ActiveX controls to interact with data coming from different fields, node binding is the way to go. A classical example would be an ActiveX control capable of showing an Address type complex structure composed of Street, City, State and ZipCode fields.
In this case, you need an Xml node in InfoPath form template as a data source that obeys the schema of Address object.
InfoPath form
We will design the data source of InfoPath first. Let's just write a schema file that corresponds to the structure of Address class. A simple schema file just including address data would be similar to this:
<xsd:schema xmlns:xsd="http://www.w3.org/2001/XMLSchema">
<xsd:element name="fields">
<xsd:complexType>
<xsd:sequence>
<xsd:element ref="address" minOccurs="0"/>
</xsd:sequence>
</xsd:complexType>
</xsd:element>
<xsd:element name="address">
<xsd:complexType>
<xsd:sequence>
<xsd:element ref="street" minOccurs="0"/>
<xsd:element ref="city" minOccurs="0"/>
<xsd:element ref="state" minOccurs="0"/>
<xsd:element ref="zipCode" minOccurs="0"/>
</xsd:sequence>
</xsd:complexType>
</xsd:element>
<xsd:element name="street" type="xsd:string"/>
<xsd:element name="city" type="xsd:string"/>
<xsd:element name="state" type="xsd:string"/>
<xsd:element name="zipCode" type="xsd:integer"/>
</xsd:schema>
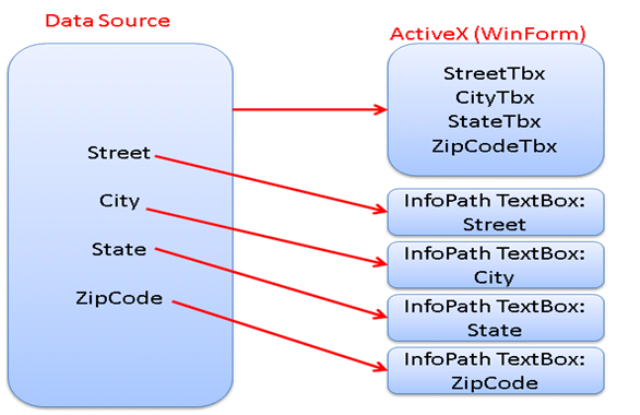
Start to design a new InfoPath form template from XmlSchema and use this schema as your source. InfoPath should parse the schema, and should create the data source entries in Data Sources tab in design task pane for you. At this point, let's create 4 text boxes that will display each of these fields. For the educational purposes of demo, do not drag and drop the whole address node onto the surface. Instead, drag and drop individual fields on to the design surface. This is because, after designing the ActiveX such that it is bound to whole DOM node, we will get a binding structure like this:
UserControl
Since we finished the main part of the form template, let's start to prepare the ActiveX object that we will use in the template. Assuming you read the article Creating an InfoPath Custom Control using C# and .NET, I will just touch the points not told there.
Design the control
Simply drag and drop four Labels and four TextBoxes on to the user control for each of the fields in Address type.
Register for ComInterop
As told in the article, we will need a Guid attribute for Visual Studio to register the control for Com Interop. What is not told in the article is, we need one more attribute to be able to register the control via Visual Studio: ComVisible. Although, UserControl class is donated with ComVisible(true) attribute in .Net framework, we have to state it explicitly one more time, because ComVisible attribute is created with AttributeUsage(…, Inherited = false), which prevents the value of the attribute to be inherited to children classes. So, our control should look similar to this for a successful registration:
[Guid("08E623D3-BEAD-4bd3-8401-EFF51FD754CD")]
[ComVisible(true)]
public class ComplexUserControl : UserControl
After building this code, a quick search through registry for Guid, will prove that class is really registered.
Interfaces
You should import the IObjectSafety interface exactly as told in the article. Before discussing IPropertyNotifySink, let's first take a look at the control interface, that will define the Value and Enabled property. In simple binding example, we had a primitive property in ICOMControl interface. Since we are no longer binding to a primitive field, we have to define a new interface.
Let's define an IComplexControl interface similar to IComControl interface in the article. For Value property, we will use IXMLDOMNode type defined in Microsoft.Office.Interop.InfoPath.Xml.dll assembly that you will find in your Office 12 installation directory. This corresponds to a node in InfoPath main DOM data source. At the end, our interface should be similar to this:
[InterfaceType(ComInterfaceType.InterfaceIsDual)]
public interface IComplexCOMControl
{
[DispId(ComplexUserControl.DISPID_VALUE)]
IXMLDOMNode Value { get; set; }
[DispId(ComplexUserControl.DISPID_ENABLED)]
bool Enabled { get; set; }
}
As stated in the article, Constants.DISPID_VALUE should be 0, and Constants.DISPID_ENABLED should be 1, in order for InfoPath to correctly communicate with our control.
Now let's inspect IPropertyNotifySink interface. One of the main differences between Simple Binding and Node Binding is the type of the Value property. Simple binding deals with primitive types, whereas node binding deals directly with DOM. In simple binding a rough sequence of events would be like this:
Property change in data source --> … -->Set Value property of ActiveX
And the other way around:
Property change in ActiveX --> Raise OnChanged -->InfoPath queries for Value property --> … -->Set Value property of ActiveX
However, since InfoPath sends the whole DOM node as our Value property by reference, we don’t need to set an intermediary Value property. Instead we can directly change DOM values from DOM node reference. So we can safely ignore RaiseOnChanged and InfoPath queries for Value property steps. Since IPropertyNotifySink interface is used mainly for property change notification purposes will not implement it in this demo. If you care about Enabled property changes, you still have to implement this interface and notify InfoPath when Enabled property changes.
Value property implementation
When InfoPath first calls the setter of Value property after instantiating our control, it will pass in the IXMLDOMNode representing the main DOM of InfoPath. We have to keep this node in our control, in order to be able to change the data values corresponding to changes in UI.
In the getter of the property, since we are not changing the reference of DOM node, it is safe to return this kept value.
Whenever some field (or subfields in our group field)changes in DOM, InfoPath will call the setter of our Value property. In the setter, we should query the DOM according to XPaths of our fields, and then update the UI according to the values if necessary. At the end, our Value field should look like this:
private IXMLDOMNode domNode = null;
public IXMLDOMNode Value
{
get
{
return domNode;
}
set
{
if (domNode != null)
{
ChangeUI(streetTbx, domNode.selectSingleNode("/fields/address/street").text);
ChangeUI(cityTbx, domNode.selectSingleNode("/fields/address/city").text);
ChangeUI(stateTbx, domNode.selectSingleNode("/fields/address/state").text);
ChangeUI(zipCodeTbx, domNode.selectSingleNode("/fields/address/zipCode").text);
}
}
}
private void ChangeUI(TextBox tbx, string text)
{
if (tbx.Text != text)
{
tbx.Text = text;
}
}
At this point we have completed the one direction of binding, originating from data source and going to UI. Now, let's handle the other way around, from UI to data source. In order to do this, we have to create a simple event handler that will catch change events in UI. Then register for all four text boxes' TextChanged events, such that each of them will be handled by this event handler. Code should look like this:
public ComplexUserControl()
{
this.InitializeComponent();
// Register for UI change events
this.streetTbx.TextChanged += this.HandleChangesInUI;
this.cityTbx.TextChanged += this.HandleChangesInUI;
this.stateTbx.TextChanged += this.HandleChangesInUI;
this.zipCodeTbx.TextChanged += this.HandleChangesInUI;
}
private void HandleChangesInUI(object sender, EventArgs e)
{
TextBox senderTbx = (TextBox)sender;
if (senderTbx == this.streetTbx)
this.ChangeDOM("/fields/address/street", this.streetTbx.Text);
else if (senderTbx == this.cityTbx)
this.ChangeDOM("/fields/address/city", this.cityTbx.Text);
else if (senderTbx == this.stateTbx)
this.ChangeDOM("/fields/address/state", this.stateTbx.Text);
else if (senderTbx == this.zipCodeTbx)
this.ChangeDOM("/fields/address/zipCode", this.zipCodeTbx.Text);
}
private void ChangeDOM(string xPath, string value)
{
if (domNode != null)
{
IXMLDOMNode singleNode = domNode.selectSingleNode(xPath);
if (singleNode.text != value)
{
singleNode.text = value;
}
}
}
Integration
In order to be able to use the ActiveX Control in the design of a form template, we have to make one final trick: Placing the .ict file that describes the control and its binding, to our controls directory. In order to add custom controls design task pane in InfoPath, generally you first go to the Controls tab, then click Add or Remove Custom Controls at the bottom of this tab, select to add a new ActiveX control, and finally select the ActiveX you want to add from the list of registered controls. If you have ever done this before, there should be a directory named
C:\Documents and Settings\username\Local Settings\Application Data\Microsoft\InfoPath\Controls
In this directory there should be a .ict file for each of the ActiveX controls that you have done this operation for. We have to create a new .ict file for our control. If above directory does not exist, create it. Then create a file with name "{yourClassGUIDHere}.ict". This file should be in this format:
<?xml version="1.0" encoding="UTF-8" standalone="no"?>
<ict:control name="Complex C# Control, v1.0" xmlns:ict="http://schemas.microsoft.com/office/infopath/2003/ict" xmlns:xsd="http://www.w3.org/2001/XMLSchema" xmlns:xdSdl="http://schemas.microsoft.com/office/infopath/2003/xct" xmlns:ict2="ict2" xmlns:xd="http://schemas.microsoft.com/office/infopath/2003">
<ict:designTimeProperties>
<ict:iconBitmap>Qk3uAAAAAAAAAHYAAAAoAAAAEAAAAA8AAAABAAQAAAAAAAAAAADEDgAAxA4AABAAAAAQAAAAAAAA/wAAgP8AgAD/AICA/4AAAP+AAID/gIAA/4CAgP/AwMD/AAD//wD/AP8A/////wAA//8A/////wD//////4iIiIiIiIiIiIiIiIiIiIiIiIiIiIiIiP//////////eIiIiIiIiI94RIRIRIiIj3hEhEhEiIiPeESESESIiI94RIRIRIiIj3iIiIiIiIiPd3d3d3d3d3eIiIiIiIiIiIiIiIiIiIiIiIiIiIiIiIiIiIiIiIiIiA==</ict:iconBitmap>
</ict:designTimeProperties>
<ict:deployment>
<ict:controlPackage classid="{yourClassGUIDHere}"/>
</ict:deployment>
<ict:shapes>
<!--default shape-->
</ict:shapes>
<ict:schemaEditing>
<ict:any/>
</ict:schemaEditing>
< ict:view >
< ict:controlObjectbindingProperty = "Value"bindingType="xmlNode"enabledProperty="Enabled"enabledValue="true"/>
</ ict:view >
</ict:control>
Note the bolded text. You should place the correct GUID for your control, and note that we are actually specifying 'xmlNode' as bindingType. Rest of the file is almost standard except the iconBitmap part, which specifies the icon that will be displayed next to your control in design task pane.
Since we have a ready control now, we can safely use it in our form template. Open the InfoPath form you have designed in design mode again. Go to Controls tab in design task pane. At the bottom, under Custom section, you should see the 'Complex C# Control, v1.0' with icon I have copied from Microsoft Forms Progress Bar control. Drag and drop this control to design surface. According to your security settings, it may ask you if you want to run ActiveX control. If so, press 'Yes' and continue. Since we have already defined a data source in the form, InfoPath will ask which field or group do we want our control to bind to. Choose address here. Now you should see the control on the surface, and its binding field is specified as /fields/address. Press Ctrl+Shift+B to preview the form. You should see the corresponding InfoPath TextBoxes and our UserControl's TextBoxes are synchronized, because they are bound to same data source fields.
Now we have a functional complex WinForm UserControl, that we can display in an InfoPath form template, and even better, this UserControl is bound to InfoPath main DOM.
Improving ActiveX Discrepancies
If you played with the form a few minutes, you must have noticed that there is something weird going on. If you are changing the text value of InfoPath TextBoxes, you see a flicker in the UserControl before data is reflected to it. Similarly, if you change the value of a TextBox in your UserControl, you also see a flicker in the UserControl, and focus is continuously given to first TextBox added to UserControl.
Main reason for this issue is, whenever a data field that is bound to your ActiveX is changed, InfoPath destroys your control and create a new one. This is mainly because InfoPath has to apply your view xsl to your data source to create the view you see on the display. Every time data source changes, InfoPath re-applies the xsl file and creates the view from scratch for controls that are bound to changed data fields. If you are debugging the form, you can easily see this by putting a breakpoint in the constructor of UserControl. Clearly, this leads us to write stateless controls, since each time the controls are destroyed, state is destroyed too. Or, as a second approach, we can take advantage of a helper interface, InfoPathControl interface, to save the state to some persistent storage just before destruction, and retrieve it after re-creation. Let's inspect how this approach works.
InfoPathControl interface is defined in Microsoft.Office.Interop.InfoPath primary interop assembly. Add a reference to this assembly to your project and implement the interface on your UserControl. I advise you to read the explanation of all four methods of the interface, and how they are used in MSDN. Here, we will only concentrate on two of them, which are Init and SaveState methods.
SaveState is called by InfoPath, just before the destruction of the older control, which makes it a perfect point to save the state to some storage. Init is called after creating the new control, which lets us to use it to retrieve the saved state and apply it to our control.
Init method takes a parameter of type InfoPathControlSite. This interface gives us the main DOM node and XDocument of InfoPath form template, which basically enables us to access pretty much all of the object model of InfoPath. So, we don't have to wait for the setter of Value property anymore. We can cache the domNode here in Init method. We will also cache the XDocument for storing the state in, since we will need a persistent storage for our state while we are destroyed. In general, Init method body should be similar to this:
private XDocumentClass xDocument = null;
public void Init(InfoPathControlSite pControlSite)
{
this.domNode = pControlSite.Node;
this.xDocument = (XDocumentClass)pControlSite.XDocument;
this.RestoreState();
}
We will inspect RestoreState method after SaveState method.
For simplicity, we will assume that we only want to keep which control has the focus in UserControl and give focus to that control after re-creation. Saving the name of the active control should be enough for state restoration. In reality in a control like this we should also keep the location of the cursor inside the TextBox as well as which TextBox is active.
We said that we will use XDocument to save the state. This is because XDocument lives with the form template, so it is persistent during the lifetime of our control, and XDocument has a property bag that we can use for this purpose. We can update this property bag by calling SetNamedNodeProperty and querying it by calling GetNamedNodeProperty method on XDocument object. At the end, SaveState and RestoreState methods should be similar to this:
public void SaveState()
{
if (this.xDocument != null)
{
this.xDocument.SetNamedNodeProperty(this.domNode, "ActiveControl", this.ActiveControl.Name);
}
}
private void RestoreState()
{
if (this.xDocument != null)
{
Control activeControl = this.Controls[this.xDocument.GetNamedNodeProperty(domNode, "ActiveControl", this.Controls[0].Name)];
if (activeControl != null)
{
activeControl.Focus();
}
}
}
In the call to GetNamedNodeProperty in RestoreState method, third parameter is the default value, which will be returned back if specified property name can't be found in property bag. This will be the case when control is first created.
Now, each time data source has changed, we save which control was active in UserControl before it is destroyed. Then InfoPath instantiates a new instance, we restore the state if there is any. Then InfoPath sets the Value property with updated fields.
Saving the whole state in a WinForm control is a non-trivial task and maybe somewhat cumbersome. I'm optimistic about this re-creation of ActiveX controls will be optimized by InfoPath team in the next release.
At the end, our code will look like this attached file.
Deniz Demircioglu
Software Design Engineer