Workflow user experience in InfoPath
Microsoft Office SharePoint workflow can be described as a series of tasks implemented with specific business needs to help people manage their project tasks. In Microsoft Office InfoPath 2007, we provide the workflows user experience for InfoPath forms. Additionally, we enable InfoPath business logic to key off workflow properties.
This article will demonstrate how to enable an InfoPath form to respond to workflow status. Let's explore the following scenario: Nicholas has created an expense report form template and has associated it with a form library with the “Approval” workflow defined. He wants a form to be displayed at different view when the workflow for that form is approved.
Step 1: Create a expense report document library by publishing a form template
• Launch Office InfoPath 2007.
• Create your expense report form template with two views. For example, one is the expense detail view and one is the summary view.
• Click the File menu | Save to save your template.
• Publish your form template to a new document library on a SharePoint site. Name the library ‘Expense Report’.
Note: please leave the form template open as we will come back to customize this template more in later sections.
Step 2: Switch to SharePoint and add an Approval workflow to the expense report library
• Navigate to the SharePoint site.
Note: you will see Expense Report library created on the SharePoint site.
• Open the Expense Report library.
• Add an Approval workflow to this Expense Report library via Form Library Settings | Permission and Management | Workflow
Note: When adding this workflow, you can specify how, when or by whom a workflow to be started and other options regarding how this workflow should work.
Step 3: Switch back to InfoPath and add a data connection
This section explains how to add a secondary data connection to query the workflow status of the workflow you added in the previous section. This secondary data connection provides the data that enables business logic in the form to switch views according to the status of the workflow.
• Switch back to InfoPath. You should still have your expense report form template opened from step 1.
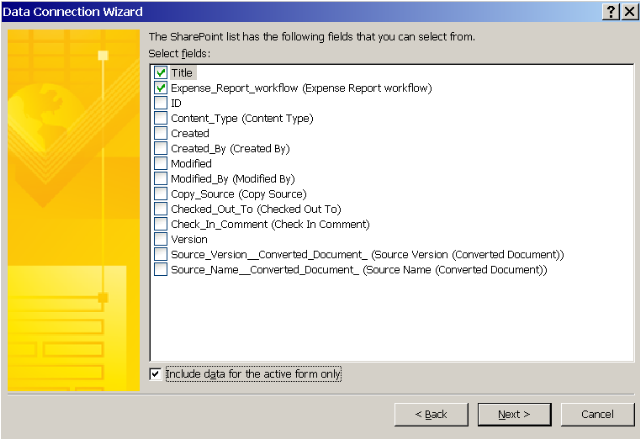
• Add a Data Connection that receives data from Expense Report library via Tools | Data Connection | receive data from SharePoint library or list.
• On the page of Select fields, select the check box next to the name of the field that matches the workflow name.
• Click Include data for the active form only, and then click Next.
Note: this step is the key point to retrieve current form’s workflow status.
• Follow all the default options to finish the Data Connection Wizard.
Step 4: Add a Rule to the form template to switch to a specific view according to current form’s workflow status
For this example, we want to add business logic to the form that it will switch to summary view when this form’s workflow is approved. This can be achieved by applying an on load Rule to switch view when current form’s workflow status is equal to “Approved” status.
• Set on load Rule via Tools | Form Options | Open and Save | Rules
• When setting Condition, you want to select the workflow status field from the secondary data source you added in the previous section in your first dropdown of the condition builder
• In the second dropdown, choose "is equal to".
• In the third dropdown, click Type a number, and then type the value that corresponds to the workflow status.

| Status | Numeric value |
| In progress | 2 |
| Complete | 5 |
| Canceled | 15 |
| Approved | 16 |
| Rejected | 17 |
In our example, we choose number 16, corresponding to status "Approved".
Step 5: Republish the form template
• Click the File menu | Save to save the changes you made to the template.
• Click the File menu | Publish.
• Since you republish the form template, the Publishing Wizard will repopulate previous values. Click Nexts -> Publish -> Close to finish the Publish Wizard.
Now you have successfully designed a workflow driven expense report form template. When a user fills out an expense form from this library, the view of the form will be displayed according to the status of the workflow.
Emily Ching
Software Design Engineer in Test