Dynamic Pictures
When designing a feature-rich InfoPath form template, it is sometimes necessary to provide a dynamic image in response to user action. InfoPath picture control hides treasures that will help you satisfy such a requirement. In this article, we will explore a technique that allows you to make this happen without writing any code.
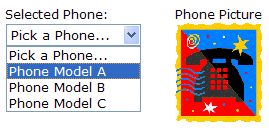
Here is our scenario: build a hardware order form for the telecommunications department. In the form, we would like to let the user choose the phone that they want to order, and show them a picture of the phone as soon as they select it.
The following steps will make this possible:
Place pictures of available phones in a shared location; let's call it http://mysite/phones/photos/. Pictures are named according to phone ID's - for example, 1.jpg, 2.jpg, 3.jpg, etc.
Insert a picture control. When you do so, InfoPath will ask whether you want the picture to be included into the form, or if you want it to be linked. Choose the second option.
Take a look at the node that was just inserted into your data source by going to View | Data Source. Let’s call the new node hyperlinkDataSource; it’s a node with data type "hyperlink".
Insert a text box that’s also bound to hyperlinkDataSource.
Preview the form. Use the picture control to attach the image. Observe how the path in the text box changes to reflect the path of the image you just attached. Try changing the value of the text box to point to a different picture. Note how the picture control displays the new picture when you tab out of the text box.
Now, we want this step to happen programmatically, when the user selects the phone from the dropdown of available phones.
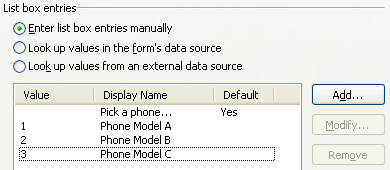
Create a phone picker dropdown; labels in the dropdown will show phone names, and values will contain phone ID's that correspond to file names we used in step 1. The simplest way to do this is to enter the items manually; don't forget to include the default "pick a phone" item.
If you want to get fancy, you can use a secondary data source - web service - to provide the list of available phones.
Create a rule on the phonePicker node: set the value of hyperlinkDataSource to
concat(" http://mysites/phones/photos/ ", phonePicker, ".jpg")
Go to control properties for the new picture control; uncheck the “Allow users to browse for new pictures” property.
We're done! Preview the form and try selecting a few phones from the dropdown.
Picture control is available in both InfoPath 2003 and 2007, however it is not supported in browser-enabled form templates.
Alex Weinstein
Program Manager