Azure Managed Disks Deep Dive, Lessons Learned and Benefits
[bing_translator]
Introduction
Managed Disks have been recently released for production (February 2017), and represent an important step to make Azure VM management much easier. In short, Azure Managed Disks feature is an abstraction built on top of current Standard and Premium storage disk in Azure Storage. Customers only need to specify the type (Standard or Premium) and size of disk they need in their selected Azure region, and Azure will create and manage the Disk accordingly. To be clear, Azure Storage Accounts are *not* going away yet, simply Azure will take care of their management on your behalf. Additionally, what will *not* change with MD is the maximum number of disks you can attach to your VM: same maximums listed in the article below apply, doesn’t matter if MD or Un-Managed (UMD - for brevity), what rules the ratio here is the number of cores of your VM.
Sizes for Windows virtual machines in Azure
/en-us/azure/virtual-machines/virtual-machines-windows-sizes
Finally, just to complete the picture of what remains the same, let me include disk size in this discussion: actually, in Azure the maximum size of disks you can create for a VM is 1TB, this is a cap originating from the maximum size of “Page Blobs” in the Azure Storage. Bigger disk sizes should come in the future, but it’s not directly tied to the MD concept and mechanism.
Benefits
Then, after the bad news related to what remains the same, what is changing and why you should care about MD? In some of my recent engagements for Microsoft Global ISVs, I had the opportunity to test in depth this new Azure feature, as a key feature requested for this project to go in production. Why lack of MD was a hard blocker for this partner? Well, MD presents some unique capabilities and important differences compared to traditional UMD. This is the prioritized list I built looking to my recent engagements:
- Remove or relax Azure storage limits: No more space or IOPs or storage bandwidth limits.
- Disks as first-class objects: provide CRUD operations, and security management, for disk objects independently from VM life-cycle.
- Image Sharing: No more image copy to target storage accounts, reference images between different storage accounts.
- Higher VM resiliency: Align Fault Domains (FD) concept for Storage with Compute.
- Independent Snapshots: creating a disk snapshot and then delete the source disk while retaining the generated snapshot.
- Instant copy: copy inside and across storage accounts must be instantaneous in the same region.
I’m going to explain you in details the above key benefits and important details you will need to keep in mind, but let me start with two obvious things: MD is ARM (Azure Resource Manager) feature only, no plans to back-port for ASM (Azure Service Management), and NO… Microsoft is not retiring UMD, even if this is the default in the Azure Portal and recommended going forward. 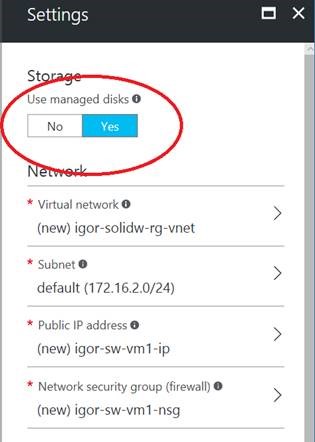
Then, you don’t need to use UMD anymore? Well, not exactly. There are few situations where you may still need to use them for Azure VMs:
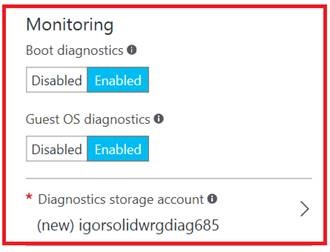
- VM Diagnostics: for diagnostic and boot logs, you still need to use “legacy” storage accounts, there is a plan to remove this in the future, but for the moment you have to do in the same old way. You can use MD for your VM OS and Data disks, but you will also need to specify a storage account where this information will be landed.
- Storage Replication: actually, MD are Locally Replicated Storage (LRS) only, if you need GRS for example, you need to use UMD.
For a complete description of Storage Resiliency options, please consult the article below:
Azure Storage replication
/en-us/azure/storage/storage-redundancy
NOTE: I will *not* cover here Azure Virtual Machine Scale Set (VMSS) enhancements due to Managed Disks, but if interested you should read the article below:
Azure VM scale sets and managed disks
/en-us/azure/virtual-machine-scale-sets/virtual-machine-scale-sets-managed-disks
- You no longer need to pre-create and manage storage accounts to store the OS disks for the scale set VMs.
- You can attach managed data disks to the scale set.
- With managed disk, a scale set can have capacity as high as 1,000 VMs if based on a platform image or 100 VMs if based on a custom image.
Remove or Relax Azure Storage limits
Based on my partners and customer’s feedbacks, one of most annoying Azure consideration is the variety of caps we have on storage: both in ARM and ASM, we have limits on the maximum number of storage accounts, maximum size for storage accounts, IOPS and storage bandwidth limits. If you have to manage many VMs, my experience here is in the order of 1000s, you will be forced to do some calculations and build a logic in your deployment engine to keep track of disks you deployed and in which storage accounts. On Standard storage, even if you have 500TB space, you are limited to 20K IOPS, then you should not place more than 40 disks on single account, since each one will consume at the maximum 500 IOPS. This is even more difficult if you use Premium Storage since have different limits (35TBs vs. 500TBs, etc.) and recommendations on how to allocate VMs compared to Standard Storage. Here the calculation you have to do is about disk allocated size. Indeed, this complexity does not exist on some other Public Cloud providers. With MD, now all these limits are gone. Something remains but I’m sure will be reasonable for your you:
- Maximum number of disks you can attach per VM doesn’t change, as I mentioned in the introduction, since not dependent on MD feature.
- Max IOPS Per VM limit is still 80,000 IOPS with GS5, max throughput per VM is still 2,000 MB/s with GS5 (may change in the future)
- Also, maximum disk size doesn’t change (yet).
- There is a default soft-limit, that can be increased, on the maximum number of MD: it is 2000, is per subscription and per region, but can be increased opening a ticket with Azure Support.
- In one specific case I was able to obtain 30K disks.
- It is worth noting that this limit includes not only MD disks, but also the snapshots you create for these.
You can create MD using either Standard or Premium storage, as with UMD, but there is an important difference: now, with MD, including using Standard storage, you have a set of fixed sizes at disk creation time. This does not mean that you cannot create a disk of arbitrary size, it simply says that you will pay for closest rounded high tier limit for declared size: for example, if you create a 200GB Standard MD, you will pay for S20, based on the table below. This may change in the future. 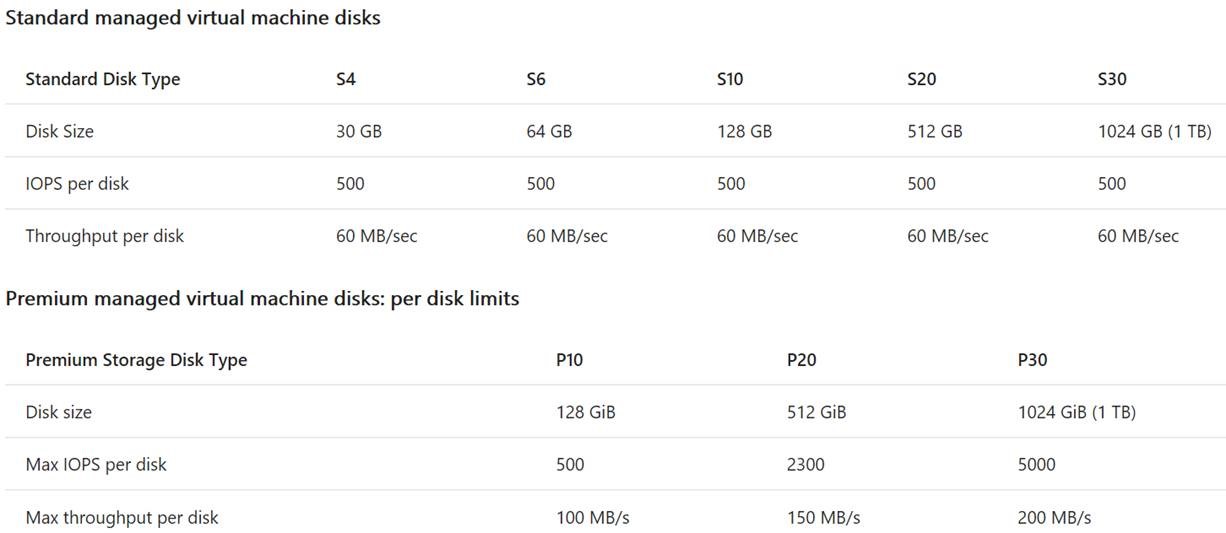
Table 1.1
These are the two key articles to consult for more details for this context discussion:
Azure subscription and service limits, quotas, and constraints
/en-us/azure/azure-subscription-service-limits
Azure Storage Scalability and Performance Targets
/en-us/azure/storage/storage-scalability-targets
Disks as First-Class objects
Some of my partners never noticed in the past, but in ARM you were not able to create a disk as a standalone object: without MD, you cannot create, for example, an empty disk of 256GB and attach later to one of your VMs. You must import from a blob or create and attach as a unique operation at VM creation time. This is a simple code snippet that shows empty MD creation and, later on, check if deployment “ProvisioningState” is “Succeeded”:
$mdiskconfig1 = New-AzureRmDiskConfig -AccountType StandardLRS -Location $location -DiskSizeGB 256 -CreateOption Empty
$mdisk1 = New-AzureRmDisk -ResourceGroupName $rgname -Disk $mdiskconfig1 -DiskName "EmptyManagedDiskMD1"
$ref1 = (Get-AzureRmDisk -ResourceGroupName $rgname -DiskName "EmptyManagedDiskMD1")
Write-Host ('Disk Provisioning State -> [ ' + ($ref1.ProvisioningState) + ' ]')
Note that MD PowerShell cmdlets are included in the "AzureRM.Compute" module, not in the "AzureRM.Storage". This should not be a surprise if you think carefully about what is MD, that is an abstraction on top of Azure Storage. Let me add another interesting fact: you don’t specify, and you don’t see, any VHD URL. Azure MD resource provider will manage this for you, simply specify the disk you want, in terms of size and type (Standard or Premium), and Azure will create where you want it with a specified name. If you want, you can get access to the underlying URL, sometimes maybe necessary for example for copy operations, here is the API or PowerShell cmdlet you can use, secured using SAS signature mechanism: 
Grant-AzureRmDiskAccess -ResourceGroupName $rgname -DiskName 'EmptyManagedDiskMD1' -Access 'Read' -DurationInSecond 60
OUTPUT (scrambled to hide real data):
The output is also pretty interesting: storage account, blob and container names are auto (random? ) generated, and the URL starts with a “md” prefix. You are still not convinced, here is the REST API to create a single MD object (I included “Snapshot” for completeness), please note the “path” used in the URL: 
Then, just to summarize, you can still create a Managed Disk (MD) in implicit mode at VM creation time, but you can now also create it in explicit mode, using one of these methods:
- Copy of a Platform Image Repository (PIR) image disk
- Import of a VHD from a public storage blob
- Creation of an empty disk
- Copy of an existing disk or snapshot
At the end, Azure finally provides full CRUD operations for Managed Disks, you can also resize (only up! ), delete and create snapshots on them:
# Resize of the disk: #
$ref1.DiskSizeGB = 512
Update-AzureRmDisk -DiskName $ref1.Name -Disk $ref1 -ResourceGroupName $rgname
$ref1 = (Get-AzureRmDisk -ResourceGroupName $rgname -DiskName "EmptyManagedDiskMD1")
$ref3.DiskSizeGB
$ref3.ProvisioningState
# Create a snapshot on the Managed Disk: #
$mdisksnapshotconfig1 = New-AzureRmSnapshotConfig -AccountType StandardLRS -DiskSizeGB 512 -Location $location -SourceUri $ref1.Id -CreateOption Copy
$mdisksnapshot1 = New-AzureRmSnapshot -ResourceGroupName $rgname -SnapshotName "EmptyManagedDiskMD1snaphot1" -Snapshot $mdisksnapshotconfig1
Finally, let me include the diagram below, I’m sure will definitely clarify the relationship between MD main object type and the other objects that I’m going to cover later in this post, that is "Snapshots" and "Images". 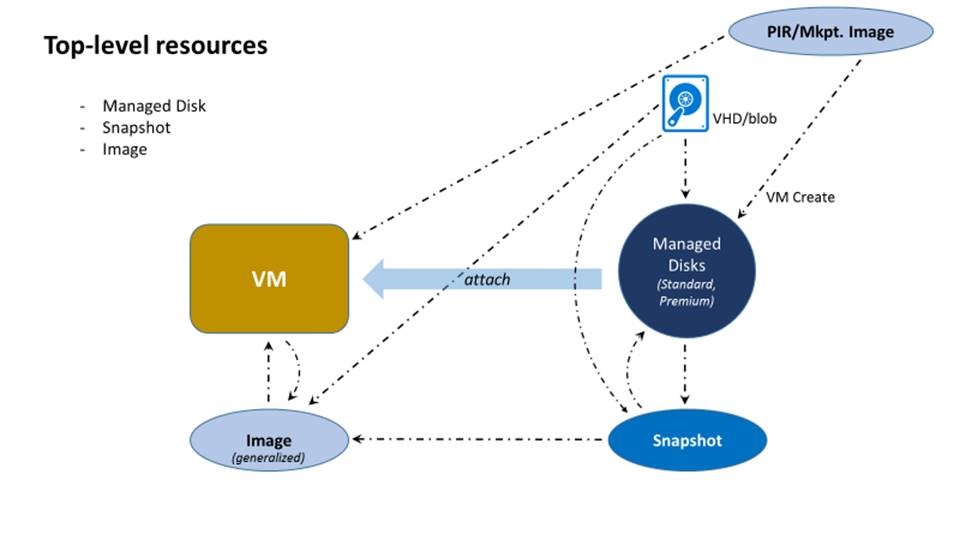
Image Sharing
This functional aspect was very important for my partners, due to the nature of how VM images are built. What I have seen pretty frequently is the requirement to build images in a central Azure subscription, then deploy VMs in other subscriptions, using several/many storage accounts. It doesn’t matter if you use Standard or Premium storage account, you had to copy the image in the target storage account before being able to create a VM from there. Now with Managed Disks (MD) this is not necessary anymore, you can create VMs in a subscription using an image (MD-based) that can reside in any storage account of the same subscription. But what happens if you need to copy your image across subscriptions? At the moment, Managed Disks (MD) don’t provide this feature, but I would be not surprised to hear important updates in the near future. In the meanwhile, a practical workaround to use includes these simple steps: get Image underlying URL/SAS, use tools (AzCopy) or API/PowerShell to copy the blob to a target storage account in the target subscription, then create an image in the target subscription using that blob and its URL. In the example below, I realized a slightly different scenario, that is I’m starting from a VM (generalized) in a source subscription to create an image in the target subscription.
# This is the source VM for the Image copy and other necessary parameters: #
$VMName = "<<VM Name>>"
$sourcergname = "<<source resource group>>"
$targetrgname = "<<destination resource group>>"
$ImageName = "<<image name>>"
$storageacccountname = "<<storage account name>>"
$containername = "images"
$VM = Get-AzureRmVM -ResourceGroupName $sourcergname -Name $VMName
$OSDiskName = $VMName + "-osDisk"
$OSDisk = Get-AzureRmDisk -ResourceGroupName $sourcergname -DiskName $OSDiskName
# Stop VM, Generalize and get access to OS Managed Disk's underlying blob URL: #
Stop-AzureRmVM -ResourceGroupName $sourcergname -Name $VMName -Force
Set-AzureRmVm -ResourceGroupName $sourcergname -Name $VMName -Generalized
$mdiskURL = Grant-AzureRmDiskAccess -ResourceGroupName $sourcergname -DiskName $VM.StorageProfile.OsDisk.Name -Access Read -DurationInSecond 3600
# Now copy out the Managed Disk using SAS as a "normal" VHD in a "normal" target storage account #
$storageacccountkey = Get-AzureRmStorageAccountKey -ResourceGroupName $targetrgname -Name $storageacccountname
$storagectx = New-AzureStorageContext -StorageAccountName $storageacccountname -StorageAccountKey $storageacccountkey[0].Value
$targetcontainer = New-AzureStorageContainer -Name $containername -Context $storagectx -Permission Blob
$targetcontainer = Get-AzureStorageContainer -Name "images" -Context $storagectx
$destdiskname = $VM.StorageProfile.OsDisk.Name + ".vhd";
$sourceSASurl = $mdiskURL.AccessSAS
$ops = Start-AzureStorageBlobCopy -AbsoluteUri $sourceSASurl -DestBlob $destdiskname -DestContainer $targetcontainer.Name -DestContext $storagectx
Get-AzureStorageBlobCopyState -Container $targetcontainer.Name -Blob $destdiskname -Context $storagectx -WaitForComplete
$sourceimagediskBlob = Get-AzureStorageBlob -Context $storagectx -Container $targetcontainer.Name -Blob $destdiskname
$sourceimagediskURL = ($sourceimagediskBlob.Context.BlobEndPoint) + $containername + "/" + $destdiskname;
# Finale step: create image from local copied VHD: #
$targetimagecfg = New-AzureRmImageConfig -Location $location
Set-AzureRmImageOsDisk -Image $targetimagecfg -OsType 'Linux' -OsState 'Generalized' -BlobUri $sourceimagediskURL;
$targetimage = New-AzureRmImage -Image $targetimagecfg -ImageName $ImageName -ResourceGroupName $targetrgname
Now that you have your “golden” image in your target subscription, and in the specific region, you can create as many VMs you want, without the need to copy into all target storage accounts. For the cross-subscription and cross-account copy, PowerShell makes available the most efficient API: “Start-AzureStorageBlobCopy” is extremely fast and support parallel copy by defaults using multiple threads. As an alternative, you may also use AzCopy tool, the underlying REST API is the same. One final note: In this specifc sample, be sure to follow generalization steps specific for your VM Guest OS (see below), then stop your VM.
Generalize a Windows virtual machine using Sysprep
/en-us/azure/virtual-machines/virtual-machines-windows-generalize-vhd
How to generalize and capture a Linux virtual machine
/en-us/azure/virtual-machines/virtual-machines-linux-capture-image
Be careful before deciding to drop the original disk, or snapshot or VM, you used to create your image: image is a regional-scoped object, then if you want to create the image in a new region, at least today, you have to copy manually the VM, disk or snapshot to the target region, then create a new image object based on that source. Name is not mandatory to be the same, but if you want your code to run without modification, you need to use the same one. Process is pretty simple, for example using Snapshots: you need to get access to the underlying blob objects via SAS token, then copy to the target destination region as a blob, then create a new image using the same name (optional) using the copied snapshot. Code sample (not complete) is reported below:
$TargetStorageAcccountkey = Get-AzureRmStorageAccountKey -ResourceGroupName $rgname -Name $TargetStorageAcccountName
$TargetStorageCTX = New-AzureStorageContext -StorageAccountName $TargetStorageAcccountName -StorageAccountKey $TargetStorageAcccountkey[0].Value
New-AzureStorageContainer -Name $TargetContainerName -Context $TargetStorageCTX -Permission Container
$Snapshot = Get-AzureRmSnapshot -ResourceGroupName $rgname -SnapshotName $SourceSnapshotName
$SnapshotSASurl = Grant-AzureRmSnapshotAccess $rgname -SnapshotName $SourceSnapshotName -DurationInSecond 3600 -Access Read
Start-AzureStorageBlobCopy -AbsoluteUri $SnapshotSASurl.AccessSAS -DestContainer $TargetContainerName -DestContext $TargetStorageCTX -DestBlob $DestBlob
$TargetImageConfig = New-AzureRmImageConfig -Location $TargetLocation
$osDiskVhdUri = ($TargetStorageCTX.BlobEndPoint + "$TargetContainerName" + "/" + $DestBlob)
Set-AzureRmImageOsDisk -Image $TargetImageConfig -OsType 'Linux' -OsState 'Generalized' -BlobUri $osDiskVhdUri
New-AzureRmImage -Image $TargetImageConfig -ImageName $ImageName -ResourceGroupName $rgname
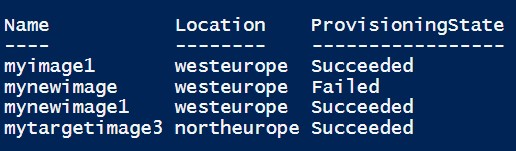
(Get-AzureRmImage -ResourceGroupName $rgname) | select Name,Location,ProvisioningState
Higher VM resiliency
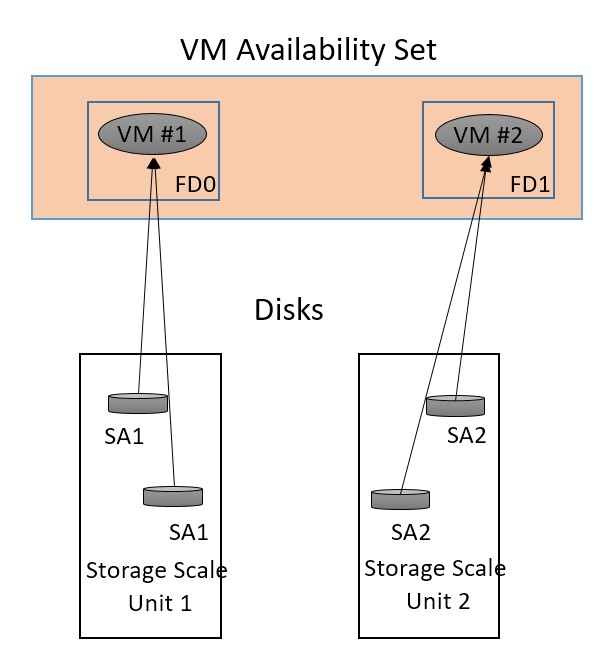
This is my favorite improvement, long waited for several of my partners. To better explain this, let me start with a bit of history to set the context. In the “old” ASM days, Azure guaranteed (and do it also today) only two “Fault Domains” (FD). Only with the introduction of ARM, is possible to have guaranteed three FDs. Then, what MD provides on top of ARM? While you are reading here, I would suggest to also give a quick look at the picture below: essentially, without MD you don’t have control over placements of your disks. Traditional Un-Managed Disks (NMD) reside in storage accounts, even if you use different ones for different VMs, there is no guarantee that these accounts (and contained disks) will be placed in different Azure Storage “Storage Units” (or “Stamps”). MD resolves this problem for you: since you don’t have to care anymore about storage accounts, MD will ensure (if requested) that your VMs disks will be placed in different “Storage Units”, then maximizing the resiliency for your deployment. Let me be clear here: for what is concerning Azure VM High-Availability SLA, nothing is changing here, you still have 99.95% for multiple VMs (>1) inside a specific Availability Set, and 99.90% for single instances using Premium Storage. This is an enhancement for resiliency, not a fix for a bug of our previous infrastructure behavior. 
NOTE: The number of managed disk fault domains varies by region - either two or three managed disk fault domains per region.
Once you created Availability Set (AS) as “aligned”, you will be allowed to put in there only VMs that are using MD, mixing with UMD VMs will return an error. It is also worth mentioning that, at the moment, it is not possible to change AS for a VM after creation, this is something that may change in the future, but today this is the status. Be careful with MD defaults: in order to have this alignment between Compute and Storage FDs, you have to use explicitly a special crafted AS object that requires a specific parameter in its creation, this is shown in the PowerShell cmdlet below.
# Un-Managed Availability Sets (AS): #
New-AzureRmAvailabilitySet -Location "West Europe" -Name "MyNewUnManagedAS1" -ResourceGroupName $rgname -PlatformFaultDomainCount 3 -PlatformUpdateDomainCount 20
New-AzureRmAvailabilitySet -Sku "Classic" -Location "West Europe" -Name "MyNewUnManagedAS2" -ResourceGroupName $rgname -PlatformFaultDomainCount 3 -PlatformUpdateDomainCount 20
# Managed Availability Sets (AS): #
New-AzureRmAvailabilitySet -Managed -Location "West Europe" -Name "MyNewManagedAS3" -ResourceGroupName $rgname -PlatformFaultDomainCount 3 -PlatformUpdateDomainCount 20
New-AzureRmAvailabilitySet -Sku "Aligned" -Location "West Europe" -Name "MyNewManagedAS4" -ResourceGroupName $rgname -PlatformFaultDomainCount 3 -PlatformUpdateDomainCount 20
# Check if AS is "managed" or not in two different ways: #
$rg1 = (Get-AzureRmAvailabilitySet -ResourceGroupName $rgname -Name "MyNewUnManagedAS1")
Write-Host ("Is [" + $rg1.Name + "] Availability Set Managed? " + $rg1.Managed +"...")
$rg2 = (Get-AzureRmAvailabilitySet -ResourceGroupName $rgname -Name "MyNewManagedAS4")
Write-Host ("How [" + $rg2.Name + "] Availability Set is? " + $rg2.Sku +"...")
As you can see from the code snippet above, there are multiple ways to achieve the same configuration:
- By default, a new Availability Set (AS) is created as standard type, that is no alignment of Storage FDs with Compute FDs (first command).
- If you want to do the same as above, but specifying explicitly, you can do specifying value “Classic” for parameter “ -Sku” (second command).
- The new type of AS can be created specifying “ -Managed” flag (third command).
- Same configuration as the previous one can be obtained specifying “Aligned” for the parameter “ -Sku” (fourth command)
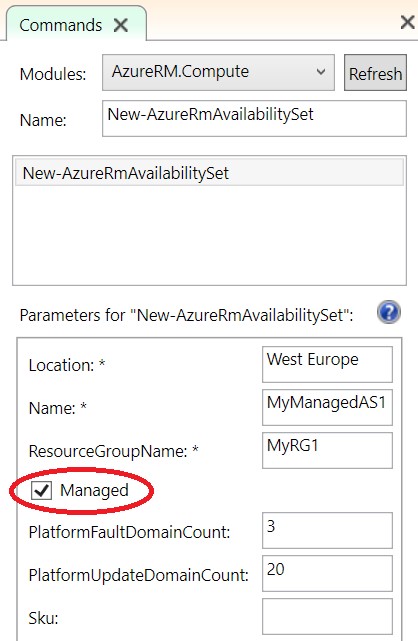
At the end, if you want to create a new Availability Set for VMs with Managed Disks that you want “aligned”, you can either specify “ -Managed” or “-Sku Aligned”, but the latter is recommended since the former may be removed in the future. This is how it looks like now using Azure PowerShell module version 2.7.0 (February 2017) for AzureRm.Compute:
For more information on Azure Virtual Machines and availability, you can reach the URL below:
Manage the availability of Windows virtual machines in Azure
/en-us/azure/virtual-machines/virtual-machines-windows-manage-availability
Higher VM resiliency – Data Disks
Same approach described for OS disks is valid also for Data Disks. You don’t have to worry about that: MD mechanism will take care of segregating storage accounts used to host Data Disks in different Storage Stamps, then aligning with Compute Fault Domains (FDs). Best practices in use before MD will remain valid: keep all Disks (OS and Data) associated with a VM in the same Storage Account, but in this case Azure will enforce it behind the scenes. It is worth mentioning that if you add a MD Data Disk later, after VM creation time, Azure will ensure to place in the correct Fault Domain (FD), eventually moving it to a different managed storage account. In this way, resiliency will not be diminished introducing a dependency on an object in a different FD.
Independent Snapshots
Snapshot of a MD is something totally different from what you may know already for classic UMD. Aligning the design with what other cloud providers do, Snapshots here are totally independent from the MD object: once created, you can delete the source MD and the Snapshot will survive. This new paradigm is more consistent with the concept of a read-only copy of some another object. You can create as many snapshots as you want on the same MD, I tried 500 personally, there is no hard limit as far as I know, but without noticing performance degradation of the source MD. This makes Snapshots suitable for Point-in-Time (PIT) backups of MD. Keep in mind that you will pay for the snapshot size as an allocated MD space, finally at the moment Snapshots on MD are not incremental but fully copy, this is something that may change in the future. Regarding resource allocation limit, there is no specific Snapshots limit per region per subscription, they are counted against the same cumulative quota with MD as I wrote previously. Since Snapshots are independent objects, sourced with a copy operation from MD, you can have a Snapshot created on Premium Storage originating from a MD allocated on Standard Storage, and vice-versa, if you don’t specify a storage type, Standard will be used. They also support encryption at the disk level, but not Storage Service Encryption (SSE) for Data at Rest, this will come in the future. These are the typical operations that you could do with MD Snapshots, in relationships with the other object types (VM, Image, Managed Disk, VHD/Blob):
- Create a Snapshot from a MD
- Create a MD from a Snapshot
- Create a Snapshot from a VHD/Blob
- Create an Image from a Snapshot
- Create a Snapshot as copy of another Snapshot
Creating Snapshots using REST API or PowerShell is extremely easy, as with all the available SDKs, also in this case the specific Resource Provider is under the Compute umbrella, not the Storage one.
$mdisksnapshotconfig1 = New-AzureRmSnapshotConfig -AccountType StandardLRS -DiskSizeGB 512 -Location $location -SourceUri $ref1.Id -CreateOption Copy
$mdisksnapshot1 = New-AzureRmSnapshot -ResourceGroupName $rgname -SnapshotName "EmptyManagedDiskMD1snaphot1" -Snapshot $mdisksnapshotconfig1

Like Managed Disks, also for Snapshots you have full support for all CRUD operations, including getting access to underlying Blob/VHD that is normally hidden to users: in PowerShell, you can use Grant-AzureRmSnapshotAccess and Revoke-AzureRmSnapshotAccess to obtain SAS URL to eventually copy the object. During my tests and project work, the only time I had to use underlying URL, was when I had to explicitly copy the Snapshot across subscriptions, this is something that is not provided (yet) by the platform, this may change in the future. One final note about performances: even if a Snapshot is full copy (read-only) of source Managed Disk (MD), copy operation is extremely fast, almost instantaneous, see next sections for details.
Instant copy
This is really a hidden gem in MD. Almost every copy operation involving MD or Snapshot is pretty instantaneous, completely different behavior compared to traditional UMD. Azure team here implemented some kind of “copy-on-read” mechanism that will asynchronously populate bits in the target object, but will return fast success acknowledge of the operation. We used this extensively during our projects, the only current limitation, not so bad for us, is tied to the locality of the copy that must happen in the same region. Again, this optimization is valid for both MD and Snapshots. Another big value of this of this mechanism, is that you can create a MD or a Snapshot based on a Blob resident in a storage account in another subscription, if the target subscription is under the same Azure Active Directory tenant. In our case this was extremely useful because Azure automatically copied in background the source blob using the super-fast “copy-on-read” feature. If you have scenarios where you build images and VMs in a “source” subscription and then you deploy running VMs in a “target” subscription, then this will be very useful for you. Remember: you can create an image from a VHD/Blob or Snapshot, not only directly from a VM.
Syntax Difference: Managed vs. Non-Managed
This is an area where you need to force yourself to pay close attention reading the code. Surprisingly, if you look at PowerShell syntax for example, there is no special cmdlet or parameter to create a VM based on a MD for the OS. Here is a code snippet to create a VM using MD for the OS disk (some parts removed for brevity):
$sourceimage = Get-AzureRmImage -ResourceGroupName $rgname -ImageName $ImageName
$VirtualMachine = New-AzureRmVMConfig -VMName $VMName -VMSize $VMSize -AvailabilitySetId $as.Id
$VirtualMachine = Set-AzureRmVMOperatingSystem -VM $VirtualMachine -Linux -ComputerName $ComputerName -Credential $Credential
$VirtualMachine = Add-AzureRmVMNetworkInterface -VM $VirtualMachine -Id $nic.Id -Primary
$VirtualMachine = Set-AzureRmVMSourceImage -VM $VirtualMachine -Id $sourceimage.Id
$VirtualMachine = Set-AzureRmVMOSDisk -VM $VirtualMachine -Name $OSDiskName -StorageAccountType StandardLRS -DiskSizeInGB 128 -CreateOption FromImage -Caching ReadWrite
$VM = New-AzureRmVM -ResourceGroupName $rgname -Location $Location -VM $VirtualMachine
Are you able to see where is the MD indication for this VM OS disk? The answer is not in what is here, but in what is *not* here. Here is the correspondent syntax using UMD:
$sourceimage = Get-AzureRmImage -ResourceGroupName $rgname -ImageName $ImageName
$VirtualMachine = New-AzureRmVMConfig -VMName $VMName -VMSize $VMSize -AvailabilitySetId $as.Id
$VirtualMachine = Set-AzureRmVMOperatingSystem -VM $VirtualMachine -Linux -ComputerName $ComputerName -Credential $Credential
$VirtualMachine = Add-AzureRmVMNetworkInterface -VM $VirtualMachine -Id $nic.Id -Primary
$VirtualMachine = Set-AzureRmVMSourceImage -VM $VirtualMachine -Id $sourceimage.Id
$VirtualMachine = Set-AzureRmVMOSDisk -VM $VirtualMachine -Name $OSDiskName -VhdUri $osDiskUri -StorageAccountType StandardLRS -DiskSizeInGB 128 -CreateOption FromImage -Caching ReadWrite
$VM = New-AzureRmVM -ResourceGroupName $rgname -Location $Location -VM $VirtualMachine
As you can see in the highlighted lines, when you use MD, there is no “-VhdUri” parameter to supply and value to specify: simply tell Azure that you want a (managed) disk and you will get it, forget URI and everything related to storage accounts! The story is a little bit different if want to attach a data disk to a VM. In this case, there is a * single * parameter to specify, that is the ID of the previously created MD you want to attach ( -ManagedDiskId) :
$MDdiskConfig = New-AzureRmDiskConfig -AccountType $storageType -Location $location -CreateOption Empty -DiskSizeGB 128
$MDdisk1 = New-AzureRmDisk -DiskName $dataDiskName -Disk $MDdiskConfig -ResourceGroupName $rgName
$VM = Get-AzureRmVM -Name $VMName -ResourceGroupName $rgName
$VM = Add-AzureRmVMDataDisk -VM $VM -Name $dataDiskName -CreateOption Attach -ManagedDiskId $MDdisk1.Id -Lun 1
Update-AzureRmVM -VM $VM -ResourceGroupName $rgName
You can see that is necessary since managed disks are first-class objects that need, at the minimum to be referenced for use. My personal kudos to Azure Engineering team that made the API and cmdlets so clear for MD.
Additional Things to Remember
Azure Managed Disks is integrated in the new Portal and offers also full development tool coverage including .NET, Java, Ruby and Python SDKs, PowerShell and Azure CLI, ARM templates. What I described in this blog post was directly experienced in my recent works, but there are some other important details that deserve attention, I grouped the main one in the list below:
- Billing Model
- With MD, costs are calculated in the same way (although still at different rates) for both Premium Storage and Standard storage. Like UMD Premium storage – cost is based on the provisioned size of a disk rather than on current used space within a disk. While one can still request a disk of any size up to 1TB, MD calculates costs based on a fixed set of standard sizes. For example, when one provisions a Standard MD 60GB disk, it would be billed as an S6 (64GB) disk – the smallest standard size of >= 60GB (see Table 1.1 above).
- Regarding Snapshots on MD, at the moment they are not incremental and you will pay for the full size of the sourced MD.
Azure Managed Disks Overview- Pricing and Billing
/en-us/azure/storage/storage-managed-disks-overview#pricing-and-billing
- Outbound TCP port 8443
- If you are using Managed Disks and if you use VM extensions, you have to permit outbound only traffic over TCP port 8443, otherwise your VM deployment will fail. This port is required by the VM Agent to report VM extension status in the Azure storage as a blob. By default, outbound Internet access is permitted for Azure VMs, but if your environment requires strict traffic control and security lock-down, this may be an issue. Azure Engineering team is aware of this and working actively to remove this requirement. Based on the link below, estimated date for an update is “…by the end of May 2017.”:
Frequently Asked Questions about Azure IaaS VM Disks and managed and unmanaged premium disks
/en-us/azure/storage/storage-faq-for-disks
- Migration from Un-Managed Disks (UMD) to Managed Disks (MD)
- Migrating from UMD to MD is possible, but will involve a service downtime for all your VMs in the specific Availability Set.
- There is a nice PowerShell cmdlet called “ConvertTo-AzureRmVMManagedDisk” that will be very helpful in this task.
- If your VM has disks on a storage account that is, or at any time has been, encrypted using Azure Storage Service Encryption (SSE), then direct migration is not possible. You have to copy the disk out and decrypt before.
- During the migration from UMD to MD, is also possible to upgrade from Standard Storage to Premium Storage.
- Is also possible to migrate disks from AWS to Azure MD, if you first export the EC2 instance to a VHD in an Amazon S3 bucket; procedure is detailed below:
Migrate from Amazon Web Services (AWS) to Azure Managed Disks
/en-us/azure/virtual-machines/virtual-machines-windows-aws-to-azure
Essentially, the procedure in the article below will stop all your VMs (with deallocation!) in the specified Availability Set (AS), will “convert” (i.e. = copy!) all attached disks to MD type, then will also convert AS to be “managed”.
Convert a VM from unmanaged disks to managed disks
/en-us/azure/virtual-machines/virtual-machines-windows-convert-unmanaged-to-managed-disks
- Backup
- Azure Backup Service now supports VM backups using Managed Disks:
Overview of the features in Azure Backup - Using Managed Disk VMs with Azure Backup
/en-us/azure/backup/backup-introduction-to-azure-backup#using-managed-disk-vms-with-azure-backup
- Azure modules for PowerShell
- In order to use MD in PowerShell, be sure to use minimum version 2.6.0 or higher for AzureRM.Compute module:
Install-Module AzureRM.Compute -RequiredVersion 2.6.0
Samples and Templates
- Azure MD obviously also support ARM "Templates", you can find a large collection in GitHub at this link.
- Silvano Coriani from Azure CAT wrote some samples for Java, you can here:
ServiceBuilder: Demo of a provisioning Engine with a multi-step workflow
https://github.com/scoriani/ServiceBuilder
- Managed Disks are also available using Azure CLI tool, .NET an JAVA SDKs:
Thank you!
For the patience and great support to the work I have done on Managed Disks, great kudos to Silvano Coriani from AzureCAT ( @scoriani). Hope you enjoyed the post, let me know your feedbacks, you can also follow me on Twitter ( @igorpag).
Best regards.