How to change Subnet and Virtual Network for Azure Virtual Machines (ASM & ARM)
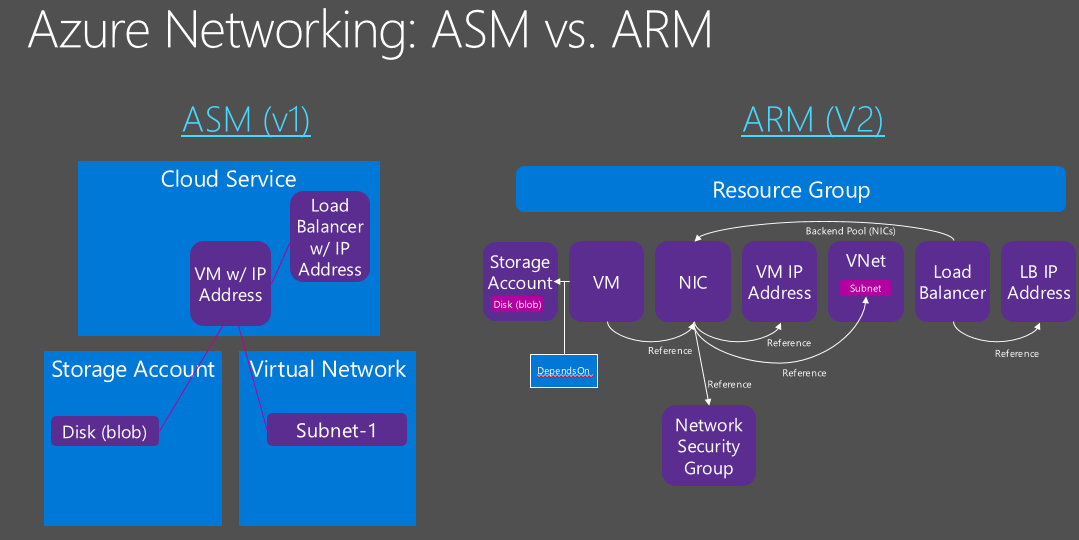
During the lifecycle of an Azure Virtual Machines (VM), you may encounter situations where you need to change the subnet, or maybe the Virtual Network (VNET) where your VM has been created. It is worth mentioning that in Azure Resource Manager (ARM) it is mandatory to place every VM in a VNET, you cannot avoid this. In legacy Azure Service Management (ASM) this requirement didn’t exist. This blog post focuses on how to change subnet, using PowerShell, for an existing VM in ARM and ASM, and clarifies what would happen in case of VNET movement. Before effectively starting, it is important to understand that the networking model in ARM is very different from the ASM model used in the earlier Azure days, you can have an immediate idea looking at the picture below:
Change Subnet in ASM
Changing subnet in ASM is pretty simple, there is a nice PowerShell cmdlet that makes the magic:
Set-AzureSubnet https://msdn.microsoft.com/en-us/library/mt589103.aspx
You can use this same cmdlet at VM creation time to configure the subnet, but you can also use to change subnet for an existing VM, PowerShell code is very simple:
Get-AzureVM –Name $MyVMname –ServiceName $MyCloudServiceName `
| Set-AzureSubnet -SubnetNames $NewTargetSubnet `
| Update-AzureVM
IMPORTANT: There is a strict requirement here: you can only change subnet if the new one is in the same VNET as the old one.
Change Subnet in ARM
In ARM, this cmdlet does not exist anymore, but changing subnet is very simple once you know where to operate the change. What I found particularly interesting is that this change needs to happen at the NIC object, not to the VM level, but if you give a look to the picture above, you will agree that is expected. First start in the procedure is to obtain references to your VM, subnet, VNET and NIC objects as reported in the code snippet below:
# Obtain VM reference and check Availability Set #
$VMName = "igor-vm1"
$VirtualMachine = Get-AzureRmVM -ResourceGroupName $RGname -Name $VMName
# VM created in Availability Set
$VirtualMachine.AvailabilitySetReference
# Obtain NIC, subnet and VNET references: #
$NIC = Get-AzureRmNetworkInterface -Name $NICname -ResourceGroupName $RGname
$NIC.IpConfigurations[0].PrivateIpAddress # '10.1.1.4'
$VNET = Get-AzureRmVirtualNetwork -Name $VNETname -ResourceGroupName $RGname
$Subnet2 = Get-AzureRmVirtualNetworkSubnetConfig -VirtualNetwork $VNET -Name $Subnet2name
Now, the subnet setting you need to change resides in the “IPConfigurations” property array, you can access it with index [0] and change directly the “Subnet.Id” value to the ID of the new target subnet:
$NIC.IpConfigurations[0].Subnet.Id = $Subnet2.Id
Set-AzureRmNetworkInterface -NetworkInterface $NIC
Once you have done this operation, you need to commit the change with the Azure ARM Network Provider using the cmdlet “Set-AzureRmNetworkInterface”. Please note that the execution of this cmdlet will take about two minutes, at least in my scenario with an A3 VM type. Why not an immediate operation? Because once you will commit the change, Azure will automatically restart the VM, then you can execute this procedure while the VM is running, but at a certain point you will have a service downtime.
If you want to check the change completed, you need to re-acquire the NIC object reference and access the private IP address or subnet properties as in the example below:
$NIC = Get-AzureRmNetworkInterface -Name $NICname -ResourceGroupName $RGname
$NIC.IpConfigurations[0].PrivateIpAddress # 10.1.1.4 -> 10.1.2.4
There is a last aspect I want to mention here: what happens if you have more than one VM in an Availability Set and you want to move one of more VMs in a different subnet? No problem, I tested this scenario and you can have one (or more) VMs in one subnet S1 and one (or more) VMs in a different subnet S2, provided that S1 and S2 are in the same VNET.

Change Virtual Network in ASM and ARM
Unfortunately, today is not possible/supported to change directly a VNET for an existing VM. the only way to operate this change is export the VM definition, drop the VM preserving disks, then re-create the VM with the same settings, except for the new VNET assignment, and attaching previous disks. As a proof in ARM, if you try to move a VM to a subnet in a different VNET, you will obtain an error like this:
Update-AzureRmVM : Subnet Subnet4 referenced by resource
/subscriptions/8e95e0bb-d7cc-4454-9443-75ca862d34c1/resourceGroups/igorrg7/providers/Microsoft.Network/networkInterfaces/nic4-igor-vm1/ipConfigurations/ipconfig1 is not in the same Virtual Network as the subnets of other VMs in the availability set.
StatusCode: 400
ReasonPhrase: Bad Request
OperationID : ''
At line:1 char:1
+ Update-AzureRmVM -VM $VirtualMachine -ResourceGroupName $rgname
+ ~~~~~~~~~~~~~~~~~~~~~~~~~~~~~~~~~~~~~~~~~~~~~~~~~~~~~~~~~~~~~~~
+ CategoryInfo : CloseError: (:) [Update-AzureRmVM], ComputeCloudException
+ FullyQualifiedErrorId : Microsoft.Azure.Commands.Compute.UpdateAzureVMCommand
Another very important property you cannot change once the VM is created, is the “Availability Set”, then you should think about it carefully. Finally, please note that even if with a single VM into an “Availability Set”, trying to move to a different VNET will give you exactly the same error as above, even if there only one VM.
That’s all I wanted to share with you on this topic, if you want you can also follow me on Twitter (@igorpag). Best regards.