Hub&Spoke, Daisy-Chain and Full-Mesh VNET topologies in Azure ARM using VPN (V1)
IMPORTANT: This is an old version using Azure PowerShell ARM module earlier than 1.0.0 release. If you want/need PowerShell version later than 1.0.0, please use the article below.
Hub&Spoke, Daisy-Chain and Full-Mesh VNET topologies in Azure ARM (V2)
Introduction
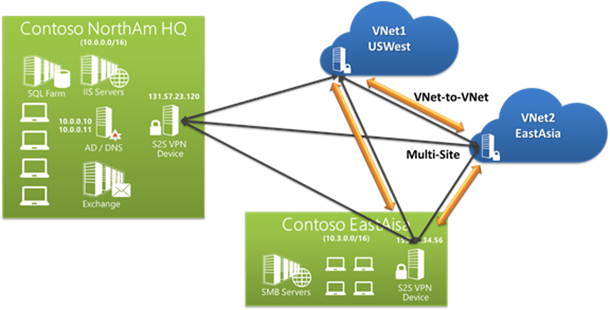
One of the key benefit of Azure VPN is the flexibility in arranging almost any kind of connected Virtual Network (VNET) topology in Azure: you can essentially connect together VNETs in any region, of any type (ARM vs. ASM), Azure only or with on-premise hybrid environment, in different subscriptions, etc. This was also possible with the legacy Azure management API called Azure Service Management (ASM), but the drawback was a not-easy not-nice manageability of the topology configuration: since no complete scripting support was available, you had to export an XML configuration file, add your connected VNETs address spaces editing it, then import back into Azure. Additionally, no PowerShell cmdlet existed to script creation of subnets nor getting programmatically the assigned Virtual IP (VIP) assigned to the VPN gateway. If you have never done this before, I suggest you to give a quick look to the article below to have an idea, you will then better appreciate the amazing support in ARM and how easy is to fully automate even complex layouts.
Multihop Routing in Azure
http://blogs.msdn.com/b/rslaten/archive/2014/12/06/multihop-routing-in-azure.aspx
Then, what is effectively changed in Azure Resource Manager? In ARM, Azure Networking team took a totally different approach and promoted many network concepts to first-level objects with full and independent life cycle support. Now you have VNET objects, subnet objects, gateway objects you can manipulate using REST API, SDKs or PowerShell as explained below:
- You can create subnet objects with New-AzureVirtualNetworkSubnetConfig;
- You can create virtual network objects with New-AzureVirtualNetwork;
- You can create VIP objects with New-AzurePublicIpAddress;
- You can create You can create VPN gateway objects with New-AzureVirtualNetworkGateway;
Before going into details on the topologies I want to show you, let me first recap shortly the main limits of Azure VPN that you need to consider when using this connectivity feature:
About VPN gateways
https://azure.microsoft.com/en-us/documentation/articles/vpn-gateway-about-vpngateways
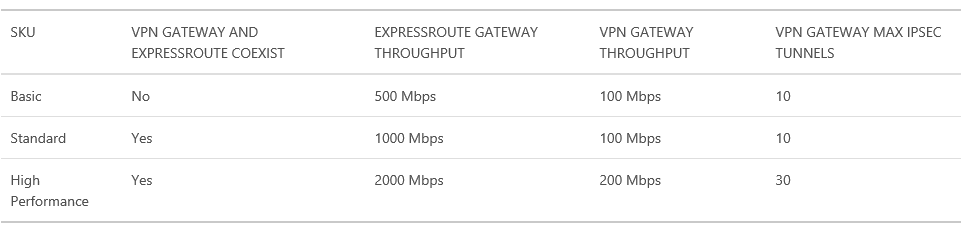
As you can see in the table above, at maximum you can connect up to 30 VNETs using the same VPN gateway using “High-Performance” SKU, be careful also with the bandwidth limit of 200 Mbit/sec. Also remember that you can have only one VPN gateway per VNET. A nice feature recently introduced is also the possibility to have coexistence of VPN gateway and ExpressRoute for the same VNET. It is also worth mentioning that Azure VPN provide high-availability SLA of 99,90%. In the remaining part of this blog post I will show you how to create different connected VNET topologies, the base article you can start with to acquire necessary concepts for PowerShell is reported below:
Configure a VNet-to-VNet connection using Azure Resource Manager and PowerShell
https://azure.microsoft.com/en-us/documentation/articles/vpn-gateway-vnet-vnet-rm-ps
I will only use three VNETs to do not over-complicate the diagrams and PowerShell scripts, but the concepts are essentially the same for any number of connected networks. Attached to this blog post you will find a sample PowerShell script (provided as-is with no warrant nor support!) I used to test all the scenarios.
NOTE: In this post I used version 0.9.8 of Azure PowerShell cmdlet.
Configuration
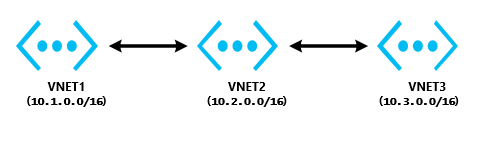
I prepared three VNETs, in two different regions (West Europe and North Europe), with simple three subnets composition, just to make the examples more comprehensive.
STEP(1): Creating subnets

NOTE: Please note that the “GatewaySubnet” subnet definition is mandatory.
STEP(2): Create VNET

STEP(3): Create the VNET Gateway

I repeated these steps for VNET(2) and VNET(3) using different IP address spaces.
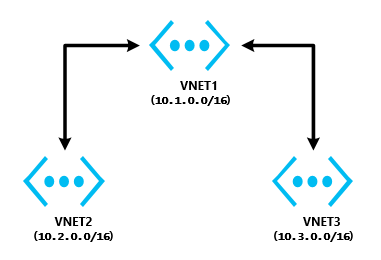
Hub&Spoke
In this type of layout, there is a central VNET (Hub) that must be connected to each other VNET (Spokes), with no direct connection between tenants, all network traffic flows back and forth from/to VNET1 in the graphical example below. Bi-directional connectivity is not mandatory but generally required.
All the logic to implement network traffic flow is in the definition of “Local Networks” objects, in PowerShell this is accomplished using “New-AzureLocalNetworkGateway” cmdlet. Here is what must be used for Hub&Spoke topology:

As you can see, the logic is pretty simple: for every VNET, I defined a “Local Network” logical object that I will later use in the connection definitions. The key information must be supplied with the “ -AddressPrefix” parameter: you need to tell Azure what is on the other side of the connection and how to arrive there (“-GatewayIpAddress”). Once defined the connected address spaces with their respective gateway IPs, you need to create the connections:
Two important things to highlight:
- A connection is mono-directional: if you want it bi-directional between VNET(1) and VNET(2), for example, you need to separately define a connection between VNET(1) and VNET(2), then another one between VNET(2) and VNET(1).
- A connection is not transitive: if you define a connection between VNET(1) and VNET(2), and a second one between VNET(2) and VNET(3), it does not mean that traffic will flow between VNET(1) and VNET(3). If you want this, you need to look at the “Daisy-Chain” scenario later in this blog post.
Daisy-Chain
Differently from the previous scenario, here you want to define a “transitive” network traffic flow: you want your packets to travel (back and forth?) from VNET(1) to VNET(3) through VNET2(2).
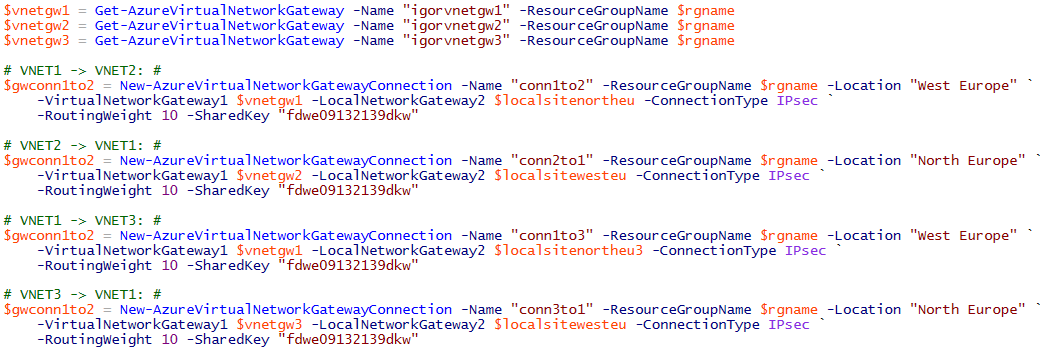
What is different from the previous approach? Look at the local network definitions you have to use as reported below. In short, from VNET(1) perspective you need to tell Azure that on the other side of the connection, that you will create later, there are two address spaces, that is VNET(2) and VNET(3). If you want to have bi-directionality, you have to create a second object representing the VNET(3) perspective.

And here are the connections that you will need to define:
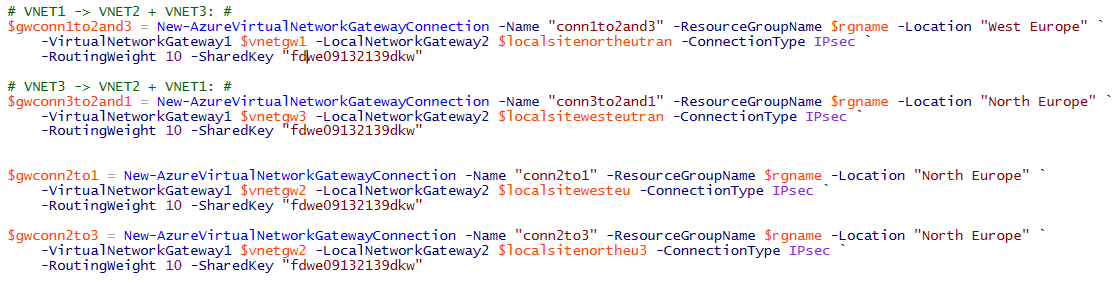
It is worth noting that the first two connections represent the “transitive” paths between VNET(1) and VNET(3) and vice-versa, but this is not sufficient: you still need to define explicitly the “direct” point-to-point connections between VNET(2) and VNET(1) and VNET(2) and VNET(3) otherwise transitive routing will not happen. Finally, keep in mind that failure on intermediate VPNs will cause a break in the chain and will make some VNETs unreachable.
Full-Mesh
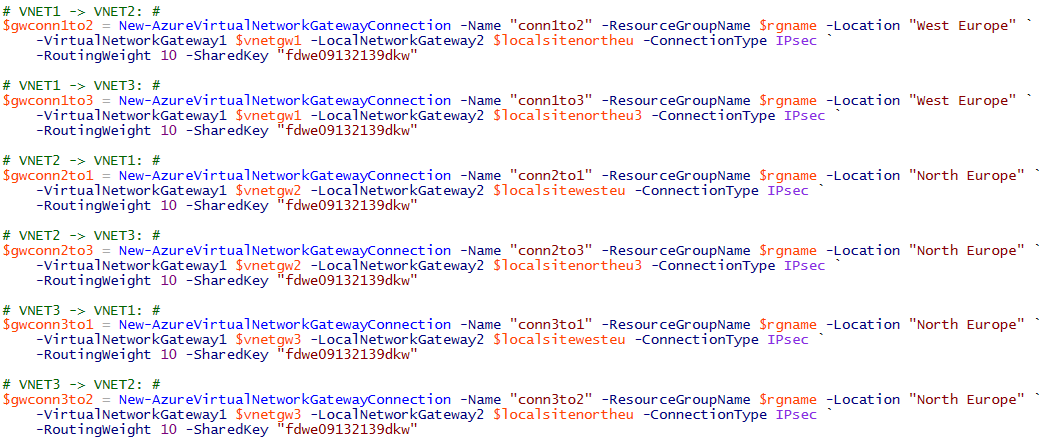
This last scenario is similar to the first one, that is “Hub&Spoke”: what is different is that you need also to add connections between each tenant VNETs, including all possible combinations. Based on my example, here you simply need to add connections between VNET(2) and VNET(3). Remember that these are two separate connections since they are mono-directional.

Here is the list of the connections you need, as you can notice the number will increase very quickly since you will need to explicitly define [N*(N-1)] objects.
Final Notes
- VNET and VPN flexibility will allow you to change dynamically the layout of your connections, then it’s pretty easy to eventually add more VNETs and/or more connections. What is important to note is that (today) VPN does not support route advertising as ExpressRoute does with BGP: this is the reason why you need to define explicitly local network objects to tell Azure how to route traffic from one side of a connection to the other side and beyond.
- In this blog post, I used “imperative” ARM model in PowerShell, but it is absolutely possible to “templatize” your connectivity schema using very powerful ARM template feature. My suggestion is to start coding your network layout using “imperative” mode, then when you will be satisfied with the results, switch to “declarative” mode and build your template. See "Template deployment" section at the link below:
Azure Resource Manager overview
https://azure.microsoft.com/en-us/documentation/articles/resource-group-overview
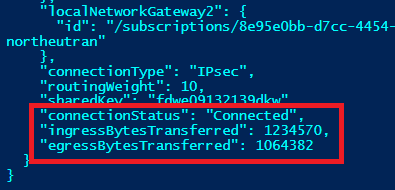
- If you want to check connectivity status for all your connections and gateways, there is a nice PowerShell cmdlet that will report specific connection status along with some nice details on traffic transferred in/out from/to the connection (please note the “ -Debug”
switch):
Get-AzureVirtualNetworkGatewayConnection -ResourceGroupName $rgname -Name conn1to2and3 -Debug
- Be aware that, at least today, you will not be able to see VPN Gateway with multiple connections in the Azure Portal.
That’s all folks, hope you enjoyed this tour of Azure Virtual Network VPN connectivity, let me know your feedbacks. You can also follow me on Twitter ( @igorpag).
Regards.