Azure Storage secrets and Linux I/O optimizations
Last Updated : December 9th 2015.
I decided to write this blog post to talk to two different audiences that generally have a common goal but very different technical knowledge: people that has good knowledge of Azure (including storage) but totally ignoring Linux, and people that knows Linux but does not know Azure storage at all. My intent is to satisfy both audiences, even if 50% of this blog post will be trivial for either reader categories. Working with several partners and customers, testing various Azure storage optimizations and Linux file system settings, we found useful to adopt some best practices and tricks that I reported below. I put extreme care in testing this material and thanks to my colleague Vittorio Franco Libertucci (Microsoft Premier Support - Linux) for help and support on reviewing the final version.
Azure OS Disk
It is highly recommended to do not use the default OS disk ( /dev/sda) for any application or service storage need. This disk is optimized for fast VM boot time and will not be able to provide you good performances for other purposes. For Windows images contained in the Gallery, OS disk size has been raised recently to 1TB (previously fixed to 127GB), but be aware that for Linux this is not true: some images have pretty small OS disks, then be careful on where you are going to install your software and eventually move to one of the additional Azure data disk (see next section). Additionally, you can create your customized Linux VM on-premise and then move to Azure and create your own image. Regarding the Azure Host cache settings for OS disk, see later in this blog post.

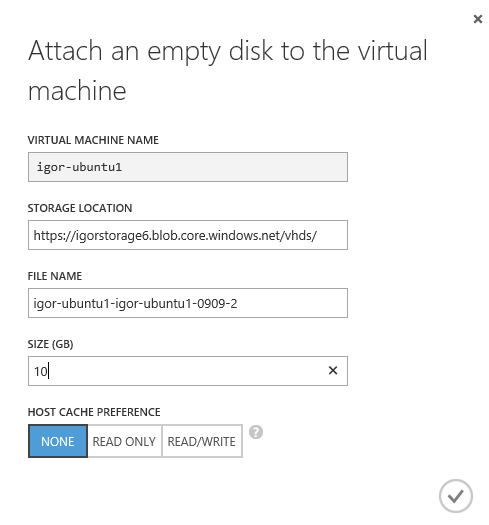
Azure Data Disks
In Azure, you can add up to 16 additional disks on A-SERIES, 32 on D-SERIES (and DS-SERIES) and 64 on G-SERIES, 1TB each, depending on the VM size as listed at the link below. The total maximum amount of disk space for additional data disk is then equal to 16TB for A-SERIES, 32TB for D-SERIES (and DS-SERIES) and 64TB for G_SERIES. Each disk has a performance target of 300 IOPS for Basic VM type, 500 IOPS for Standard VM type with Standard storage, and up to 5000 with Azure Premium Storage. It is highly recommended to add additional disks as needed per space and IOPS requirements and do not use the OS disk. For optimal performances, it is highly recommended to use storage accounts in the same Azure datacenter where you will create your VM. Regarding the Azure Host cache settings for OS disk, see later in this blog post. You can read more details and step-by-step procedures later in this post in section “Adding Azure Disks to Linux VM”.
Virtual Machine and Cloud Service Sizes for Azure
http://msdn.microsoft.com/en-us/library/azure/dn197896.aspx
IMPORTANT (kudos to Von Hermann Daeubler): NEVER mount Azure data disks to an Azure Linux VM via device id. Instead use UUID. Be careful when using e.g. graphical tools to mount Azure data disks. Double-check the entries in /etc/fstab.
Testing SAP NetWeaver on Microsoft Azure SUSE Linux VMs
The issue with device id is that it might change and then the Azure VM might hang in the boot process. One might add the nofail parameter in /etc/fstab to mitigate the issue. But watch out that with nofail applications might use the mount point as before and maybe write into the root file system in case an external Azure data disk wasn't mounted during the boot.
The “LUN(0)” Problem
When you attach a disk to a Linux VM in Azure, you need to be sure that LUN(0) is already used, otherwise the new disk will not be properly recognized. This is not an Azure problem, instead a standard Linux behavior and part of the SCSI specs and how Linux kernels implemented. In order for Linux to determine the SCSI level of the host it looks for LUN-0 first, so this must always exist. After scanning for LUN-0 it can then scan the rest of the LUNs using various SCSI commands, depending on what SCSI level the host reported (SPC-2, SPC-3, etc.). In other cloud platforms, LUN concept is not exposed directly, then this behavior is someway hidden and managed. As possible workarounds, you can check for LUN(0) presence when attaching a new data disk, or you can attach a dummy disk/device at VM creation time.
Azure Premium Storage
In April 2015, Microsoft released Premium Storage for VMs, able to provide up to 5K IOPS per single disk with a maximum cap of 50K IOPS per VM (DS-SERIES):

Each Azure Premium Storage account is able to provide up to 32TB disk space and VMs require DS-SERIES to leverage this capabilities. In order to leverage this capability, Linux VMs must:
- For all Premium Storage disks with cache setting as either “ReadOnly” or “None”, you must disable “barriers” while mounting the file system in order to achieve the scalability targets for Premium Storage. You do not need barriers for this scenario because the writes to
Premium Storage backed disks are durable for these cache settings. When the write request successfully completes, data has been written to the persistent store. Please use the following methods for disabling “barriers” depending on your file system:- If you use reiserFS, disable barriers using the mount option “barrier=none” (For enabling barriers, use “barrier=flush”) ;
- If you use ext3/ext4, disable barriers using the mount option “barrier=0” (For enabling barriers, use “barrier=1”);
- If you use XFS, disable barriers using the mount option “nobarrier” (For enabling barriers, use the option “barrier”);
- Use the certified and validated Linux distributions/versions below:
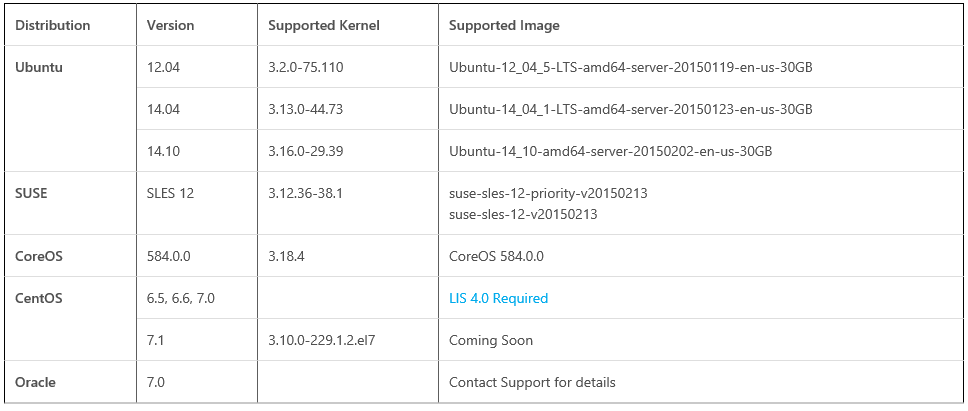
NOTE: More images will be added to the list, check for future inclusion at the link below:
Premium Storage: High-Performance Storage for Azure Virtual Machine Workloads
http://azure.microsoft.com/en-us/documentation/articles/storage-premium-storage-preview-portal
Need More Disk Space?
If you need more disk space than 16TB on A-SERIES, 32TB on D-SERIES and DS-SERIES, 64TB on G-SERIES, you can use a new Azure features, called “Azure Files”. It is basically SMB on top of Azure Blob Storage, this will give you 5TB network shares that you can also mount on multiple VMs at the same time. Even if SMB is a typical Windows technology, you can use also on certain Linux distributions (Ubuntu) as described at the link below, see “Can I mount a share from Linux? ” in the FAQ section:
Introducing Microsoft Azure File Service
Azure Blob Storage Limits
In addition to what stated at the previous point, it is worth mentioning that each Azure standard storage account has a general cap on maximum IOPS of 20K and 500TB capacity, as stated at the link below. This means that it is not recommended to create more than 40 disks, including OS disks but excluding temporary disks, on the same storage account. For Azure Premium storage, there is no explicit limit on the IOPS, but it is able to provide only 32TB space. Additionally, Premium disks come in three different flavors, each one able to provide specific IOPS and bandwidth, based on size provisioned. Be sure to correctly match the maximum bandwidth of the VM with the bandwidth associated to each VM size. A single VM can use disks from multiple storage accounts, this is especially important in two situations:
- G-SERIES VMs: here you can use up to 64 disks, then probably you may need to use more storage accounts to leverage maximum capabilities.
- DS-SERIES: VMs: here you may want/need to attach not only disks from Premium Storage account, but also from Standard Storage accounts, for example for OS disk and Backup disks that would not require Premium performances.
Every Azure subscription has a hard limit of 100 storage accounts (using Azure Service Management API (SM)) that cannot be increased; using the new Azure Resource Manager API (ARM), will be possible to go beyond this limit. All details are reported at the link below:
Azure Storage scalability and Performance Targets
http://msdn.microsoft.com/library/azure/en-us/dn249410.aspx
Azure Disk Caching
When you attach data disks to a VM, with standard storage accounts, you have the option to enable caching at the Azure Host level, up to four disks per VM. If you have light read workload, you can enable it, but if you have big file contents (more than few tens of GB) and/or write intensive workload, it is recommended to disable this option.
With Premium storage accounts, all disks can have caching enabled, but only OS disks can have Read/Write, data disks can be set only to ReadOnly or None. For write intensive I/O, it’s recommended to set caching to None on the additional data disks.
Azure Temporary Disk
By default, when creating a new VM, Azure will provide you an OS disk (/dev/sda) and a temporary disk (/dev/sdb), subsequently added disks will show as /dev/sdc, /dev/sdd and so on. Be aware that content on this disk may be lost in case of specific events like VM resizing or Azure Host OS failure. Even if content will survive VM reboots, should be considered a temporary storage. The size of temporary disk will vary depending on the VM size and SKU as listed at the link below. This disk is recommended to be used for the Linux swap file as you can read in the next point below..
Virtual Machine and Cloud Service Sizes for Azure
http://msdn.microsoft.com/en-us/library/azure/dn197896.aspx
With the introduction of Azure D-SERIES VM SKUs, the local temporary disk provided by Azure will be backed up fast SSD local storage mounted directly in the Azure hosts: this will give you very powerful and fast I/O, up to 48K IOPS, up to 800GB space size, 768MB/sec read and 384 MB/sec write throughput. More details at the link below::
D-Series Performance Expectations
http://azure.microsoft.com/blog/2014/10/06/d-series-performance-expectations
With DS-SERIES, the space available on the local SSD drive is reduced by 25% in order to provide caching for Premium Storage: if you are only interested in local SSD and not using Premium Storage, it’s recommended to use D-SERIES, or the most powerful G-SERIES where you can have up to 6TB local SSD space.
Azure Disk Resiliency & High-Availability
Azure Storage comes with a high-availability SLA of 99,90% for read-write operations. Each VM disk is a VHD into the Azure Blob storage type. By default, each disk is replicated in three copies synchronously inside the same Azure datacenter (LRS) and asynchronously to another paired datacenter with other three copies (GRS). You can eventually disable GRS and maintain only three local replicas, then saving about 30% on your storage billing and having higher storage bandwidth. If you want to geo-replicate your VM disks to a remote Azure datacenter, you have to keep in mind that there is no coordination between multiple disk replicas: write order is only guaranteed at the single disk/VHD/blob level, then you may end up having disk inconsistencies, that’s why we don’t recommend using GRS. There are additional options called “Read Access - Geo Redundant Storage (RA-GRS) ” and “Zone Replicated Storage (ZRS) ” but are not suitable for IaaS VMs. You can read more details at the link below:
Introducing Zone Redundant Storage
If using Premium storage, be aware that only LRS is available, then there is no geo-replication of disks created in this type of storage accounts.
Linux Swap File
What I have found during my tests is that even if the temporary disk shows correctly in Linux, OS swap file is not fully configured, then you need to perform some extra configuration actions as specified later in this post (see section “Swap file on Linux”). It is highly recommended to check that Linux swap is correctly configured before using the VM in production environments. There are several articles over Internet on this topics, some of them didn’t work in my case, then be careful and tests what you read, I made it and succesfully configured temporary disk for Linux swap file following the one below:
SWAP space in Linux VM’s on Windows Azure – Part 2
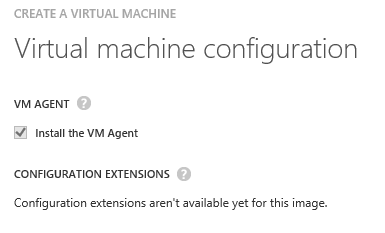
The VM Agent for Linux is required to manage VM extensions and for the Azure infrastructure to interact with Linux OS: if you deploy from the Azure Gallery, it’s mandatory to install at creation time, as shown in the Azure Portal dialog below. If you bring your own Linux image, you need to prepare the image accordingly and include the VM Agent as well:
Azure Linux Agent User Guide
http://azure.microsoft.com/en-us/documentation/articles/virtual-machines-linux-agent-user-guide
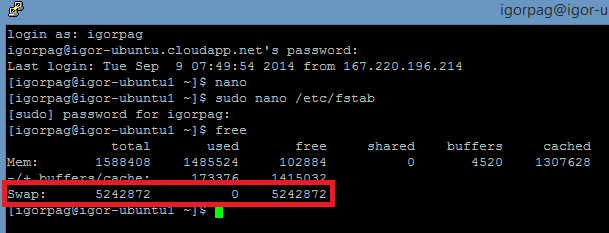
Use “Free” command to check swap and overall system resource usage. If Swap = 0, then modify the WAAgent settings as described by the latter URL mentioned above, then reboot the VM and check with “Free” again. If correctly configured, it should appears as below:
Linux Disk Layout
This is the layout of disks as it appears in the Azure Portal and in the Linux shell, using “sudo fdisk -l” command, after adding two Azure data disks, in addition to the default OS and temporary disks:
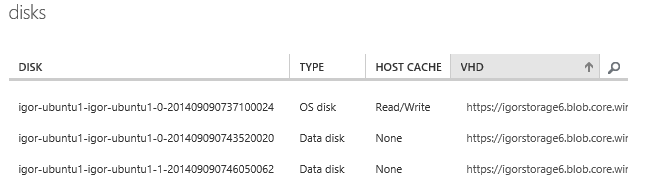

For Linux newbies, let me recap how to locate here your disks:
- “ /dev/sda” is the Azure VM OS disk;
- “ /dev/sdb” is the Azure VM local temporary disk;
- “ /dev/sdc” is the first Azure VM added data disk (50GB);
- “ /dev/sdd” is the second Azure VM added data disk (10GB);
Regarding the partition naming, “ /dev/sdc1” and “ /dev/sdc2” are examples of two partitions built inside the “ /dev/sdc” disk.
Linux File System
Over the Internet, looking at recommendations for major software like MySQL and MongoDB, you may find different file systems used. You should use Ext4 or Xfs, it is recommended to test both with the specific application you want to use. As listed in previous content of this post, you can decide which file system to use using mkfs command, after creating a partition with fdisk tool.
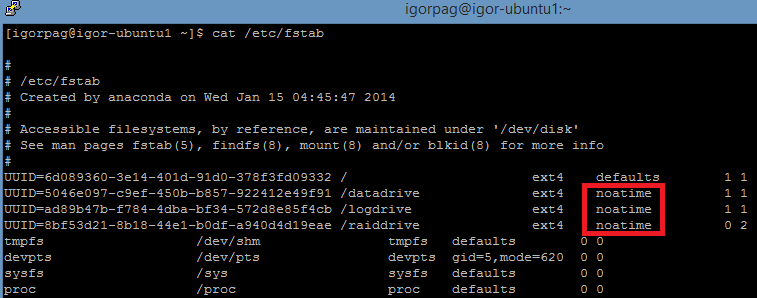
File Access Tracking
Several Linux applications and services, like MongoDB, constantly probe their files, then disabling file access time tracking may slightly increase the performances. You can achieve this adding noatime in your /etc/fstab configuration file as shown in the example below:
Block Size
Parameter "blob-size" (" -b" switch in mkfs command) seems to have little or no effect, then I used the default one (4KB on Ext3 and Ext4). You can check this parameter value using sudo tune2fs -l /dev/sdc1.
Parallel I/O
If you want to have the maximum from Azure disks on Blob storage, your Linux VM OS and application mush push parallel I/O on disks, otherwise you may be not able to reach the target limits I mentioned above, especially when using disk striping technologies (see below). By default, at least on my Ubuntu VM installed from the Azure Gallery, the OS default is already sufficiently high as you can check with command “cat /sys/block/sdc/queue/nr_requests”, in my case is (128). You can test the storage performances, after setting higher values, with command “iostat -d -xm 1”, but it is more important to focus on the application that will generate I/O operations. Then, if you want to use MySQL, Cassandra, or any other I/O intensive application, be sure to review the specific I/O optimizations to push as many parallel I/O as possible. Be aware of not pushing too high, otherwise Azure storage will throttle your workload and your performances may drop suddenly. Be sure to review again the performance target limits I mentioned earlier in this post.
Adjust the disk I/O scheduling algorithm
Linux implements four types of I/O scheduling algorithms:
- NOOP algorithm (No Operation)
- Deadline algorithm (Deadline)
- Completely fair queuing algorithm (CFQ)
- Budget period algorithm (Anticipatory)
From the kernel 2.5, the default I/O scheduling algorithm is Deadline. Beginning from the kernel 2.6.18, CFQ became the default I/O scheduling algorithm. You can specify this setting at Kernel boot time or dynamically modify this setting when the system is running. For SSD, using NOOP or Deadline can achieve better performance than the Default scheduler. If applications or services using data disks make usage of sequential I/O then it's recommended to change the scheduling algorithm to Deadline. You can check and eventually change it using the instructions provided at the link below:
Optimizing MySQL Performance on Azure Linux VMs
http://azure.microsoft.com/en-us/documentation/articles/virtual-machines-linux-optimize-mysql-perf
Software RAID
If you want to scale out on the number of IOPS that a single disk can provide, you will need to use some kind of software RAID configuration at the LINUX file system level. I tested both MD and LVM and we found that, at least in Azure, MD (MDADM) outperform LVM since it scales much better. As you can read in the details on software RAID later in this post, it is recommended to use 64KB for the “chunk” parameter. Since Azure already take care of disk replication (3 copies) for high-availability, as explained in the previous “Azure disk resiliency & high-availability” section, it is recommended to use RAID-0 striping configuration (no parity). Before proceeding with software RAID configuration using MDADM, you will need to do some preparation steps, which are create partitions on newly added data disks, format and mount. The complete procedure is described at the following link:
Configure Software RAID on Linux
http://azure.microsoft.com/en-us/documentation/articles/virtual-machines-linux-configure-raid
One important factor to consider, in the context of software RAID, is the CPU power: the higher the number of cores, the better will be the scalability factor on using multiple disks, with a significant advantage of Intel-bases D-SERIES VM SKUs over AMD-based A-SERIES ones.
That’s all folks… I hope you will find this material useful, feel free to comment here with your feedbacks.
As always, you can also follow me on Twitter ( @igorpag). Regards.