Best Practices & Disaster Recovery for Storage Spaces and Pools in Azure
With Windows Server 2012, Microsoft introduced a very nice feature called “Storage Spaces” (and related “Storage Pools”): this technology enables you to virtualize storage by grouping industry-standard disks into storage pools, and then create virtual disks called storage spaces from the available capacity in the storage pools. You can then configure these virtual disks to provide striping capabilities across all disks in the pool, combining good performance characteristics. In addition, it enables you to add and remove disk space based on your needs. You can read more details at the link below:
Storage Spaces Overview
http://technet.microsoft.com/en-us/library/hh831739.aspx
In the context of this post, I will only cover aspects related to “Storage Spaces” feature used inside Azure IaaS Virtual Machines (VM), with the addition of some good suggestions for SQL Server specific usage case. First of all, why you should use “Storage Spaces” in Azure VMs? As you probably know, there is a limit on the number of Azure disks you can attach to any VM depending on the VM size, and “Storage Spaces” feature will not help you crossing that border. Then, why using it? The answer is simple: scaling up on the number of IOPS on a single volume. Look at the first two tables in the link below:
Virtual Machine and Cloud ServiceSizes for Azure
http://msdn.microsoft.com/en-us/library/azure/dn197896.aspx
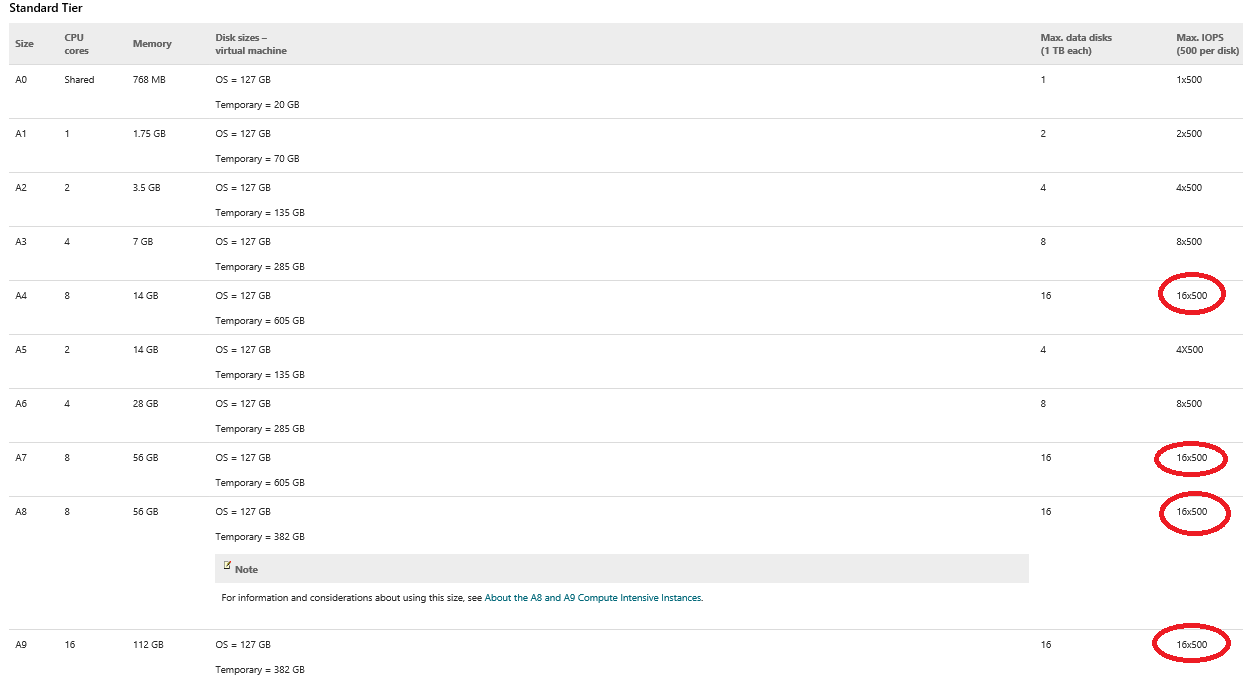
As you can see, at the very maximum you can have 16 1TB disks for A4, A7, A8 and A9 VM sizes; additionally, each single disk would be able to provide target performance level of 500 IOPS. You can easily imagine that if you want more IOPS in your VM, you have to use more disks, but what you can do if you need more IOPS on a single volume as in the case of SQL Server transaction log? This is where “Storage Spaces” come into the game: you can group together more Azure data disks (pool) and present a unique volume (space) on top of that pool! Before proceeding with this approach, be careful on the following points:
If you are using your Windows Server 2012 R2 image, then not provided by the Azure Gallery, be aware of a bug preventing you from configuring “Storage Pools”: it has been fixed in late January, there is no public Knowledge Base article available, but if you applied regular OS updates via Windows Update, you will have the hotfix included. NOTE: This problem did not affect Windows Server 2012.
Even if, in theory, you can include all the available disks in the pool, this will not scale well above a certain threshold, you can read the details in the following white paper:
Performance Guidance for SQL Server in Windows Azure Virtual Machines
- This threshold essentially depends on the CPU power: the higher the number of cores, the better Storage Spaces will scale;
- Based on my early testing, building more storage spaces or a single one with all the available disks make no real difference: scalability is still constrained by the CPU power of the VM;
- I still have to test extensively the new D-Series VM SKUs, aimed to provide 60% faster CPUs, but based on the previous considerations, I expect a sensible improvement: the max IOPS limit per single disk is still at 500 IOPS, but scalability should be better;
New D-Series Virtual Machine Sizes
http://azure.microsoft.com/blog/2014/09/22/new-d-series-virtual-machine-sizes
- IMPORTANT: Do not use standard Windows Server disk striping technology, it will not scale at all and will give you very bad performances!
- Specifically for SQL Server, the performance difference between using multiple SQL Server database data files vs. storage space with multiple disks is negligible: use the storage space solution if you prefer to have a simpler SQL Server configuration. For transaction log, instead, if you need more than 500 IOPS, you have to use storage spaces, no other way to increase I/O performances; more details are available in the white paper I mentioned above.
- Be sure to disable Azure storage geo-replication for the accounts where the disks used for the storage pool reside: geo-replication is asynchronous and Azure will not guarantee replication orders among different disks/blobs. This will also provide you a 33% cost reduction for the storage consumption.
- Before installing and configuring SQL Server in Azure VM environment, be sure to read the following article:
Performance Considerations for SQL Server in Azure Virtual Machines
http://msdn.microsoft.com/en-us/library/azure/dn133149.aspx
After this pretty long prologue, let me start with the real scope of this post, that is emonstrating how “Storage Spaces” and Pools) can be easily exported from one Azure VM to another or how the entire configuration can be recovered in case of a non-recoverable VM
crash. If you already needed to find a solution to this problem and searched over the Internet, probably you found the article below from my colleague Martin Lucas:
Windows Server 2012: How to Import a Storage Pool on another Server
As you can read in the article, it seems pretty easy to migrate (or recover) a storage pool from a server to another (no Azure mentioned here), but there are some steps to do, even if they are simple, to obtain a final good result. Please note that in my case the scenario is quite
different:
- I used Windows Server 2012 R2 instead of Windows Server 2012
- I used Azure VMs instead of on-premise physical or virtual servers
- Most important, I shut down the target VM before attaching all the disks
As I will demonstrate you in a moment, I was able to migrate an entire storage pool/space from an Azure VM to another Azure VM, without any corrective action and (obviously) preserving all the data allocated inside the storage space. Additionally, I will also show you that existing NTFS permissions and disk quotas will be preserved, but you will lose the share definitions.
Initial Configuration
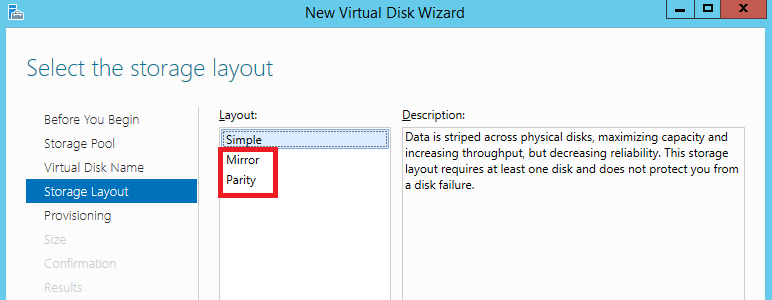
I started creating a simple Azure VM with three additional empty data disks attached. Once booted up the VM, I executed simple steps to create a new storage pool, then a new virtual disk using “Simple Volume” (RAID-0) as the storage layout, finally a new volume on that disk. To test the procedure, I also put 10GB files into the disk, then created an SMB share, added some NTFS permissions and configured disk quotas. Nothing special in this preparation procedure, but there is a very interesting detail that I want to highlight: when you create the new virtual disk on top of the storage pool, do not use “Mirror” or “Parity” storage layouts to protect your data, instead use “Simple”. Azure storage will take care of that natively maintaining (locally) three copies of the underlying blobs. Nice!
At the end, this is the final layout I created:
Performances
In order to have maximum performances, when you create a new virtual disk onto the storage pool, be sure to use “New-VirtualDisk” Power Shell cmdlet and not the GUI, then specify the following parameters and values:
- “ -NumberOfColumns”: this parameter specifies the number of underlying physical disks across which one stripe of data for a virtual disk is written, should be set to the number of Azure data disks that the underlying storage pool is composed of.
- “ -Interleave”: this is essentially the number of bytes written to each underlying Azure data disk (stripe); for OLTP workload use a value of 64KB, for Data Warehousing workload use 256KB; it represents the number of bytes that is written to a single physical disk in the storage pool.
Additionally, if your workload is not log-intensive and does not need dedicated IOPs, you can configure just one storage pool. Otherwise, for VMs allowing more than four disks to be attached, place data files and log file on separate storage pools. Depending on whether your workload is data or log sensitive, you can adjust the number of disks dedicated to data files or log file storage pool accordingly. An example of cmdlet usage is reported below, for a hypothetical storage pool composed by four Azure data disk and designed to support OLTP workloads:
New-VirtualDisk -FriendlyName MyVirtualDisk1 -StoragePoolFriendlyName MyStoragePool1 -Interleave 65536 -NumberOfColumns 4 -ResiliencySettingName Simple –UseMaximumSize
For more details on Power Shell cmdlet for storage spaces and related objects, see the link below:
New-VirtualDisk Power Shell Cmdlet
http://technet.microsoft.com/en-us/library/hh848643(v=wps.630).aspx
Preparing for Recovery
Before trying to destroy your original VM, or in case you need to prepare for disaster recovery, it is highly recommended to collect and store some useful information in a secure place, ready to be used for quick recovery. Here Power Shell is your best friend because you can save your full VM configuration and disk layout in a single script and with some minor modifications, you can replay it to rebuild your disaster recovery VM. If you use the Azure Portal GUI to create your VM, be very careful when you attach the additional Azure data disks:
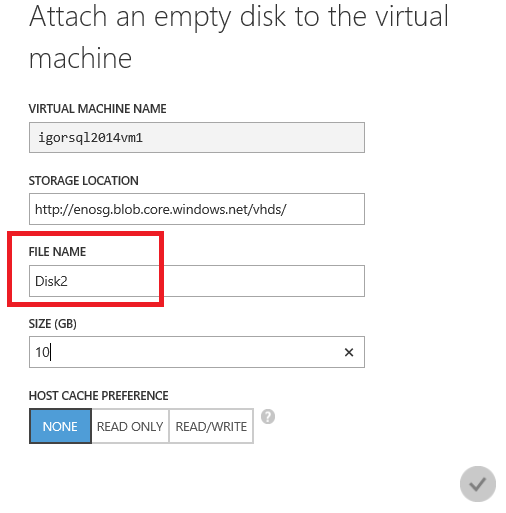
When you will need to attach these disks to a new VM, you will be asked to provide not the file name as shown in the print screen above, instead you will need to use the “DiskName”. If you don’t want to lose your time navigating in the Azure Portal through dozens or hundreds of files in the default “VHD” container, I strongly recommend you to use Power Shell to retrieve the necessary information, as in the example below:


Another advantage on using Power Shell is that you can specify the LUN for each disk that you will attach: in order to minimize recover operations on the new VM, it’s highly recommended to use the same LUN. This is all what you need at the end: the disk names, LUNs and the location in the Azure Blob storage.
Recovery Process
What you should do as first step for recovery, or if you simply want to export the storage space on a different VM, is ensuring that the disks are dismounted, very easy to do in Power Shell:

The second step, provided that you already prepared a second VM (using Power Shell), is attaching the original Azure data disk: it’s very important that until this operation is completed, you will not start this VM, otherwise you may need additional steps to recover the storage space.

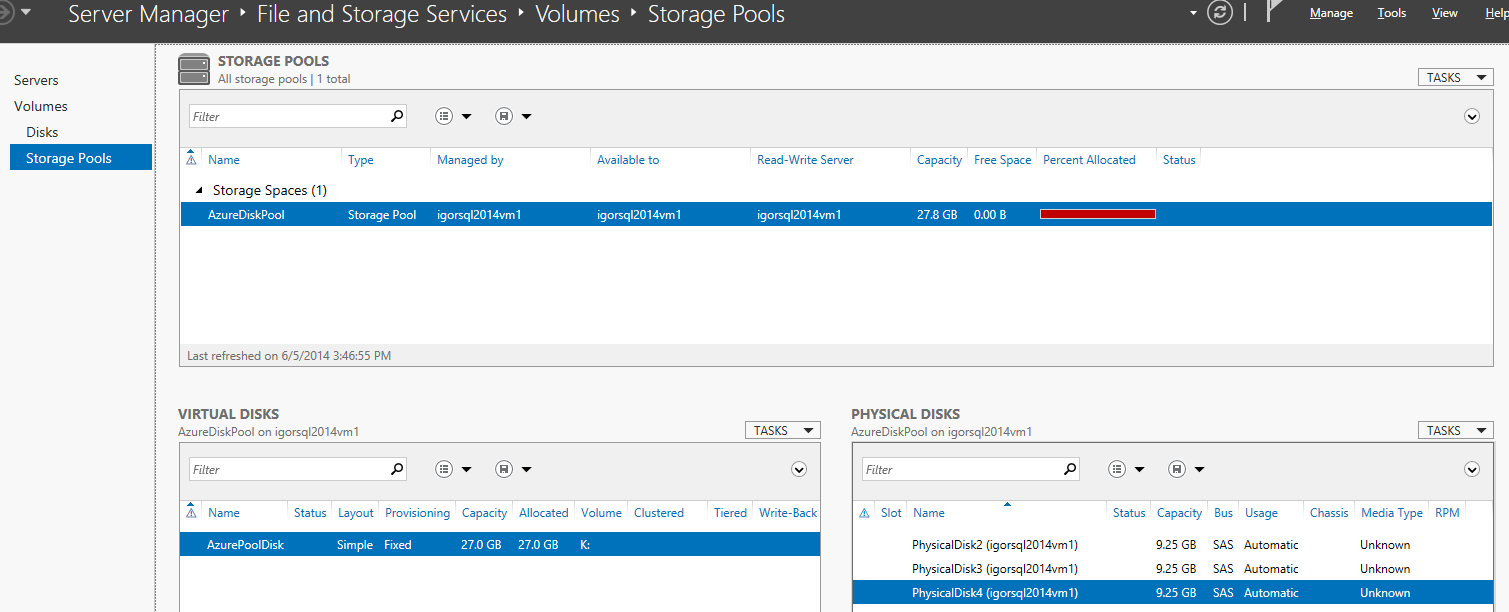
Nothing else is required, the operation will take few seconds. Now, you can start the new VM and check the result. After accessing the VM using RDP, open the Server Manager tool, go to “File and Storage Services” --> “Volumes” --> “Storage Pools” and look at the screen that should resemble as the one below:
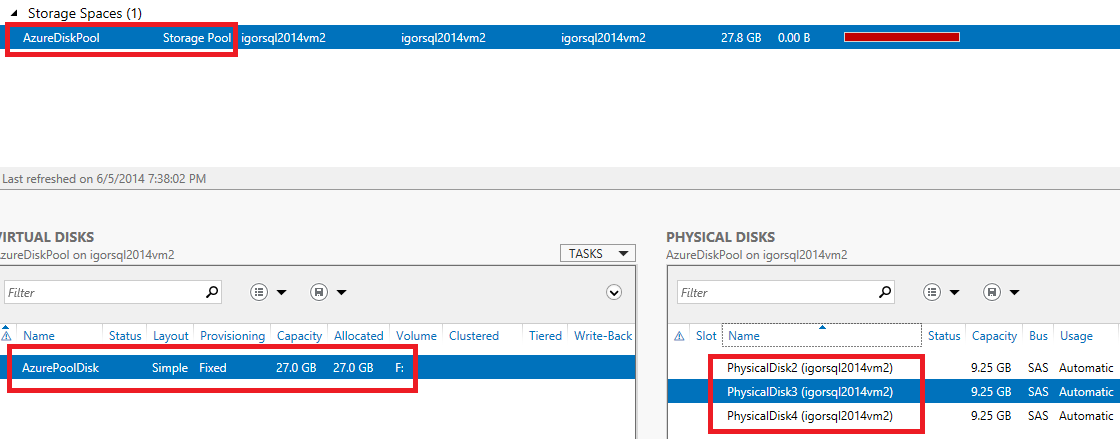
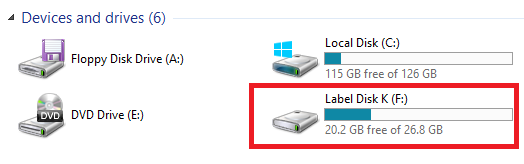
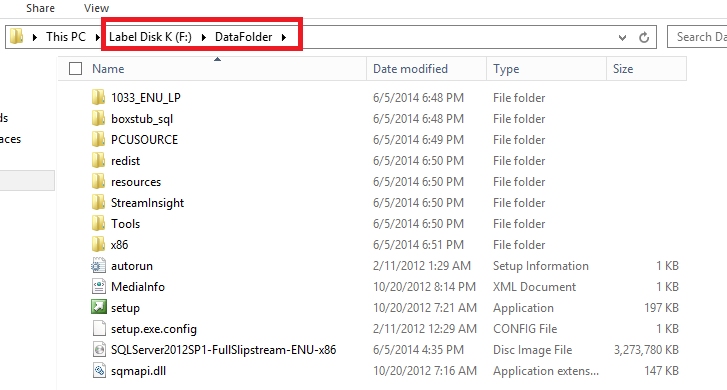
As you can see, everything is in the right place and in healthy status with no warning/error signs: all the physical disks are in there, the storage space is ok, the storage pool is online and also the virtual disks are online and healthy! What about the volume and its content? Everything is there and accessible:
Everything seems to be perfectly in the right order, but a little corrective action maybe required: actually, and it is a weird problem sometimes, when you attach an Azure disk to a VM, you cannot specify the drive letter assigned! The standard behavior is that the target VM will assign the first available drive letter, you can only change it later, but you cannot specify in advance. As I have just shown you, every configuration information necessary to recover the storage space survived to the moving operation, this means that all these information are stored on the physical disks and this is what makes possible such a smooth migration. In addition to that, also NTFS permissions (pretty obvious) and disk quotas (as you can see below) are preserved:

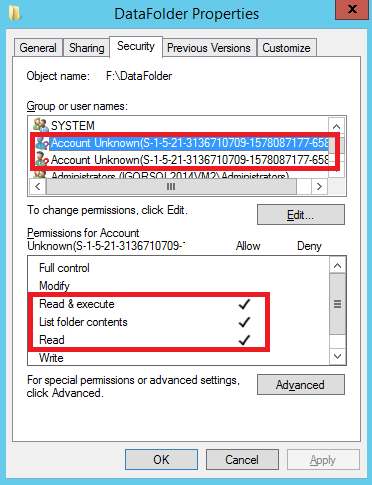
Do you see a small problem in the two print screens above? The account names are not resolved anymore, only orphaned SIDs are shown: since I did not use an Active Directory domain for the two VMs, I lost the user mapping. ACLs are still there, but cannot be resolved anymore. Obviously, if you want to avoid this kind of problem, or avoid manual reconfiguration of permissions, you need to join the two VMs to a domain. Finally, what about the SMB shares defined on this volume? Unfortunately, this information is not stored on the physical disks, but in the OS registry then it is lost in this kind of situations: the only way to preserve and migrate them, is to prepare in advance a script and replay on the target VM.
Coming to the conclusions, Windows Server 2012 R2 “Storage Spaces” is a great feature that works really well also in the Azure Virtual Machine context, where portability of storage and fast disaster recovery are desired and necessary qualities. And just to remark an important aspect: what I have shown here in this post is absolutely supported!
That’s all folks, as usual you can follow me also on Twitter ( @igorpag).