Azure Architectural Pattern - Implementing Master-Slave Model in IaaS
During the last two years, I had the privilege to work with some important Microsoft Global Partners, all over the world, on several important Azure projects. Since I personally like to share my findings and let the broader community to learn from my experiences, in this blog post I decided to discuss an interesting architectural pattern to overcome to one of the most known Azure Load Balancer (LB) limitation, which is the implementation of a MASTER-SLAVE architecture. In this post, I will concentrate my attention on Azure IaaS Virtual Machines (IaaS VM). I am sure that at many of you already know that the Azure Load Balancer (LB) is great providing load-balancing on incoming connections/requests among a pool of VMs, but what happen if you need:
- Only one “active” VM at time (the MASTER) must serves all the incoming connections/requests;
- The “passive” VM (the SLAVE) must be ready to take over processing only when the MASTER is down;
- The failover mechanism for routing Incoming connections/requests must be transparent to users/clients and other tiers in the application architecture;
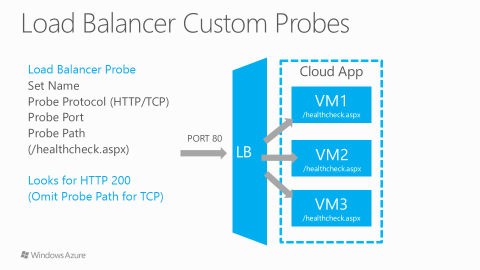
The first idea that probably comes in mind is to leverage Azure LB “Load-balanced Endpoint” and “Custom Probes” but there are at least a couple of problems:
- “Custom Probes” will only ensure that failed (monitored) VM or service will be pulled out from Azure LB rotation, then not servicing incoming requests anymore, but will not ensure that only one VM at time will respond.
- You will have to modify the application/service to solve the previous mentioned “Custom Probes” limitation, then effectively building the logic of MASTER-SLAVE pattern inside the code itself. As you know, modifying the application code is often not a viable option when you are (to choose to be) on IaaS model.
You can read more on LB “Load-balanced Endpoint” and “Custom Probes” at the links below:
Windows Azure Virtual Machines (slides 31-36)
Windows Azure Virtual Machines
http://michaelwasham.com/2012/06/08/understanding-windows-azure-virtual-machines
Now, let me show you immediately a diagram of the solution I designed for one of my partner application, consisting of several tiers requiring each tier (server role) to connect to the others:
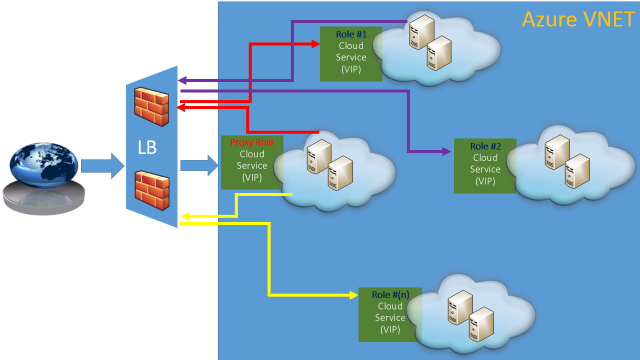
Here is what you need to know about this diagram:
- (ONE) Cloud Service per server role: this will ensure that references of/to each role will remain constant over time since the associated (1) Virtual IP address (VIP) will be tied and reserved as long as the Cloud Service exists.
- Be aware that only DNS names associated to VIPs are guaranteed to persist, not the underlying IPs.
- Each cloud service contains (TWO) VMs, one as MASTER and one as SLAVE.
- Only the MASTER will receive incoming requests from other tiers/roles.
- (ONE) special role, as an additional Cloud Service, is provided and will act as a Proxy Gateway that will route all users/clients request coming from the Internet.
- All Cloud Services for the same tenant will be grouped together in the same Azure Virtual Network (VNET) in order to provide:
- Full internal connectivity using DIP (Direct IP, internal IP addresses);
- The possibility to connect to on-premise networks using Azure Virtual Private Network (VPN);
- Self-containment for eventual Active Directory Domain and DNS name resolution (not used here).
- Each Cloud Service/Role will communicate with others using external/internet-facing VIP to leverage master/slave mechanism, then network traffic will pass through the Azure LB.
Obviously, the overall picture is not complete, you need to know how each role/cloud-service is structured internally, then let me introduce a second diagram below:
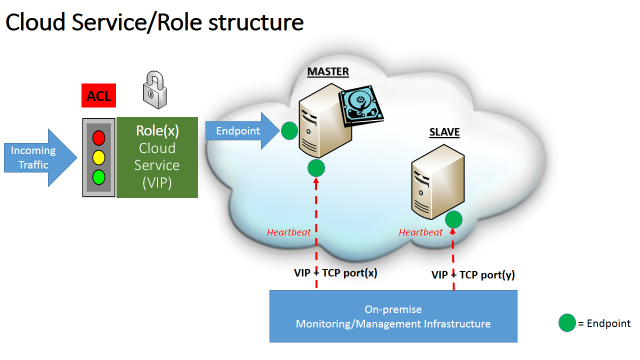
As provided above, here are the details of this picture:
- Since all cloud services are exposed to the Internet, Azure Access Control List (ACL) will be used restrict traffic, for each cloud-service, only to the admitted roles that effectively need to talk each other.
- For more information on ACL in Azure and for an example using Power Shell, see the links below:
About Network Access Control Lists (ACLs)
http://azure.microsoft.com/documentation/articles/virtual-networks-acl
SQL Server 2012 AlwaysOn Availability Group and Listener in Azure VMs: Notes, Details and Recommendations
- The unique endpoint shown in the diagram is a stand-alone endpoint, not a “Load Balanced” one, then it’s specific to the MASTER VM and will not admit traffic to the SLAVE VM.
How to Set Up Endpoints to a Virtual Machine
http://www.windowsazure.com/en-us/manage/windows/how-to-guides/setup-endpoints
- An on-premise (external) monitoring and management system will be used to periodically check the status of both VMs and service health in the MASTER VM (heartbeats): if the VM, or the service inside the MASTER VM, will not answer to the heartbeats, the monitoring system will perform a “failover” to the SLAVE VM that will become the new MASTER (more details on the logic will be provide later).
- What I described above is a perfect disaster recovery mechanism, but this system can be used for any usage pattern requiring master-slave model.
- Please note that the monitoring port endpoints must be different since you can’t have two endpoints, in the same cloud service, created on the same TCP port.
- In my specific scenario, the monitoring infrastructure is an external “authority” located on-premise due to project requirements, but it can be also located in another separate cloud service in Azure.
It is worth noting that the disk storage required for the service/application data storage is attached to the MASTER VM only and will be moved to the SLAVE VM as part of the failover process that will be described later. Now you have all the information to understand my proposed solution, I hope that details provided are enough to let you understand the mechanism, but in order to effectively demonstrate how this is expected to work, let me go over a small series of slides that will clarify the deployment and failover mechanisms.
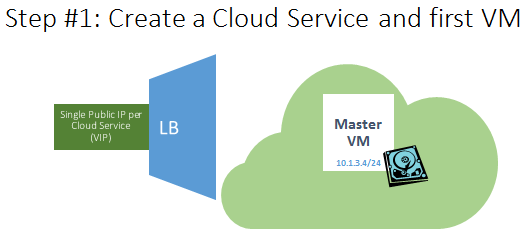
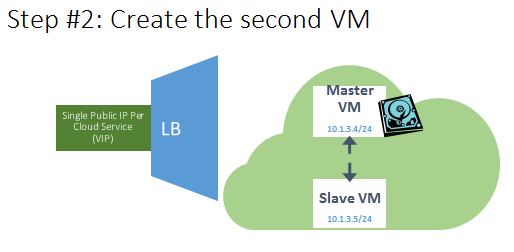
- The MASTER VM is created inside a new cloud service, based on an Internet facing/valid DNS name that will be persisted and reserved.
- VM will be part of a new Azure VNET, and will get a DIP assigned;
- Cloud service will get a VIP address that may change;
- VM will be part of a new Azure “Availability Set” used to guarantee high-availability in conjunction with the SLAVE VM that will be created later:
Manage the Availability of Virtual Machines
http://www.windowsazure.com/en-us/manage/windows/common-tasks/manage-vm-availability
- One of more Azure disks will be created and attached;
- No endpoint defined yet to allow traffic;
- We can assume, for brevity, that the application is installed inside the VM using a custom start-up script or already included in a SYSPREP’ed image, but not started yet:
Creating and Uploading a Virtual Hard Disk that Contains the Windows Server Operating System
http://www.windowsazure.com/en-us/manage/windows/common-tasks/upload-a-vhd
- The SLAVE VM is created
- Joined to the same “Cloud Service”;
- Joined to the same “Virtual Network” (VNET);
- Joined to the same “Availability Set”;
NOTE: No endpoint defined yet to allow incoming traffic;
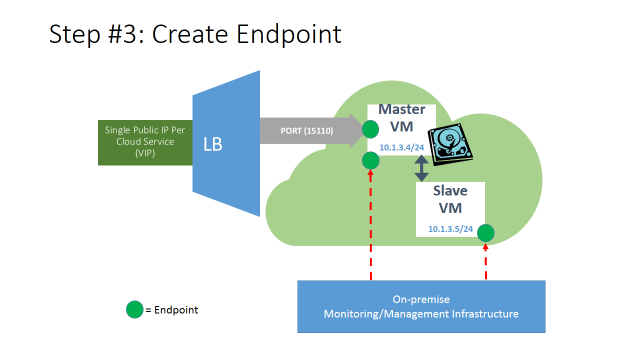
- Stand-alone input endpoint created on the MASTER VM only, for the TCP/UDP application port (in this case 15110);
- It will permit incoming traffic only to the MASTER VM, no traffic to SLAVE VM no load-balancing by Azure LB;
- It can be created using a single Power Shell command (or REST API call) as shown below:
Get-AzureVM -ServiceName $cloudservicename -Name $mastervm |
Add-AzureEndpoint -Name "APP-PORT" -Protocol tcp -LocalPort 15110 -PublicPort 15110 |
Update-AzureVM
- Stand-alone input endpoints created on the MASTER and SLAVEVMs to let the on-premise management and monitoring infrastructure to access and control the application inside the VMs.
- At this point, the on-premise management and monitoring infrastructure will start the application only on the MASTER VM and then this role is ready to serve incoming requests.
- Additionally, it will start monitoring service health on the MASTER VM, ready to apply failover procedure on the SLAVE VM in case of any problem.
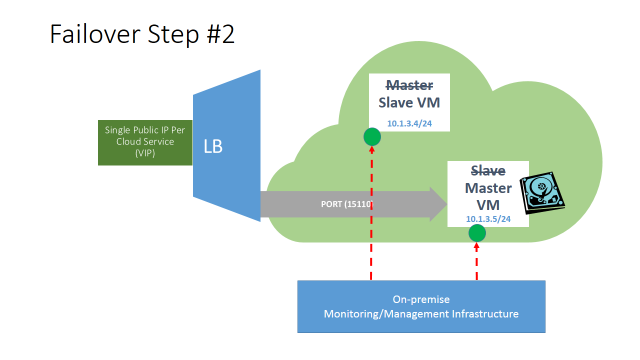
Now, when the steps described above will be completed for all the cloud-services/roles that compose the application deployment, the on-premise management and monitoring infrastructure will constantly poll the cloud resources and this is what will happen in case of any failure inside the MASTER VM:
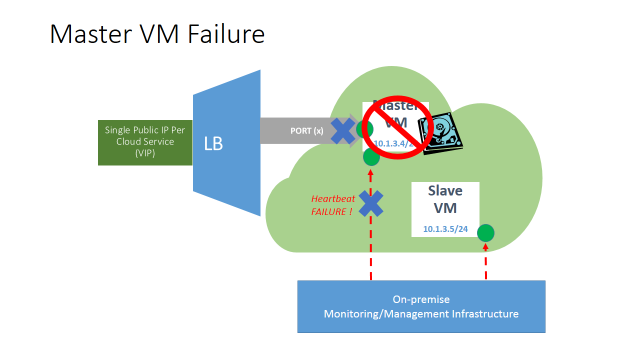
Once the monitored service inside the MASTER VM, or the VM itself, will crash or stop responding to the heartbeats, the on-premise management and monitoring infrastructure will detect and kicks the planned failover procedure:
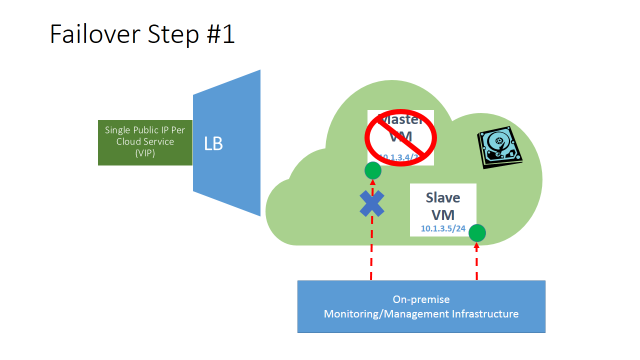
- On the MASTER VM, remove stand-alone input endpoint from the MASTERVM for application traffic.
- At this point, and for a short period of time, no incoming application traffic will be permitted and crashed VM will be isolated.
- An example of Power Shell command to achieve this action is reported below and will typically take between 5 – 10 seconds to complete:
Get-AzureVM -ServiceName $cloudservicename -Name $mastervm |
Remove-AzureEndpoint -Name "APP-PORT" |
Update-AzureVM
- On the MASTER VM, detach disk storage (Azure disk/s) where application data resides.
- It can be easily accomplished using the Power Shell command listed below and will typically take between 10 – 15 seconds to complete:
Get-AzureVM -ServiceName $cloudservicename -Name $mastervm |
Remove-AzureDataDisk -LUN 0 |
Update-AzureVM
- The SLAVE VM will be now logically promoted to MASTERVM by the on-premise management and monitoring infrastructure.
- The former MASTER VM, once recovered/re-imaged, will assume the role of SLAVE VM and heartbeat will be re-established, additionally the application will be maintained in a stopped state.
- On the new MASTER VM, the disk storage (Azure disk/s) where application data resided, that has been previously detached, will be attached here:
Get-AzureVM -ServiceName $cloudservicename -Name $slavevm |
Add-AzureDataDisk -DiskName "AppDisk1" -Import -LUN 0 -HostCaching None |
Update-AzureVM
IMPORTANT: The attach disk operation may fail if it is called too quickly after detach. This may happen because the detach disk operation will return successfully when the update has been accepted by the fabric controller, but the disk may still be in use on the old VM. In order to be sure the operation will be successful, use a code section like the sample below before attaching individual disks:
do {$disk = Get-AzureDisk -DiskName MyDisk} while ($disk.AttachedTo -notlike "")
On the new MASTER VM, the application will be started.
Now, on the new MASTER VM, a new stand-alone input endpoint will be added/created to allow application traffic to reach the application already started in the previous point.
- At this point, incoming application traffic will be permitted again and request/workload processing will resume.
- An example of Power Shell command to complete this action is reported below and will typically take between 5 – 10 seconds to complete:
Get-AzureVM -ServiceName $cloudservicename -Name $slavevm |
Add-AzureEndpoint -Name "APP-PORT" -Protocol tcp -LocalPort 15110 -PublicPort 15110 |
Update-AzureVM
As you can see, the overall process is pretty straightforward and can be fully automated using Power Shell or Azure Management REST API directly. The approach to use an external monitoring and management system will permit to do not modify the application, as you probably want, since you are using IaaS instead of PaaS. But there are several other advantages, especially when compared to other Cloud vendors that provide a special mechanism that will dynamically bind/unbind a VIP to Cloud Services, permitting a similar MASTER-SLAVE pattern:
- This solution is available today using current Azure available features.
- As you can argue, today Azure does not have this type of dynamic or floating IP behavior, but as I demonstrated here in this blog post, you don’t need it.
- The failover time of the proposed architecture is really quick, less than one minute compared to several minutes required by other cloud vendor solutions, mainly caused by necessary DNS propagation delay.
- Reserved VIP is not required, immutable references necessary to the failover mechanism are provided using Cloud Service, internet facing, DNS names.
- This solution is cheaper since does not require additional features (reserved IPs, floating IPs) that typically involve additional costs.
Additionally, other characteristics are in common with other cloud vendor solutions:
- This model is valid for any kind of application/service and solves the problem of replicating application data between multiple instances;
- ACLs need to be applied to restrict incoming network traffic;
- Full internal network connectivity (over DIP) can be guaranteed using Azure VNET;
- On-premise hybrid network connectivity can be supplied using Azure VNET VPN;
- A small overhead is always present, since network traffic must traverse some kind of routing device to provide redirection used by the failover mechanism;
- Since network communications between different roles, inside the same tenant deployment, will pass through the front-end load balancer, it will count toward i-gress network bandwidth, then with an additional network cost.
Best regards.