Create a SQL Server 2014 Database directly on Azure Blob storage with SQLXI
Last week, at SQL PASS summit, Microsoft announced availability of SQL Server 2014 CTP2, highlighting the following items:
- SQL Server 2014 CTP2 release – a feature complete CTP with new capabilities and enhancements for In-Memory technology that drives mission critical performance as well as new enhancements for hybrid cloud scenarios including backup to Windows Azure and disaster recovery to Windows Azure.
- SQL Server Backup to Windows Azure Tool preview – extends backup to Windows Azure hybrid scenario to previous versions of SQL Server.
- SQL Server for Data Warehousing in Windows Azure VMs –deploy a SQL Server Enterprise image that has been customized and tuned for the data warehousing workload as a Windows Azure Virtual Machine.
Very nice for Azure… But there is something, in my opinion very important inside CTP2, in the Azure IaaS VM context, which is worth noting over the others, that is what is called “SQL XI”!
What is “SQL XI”? Well, don’t make the mistake to read “XI” as ancient Romans, it is not…. Read it as “xStore Integration”! I’m not joking with you, then I will also tell you that “xStore” is the internal name of Azure Blob storage… Now you got it? YES, this SQL Server 2014 feature (integration) will give you the possibility to create a database and its related data and log files directly on Azure Blob storage, without passing through Azure data disks!
Still confused? Look at the picture below:

This is a feature introduced in CTP2, then if you want to play with it, you need to download it from the link below:
Microsoft SQL Server 2014 Community Technology Preview 2 (CTP2)
http://technet.microsoft.com/en-us/evalcenter/dn205290.aspx
You can find detailed info on SQL Server Integration with Windows Azure Storage in the following section of SQL Server 2014 Books Online:
SQL Server Integration with Windows Azure Storage
http://msdn.microsoft.com/en-us/library/dn385720(v=sql.120).aspx
The first question that may raise in your mind would be probably: why the SQL Product Group made it? Based on my understanding, these are valuable reasons:
- Scalability: using this method, you can bypass the limitation on the maximum amount of Azure disks you can mount on a VM (16); I didn’t test right now, but I’m expecting to be able to reach the theoretical on-premise maximum of 32767. In addition to that, since every Azure disk is targeted to provide 500 IOPS, you can scale (on data files) up to the desired/required amount of IOPS; please note that every file cannot exceed 1TB size. You can read more on Azure IOPS at the link below:
Performance Guidance for SQL Server in Windows Azure Virtual Machines
http://go.microsoft.com/fwlink/?LinkId=306266
- Portability: in this form, it’s very easy to detach a database from an Azure IaaS VM and attach the database to a different VM in the Cloud; this feature could be also suitable to implement an efficient disaster recovery mechanism since everything is directly accessible in the Azure Blob storage.
It is worth mentioning that SQL Server uses temporary leases to reserve Blobs for storage with a renewal of each Blob lease every 45 to 60 seconds. If a server crashes and another instance of SQL Server configured to use the same blobs is started, the new instance will wait up to 60 seconds for the existing lease on the Blob to expire. To remove/break the lease for emergency reasons or troubleshooting, it’s possible to manually do that using “Lease Blob” REST API or the following example application that is ready for you:
Azure Blob Lease
https://github.com/gbowerman/azurebloblease
An interesting architectural consideration is that the path to the Azure storage is different using this new feature. While using the traditional Azure data disk, and then creating a database on it, I/O traffic will pass through the Virtual Disk Driver on the Azure Host node, using
“SQLXI” it will now use the Virtual Network Driver:
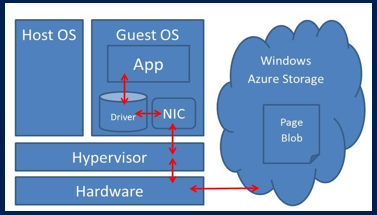
Why this is interesting and gain more performances? For the following reasons:
- Now SQL Server is able to run native REST API calls to the Azure Blob storage directly from inside the VM;
- These REST API calls are now no more limited to 128KB blocks as in the case of using Azure disks;
OK, it’s now time to finish with digressions and start with the step-by-step procedure…… Want to try immediately with this feature? Obviously you can find instructions on the links below, but there are several aspects not clarified and some un-answered questions, then I would recommend you to follow my step-by-step list below. First of all, you need to create (if not already available) an Azure storage account, and then create a container with “Private” security access:
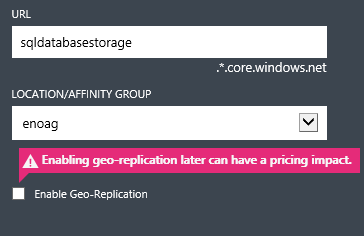
IMPORTANT: For performance reasons, it’s highly recommended to create the storage account in the same datacenter as the Virtual Machine where you will install SQL Server 2014 CTP2, or use the same “Affinity Group”.
Since you will use at least two blobs, one for data file and one for log file, it’s recommended to disable Geo-Replication since it’s not supported for SQL Server, in this way you can save 30% over your storage costs. I have been asked several times by customers and partners why this, the reason is simple: there is no ordering guaranteed in asynchronous storage replication, then may happen that writes to the data file blob would happen before the writes to the log file blob, then violating the fundamental principle (requirement) of every transactional database system including SQL Server, that is “Write-Ahead Logging” (WAL), as you can read in the super-old but still valid KB article below:
SQL Server 7.0, SQL Server 2000, and SQL Server 2005 logging and data storage algorithms extend data reliability
http://support.microsoft.com/default.aspx?scid=kb;en-us;230785
Now, you need to create a container for your atabase with “Private” security ccess level, if you want to avoid strange errors, always use lower case etters with Azure storage names, including blobs:
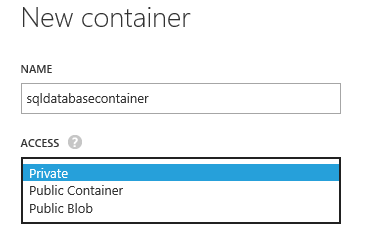
Note that my container has a full path equal to “**http://enosg.blob.core.windows.net/sqldatacontainer**”, his is important to remember when you will use Server Management Studio later this post.
Even if the same container can be used my multiple databases, I recommend to create only one per container since the security mechanism that I’m going to show you, it’s based on the container itself. The next step is to create a policy and a Shared Access Signature (SAS) to protect and secure the container, please note that this is not optional, SQL Server requires it in order to work correctly with the Azure storage. There are several ways to create the policy and the SAS, but since I don’t want to write C# code for this simple task or use complex REST APIs, let me use a nice tool called “Azure Storage Explorer” that you can find here: http://azurestorageexplorer.codeplex.com .
Install the tool and open it, then insert the name and master secret key of your storage account. If the operation will succeed, you should see the content of your storage account, along with the list of your containers, be sure to select the one you want to use to place your database in, then click on the bottom “Security” button:

In the dialog shown below, click on the “Shared Access Policies” tab, then create a new policy as shown below, at the end be sure to click on the “Save Policies” button:
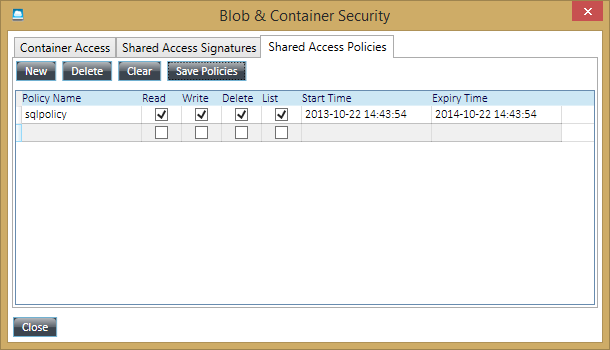
In some documentation you can find in Internet, “Delete” is not listed as a privilege requirement, but if you want the possibility to DROP the database from SQL Server, you need to include it in the policy definition. Regarding the “Expiry Time” for the policy, even if is
technically possible to have an infinite lease (see the URL below), it’s recommended to use a fixed limit in time (1 year in my example above) and then renew periodically:
New Blob Lease Features: Infinite Leases, Smaller Lease Times, and More
If you want to know more about SAS and Blob storage and containers, see the link below:
Shared Access Signatures, Part 1: Understanding the SAS Model
http://www.windowsazure.com/en-us/manage/services/storage/net/shared-access-signature-part-1
Now, you need to close the dialog and re-open, otherwise switching directly to the “Shared Access Signatures” tab for the next step will now let you see the newly created policy. After re-opening the “Security” dialog, go the “Shared Access Signatures” tab and the select as shown below:
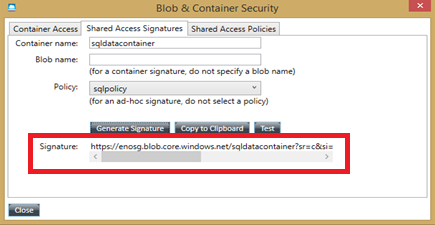
Then, click on the “Generate Signature” button and look at the string created in the “Signature” edit-box: click on the “Copy to Clipboard” button and paste the string in a secure location for later reuse. Finally, exit the tool, you will not need it anymore.
Now it’s finally the time to open SQL Server Management Studio inside the Azure Virtual Machine (VM) you created to test “SQL XI” integration, the first thing you have to do here is create the SQL credential objects necessary to properly access the Azure blob container you
created before. A SQL Server credential is an object that is used to store authentication information required to connect to a resource outside of SQL Server. The credential stores the URI path of the storage container and the shared access signature key values. For each storage container used by a data or log file, you must create a SQL Server Credential whose name matches the container path. Please, read it again: the credential name string must be exactly the same as the Blob container path, otherwise SQL and Azure will not match the security information. Just to give you a practical example with the storage container I created above, the right full path to use is, including HTTPS prefix, http://enosg.blob.core.windows.net/sqldatacontainer and this is the credential object name you have to create in SQL Server Management Studio, enclosing it in square bracket:

NOTE: Obviously I used a random and not valid signature, then don’t try to use it.
If you don’t want to use TSQL and prefer GUI, you can use the “Credentials” node in SQL Server Management Studio (under instance level “Security” container) and create a new one here. You can do that, but you need to specify a particular value “SHARED ACCESS SIGNATURE” for parameter “Identity” as shown in the picture below:
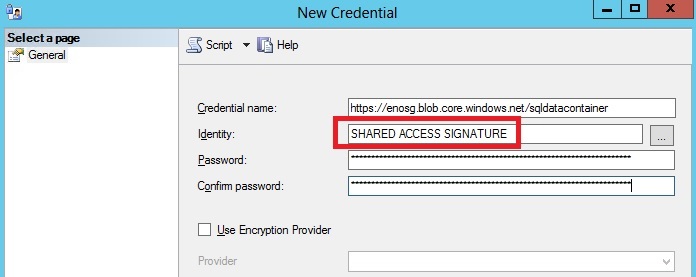
Finally, in the "Password" you need to specify the SECRET value obtained by the Shared Access Signature (SAS) policy as explained above.
An important note on the signature. The string you copied from “Azure Storage Explorer” is something like this:
But the part that you need to include in the “SECRET” clause of the TSQL statement above is only the substring starting from [ ? ] until the end, as shown below:
sr=c&si=sqlpolicy&sig=9aoywKCSbX4uQrIGEWIl%2Bfh3cMtEm5ZA3fSDxh2wskajd7
Once the command will be executed, this credential will be saved in the SQL Server MASTER database in an encrypted form, then don’t worry about security, but take care of MASTER database backup regularly. Before proceeding further, let me show you a hidden gem in SQL Server Management Studio with a single print screen that I’m sure you will recognize:
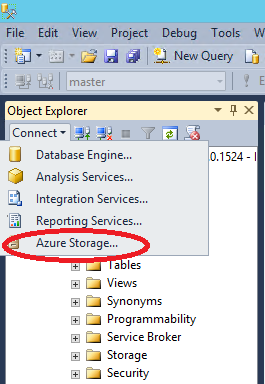
You got it! Now in SQL Server 2014 Management Studio (SSMS) it’s possible to connect (and register) to Azure Blob storage accounts, as shown in the dialog below:
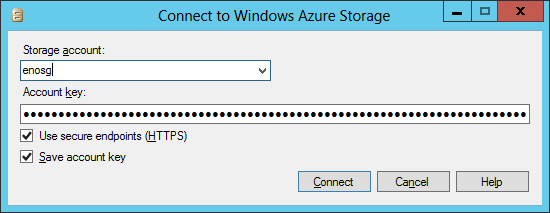
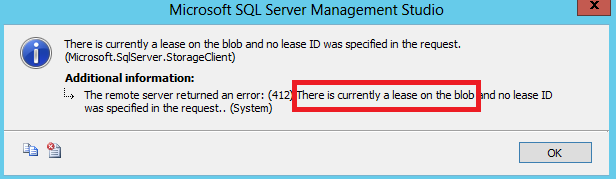
Also in this case, any secret will be stored in a secured way in the SQL Server MASTER database. This is a nice new feature in SSMS, unfortunately the operations you can do on the storage accounts are limited to list and see the containers/files, and eventually delete them: I really hope that in a future SQL Server 2014 service pack, the possibility to generate SAS policies and signatures will be added, avoiding the usage of external tools or code. If you try to delete any file that it’s in use, you will receive the following error:
Now, it’s finally the time to create your first database using the TSQL command below:
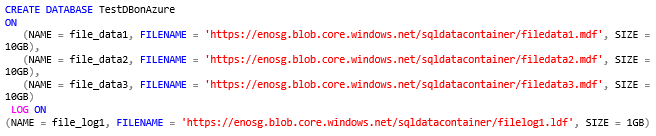
NOTE: Just for your information, this command took 7 seconds to be executed. I also tested the creation of 100GB database data file with 10GB transaction log file and it completed in 17 seconds, and it seems pretty fast.
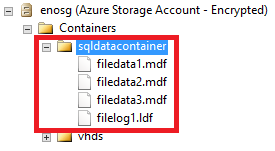
And this is the final result you can observe in SSMS:
Even if the Azure blob container has been create with “Private” security access level, and SAS policy and signature has been applied, it’s recommended to use the following security measures:
- Use HTTPS for encrypted communications;
- Use SQL Server Transparent Database Encryption (TDE) for storage encryption;
For more information on TDE, that’s fully supported also in this scenario, see the link below:
Transparent Data Encryption (TDE)
http://technet.microsoft.com/en-us/library/bb934049.aspx
Now that you have your SQL Server instance in an Azure VM and your database directly on Azure blob storage, let me point out something important related to database maintenance and life cycle:
- If you drop the database, also the blob files will be removed, then be careful;
- As on-premise, autogrowth may be detrimental for the database performances, then standard best practices apply also here;
- If you detach the database, SQL Server will release the “lease” on the Azure blob files immediately, as you can see using the Azure Portal and looking at the blob properties:

- If you take the database offline, as per detaching, SQL Server will release the “lease” n the Azure blob files immediately;
- As long as SQL Server will maintain a “lease” on the blob files, you will not e able to externally drop or modify or mount files in another SQL Server nstance: if you need to do that, you have to detach the database or stop SQL Server service;
- If you need to programmatically break the “lease” on database files, you can use a programmatic approach described in the post below by my good friend Francesco Cogno (Italy PFE), this will let you incorporate the necessary logic inside SQL Server itself:
Blob leases: how to break them from SQL Server (using SQL CLR and Windows Azure REST API)
- If you want to attach back a previously detached database, the GUI will not help you, you will need to use TSQL command;
NOTE: I just tried using the TSQL statement but I was not able to re-attach the database with any script, everything is failing with the error below. After internal investigations, we confirmed a bug in the public CTP2 build version release, I will update this blog post as soon the hotfix will be released:
Msg 5123, Level 16, State 20, Line 56
CREATE FILE encountered operating system error 123(The
filename, directory name, or volume label syntax is incorrect.) while
attempting to open or create the physical file
'https://enosg.blob.core.windows.net/sqldatacontainer/file2data1.mdf'
(NEW) : In order to solve this problem, you need to install the following post-CTP2 hotfix:
An on-demand hotfix update package is available for SQL Server 2014 CTP2
http://support.microsoft.com/kb/2907705/en-us
- A new performance counter object, called “SQLServer:HTTPStorage”, has been added to report information on Azure Storage integration, this is generally a good indicator that this feature is fully integrated in the SQL Server engine:
- The Azure Store Integration feature will be fully accessible/supported by SQL Server Power Shell module and SMO;
- There are some limitations on using this new feature, here is a list of the most interesting:
- Maximum file size for each file is 1TB: this limitation comes from Azure Blob storage, not from SQL Server XI;
- Filestream is not supported on Azure Blob storage;
- Additional files used by In-memory Hekaton feature are not supported on Azure Blob storage;
- AlwaysOn is supported as long as you don’t have to create additional files;
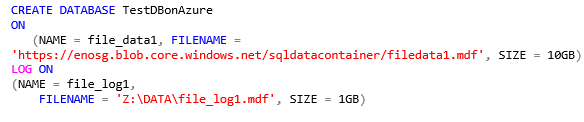
My final consideration is for the performance of transaction log file. Since SQL Server can use only one transaction log file at time, it’s not useful to create multiple ones on Azure Blob storage, as it’s valid also on-premise; in addition to that, the target performance you can reasonably expect from a single blob is 500 IOPS, then placing the transaction log there may be not a good solution for your database if you need more I/O power.How can we solve it? Well, until Azure Storage will not provide a feature like “Provisioned IOPS” (stay tuned!) to pump up I/O performances, the only possibility is to place the transaction log on a volume backed up by Windows Server 2012 Storage Space in stripe mode, created inside the VM. Adopting this approach, you will have to create your data files on Azure Blob storage using “SQL XI” feature, and leave the transaction log “inside” the VM, a TSQL command example is shown below:
For more information on Windows Server 2012 Storage Spaces and I/O scalability in Azure VMs, look at the white-paper below:
Performance Guidance for SQL Server in Windows Azure Virtual Machines
http://go.microsoft.com/fwlink/?LinkId=306266
That’s all folks, let’s move another piece of your data into the Cloud with SQL Server 2014 and Windows Azure.
Regards.