Deep-dive on New Azure FastTrack VM image (FTDW)
If you are a regular Azure VM Image Gallery visitor like me, probably you noticed that we recently introduced a new image called “SQL Server 2012 SP1 for data warehousing on WS 2012”:
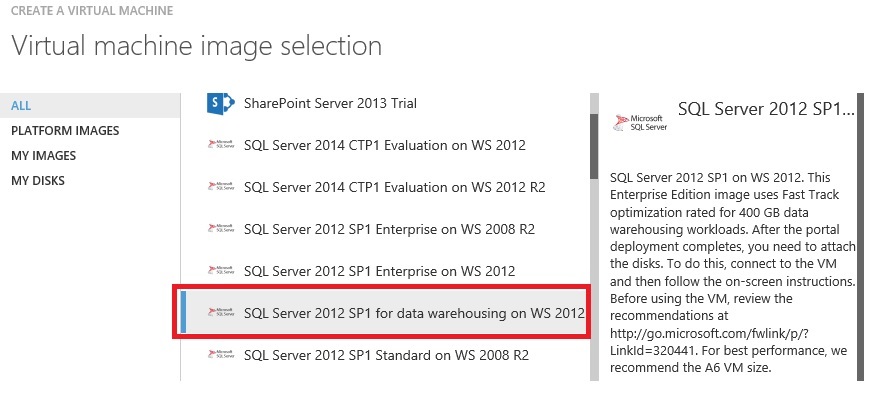
That’s really nice, I can deploy in few minutes a fully configured Azure VM as dictated by “Fast Track” architecture best practices! For whom that are not familiar with “Fast Track”, see the link below:
Fast Track Data Warehouse Reference Guide for SQL Server 2012
http://msdn.microsoft.com/en-us/library/hh918452.aspx
In short, Microsoft SQL Server 2012 Fast Track is a reference architecture data warehouse solution giving you a step-by-step guide to build a balanced hardware configuration and the exact software setup; in addition to that it provides step-by-step instructions on installing the
software and all the specific settings to configure for SQL Server and OS, including disk layout for optimal performances. This is well-known in the on-premise world, and also drives to acquisition and configuration of server hardware, in this case it’s not needed since we are in the Cloud, but specific knowledge is used, and applied, to maximize Azure investment returns.
NOTE: At the moment I don’t see any SQL Server 2014, but I’m sure it will come in once it will be officially released later next year.
As you can read in the side description, this image is optimized for data warehouse up to 400GB and, by default uses an “A6” VM size with 4 CORES and 28GB of RAM:
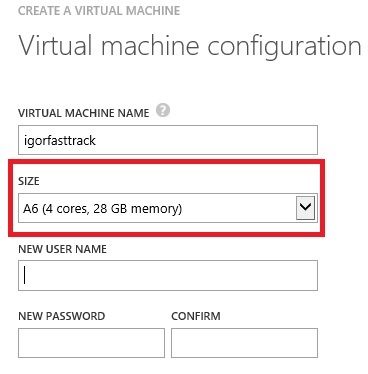
It’s interesting to note that the recommended size is already reported in the dialog as the default choice, this is what “Fast Track” reference architecture recommend, but you can easily change the VM size and use a bigger “A7” or, eventually, use a smaller one, even if not
recommended.
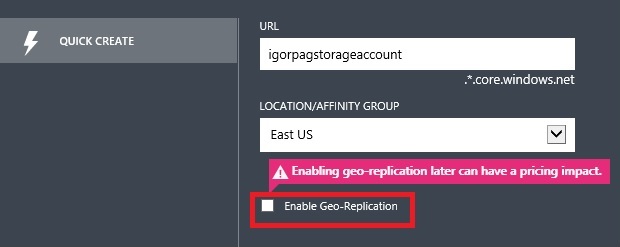
Hint: When you will be required to insert the Azure storage account to use for the VM creation, I recommend you to use a new one with “Geo-Replication” disabled to save 30% of costs. Why? The reason is simple: since the final VM configuration will use a Windows Server
2012 Storage Space, to spread the database data and log files over multiple disks (by default = 4 for A6 size) in striping mode, the asynchronous “Geo-Replication” storage mechanism cannot ensure strict ordering in writing to multiple blobs, then potentially impairing the physical integrity of the database (WAL requirement violation).
For more information on Windows Server 2012 Storage Spaces, see the link below:
Storage Spaces Overview
http://technet.microsoft.com/en-us/library/hh831739.aspx
The remaining part of the configuration does not present anything special, but I want to bring your attention on something that it’s already enabled in Azure VM creation since few months ago:
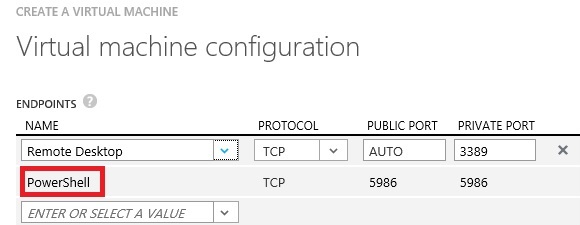
As you can see, remote Power Shell is enabled by default (and should remain as it is), and this is the key to the fully automated process that will run over the VM after Azure provisioning.
If you want to see a step-by-step procedure, please refer to Buck Woody’s blog post below:
Windows Azure Data Series: SQL Server Fast-Track Data Warehouse (FTDW)
Now, after Azure will complete the provisioning of the VM after few minutes, the work is not done, since the “Fast Track” automated configuration process still have to happen; here you have two choices, described below:
SQL Server Data Warehousing in Windows Azure Virtual Machines
http://msdn.microsoft.com/en-us/library/dn387396.aspx
- Use the Azure Portal (as I already started in the this post) to create the VM and attach disks;
- Use an “external” Power Shell script (“New-AzureSqlDWIaasVM.ps1”) instead of Azure Portal; downloadable from GitHub (https://github.com/WindowsAzure/azure-sdk-tools-samples/tree/master/solutions/infrastructure);
The Power Shell script is really nice, since it will take care of (almost) everything:
- Import Windows Azure module (needed to use Windows Azure PowerShell cmdlet)
- Import Azure publish settings (user account info etc.)
- Create Azure Affinity Group
- Create Azure storage account with geo-replication check
- Set Azure Subscription
- Get the latest (and correct SQL image)
- Create New Azure VM with additional empty Azure disks (and caching disabled)
Since the script will not do it automatically, if you use Power Shell instead of the Azure Portal, remember to:
- Create an endpoint for incoming SQL traffic;
- Create an Azure Virtual Network and join the VM to it, if required;
- Create an Azure Availability Set and join the VM to it, if required for multi-VM high availability;
Please be aware that the final image will be a standalone server in a workgroup, if you want/need to be a part of a Windows Active Directory Domain, you have to:
- Provision at least 1 Domain Controller in a separate Azure VM, but in the same Azure Virtual Network used for the SQL VM;
- Join manually the SQL VM to the Domain, or use a Power Shell script to do that at creation time;
Additionally:
- This script can also be used for SQL Server 2014 since it accepts the SQL Server version (2012 or 2014), then simply wait for the upcoming new image version and go!
- This inside the script there is also a reference to a new Azure VM size called “A8”, try to make an educated guess on what it is :-)
- When and if a new version of “Fast Track” image will be available, for SQL Server 2012 or 2014, the script will automatically use it without any modification to the provided code;
- Windows Guest OS Firewall and Windows Update are enabled by default;
Once completed one of the two alternatives above, only the first part of the process is finished, that is the Provisioning phase, a second phase for post-configuration (including SQL Server) is required. It’s interesting to note that this will happen entirely inside the VM by an automated mechanism that is based on a Power Shell script:
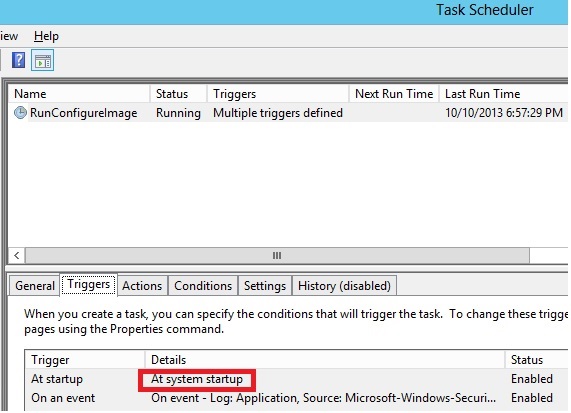
As you can see, the creators of this image inserted a schedule task on the guest OS to be ran at system startup and consists of two steps:
- Power Shell configuration script:
C:\Windows\System32\WindowsPowerShell\v1.0\powershell.exe -ExecutionPolicy Bypass -File "C:\Program Files\Microsoft SQL Server\DwIaas\ConfigDwIaaSVM.ps1"
- SQL Server Setup command line (default instance installation):
C:\Program Files\Microsoft SQL Server\110\Setup Bootstrap\SQLServer2012\setup.exe /ACTION=CONFIGUREIMAGE /IACCEPTSQLSERVERLICENSETERMS /INSTANCENAME="MSSQLSERVER" /Q
IMPORTANT: Do not try to modify that Power Shell script since it’s digitally signed, otherwise execution will fail.
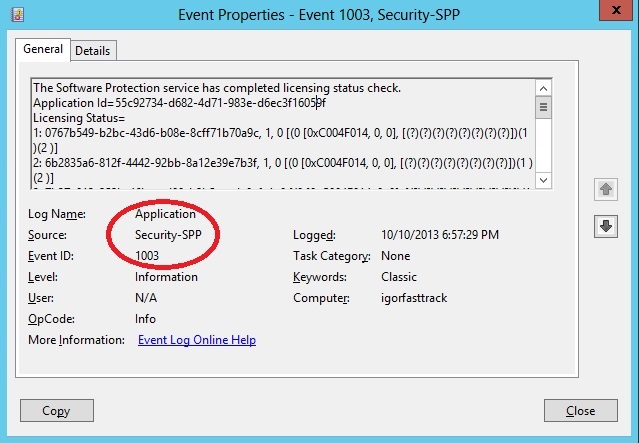
To be honest, there is another trigger action in the scheduled task, but I don’t understand the utility of this EventID 1003:
Now it’s time to give a look to the Power Shell script contained in the folder “C:\Program Files\Microsoft SQL Server\DwIaas”:
- The script will start again at each machine startup, then if you see a problem in the scheduled tasks, you can reboot the VM and try again;
- Based on the Azure VM size you used, the script will stay in an infinite loop until the exact number of disks will be attached, based on the table below:

IMPORTANT: This is not the list of maximum number of disks supported by Azure VM based on size, it is simply the number of disks recommended by “Fast Track” reference architecture.
- This is the message, shown in the “Log” sub-folder under “C:\Program Files\Microsoft SQL Server\DwIaas”, you will see until all the disks will be attached; as you can notice, the script is expecting exactly 5 disks (A6 VM size) of exactly 1023GB:
…..Waiting on new EMTPY disks size 1023 GB to be attached..., 0 out of 5 are Attached…..
- The 1023GB size, is the maximum single file supported size for Azure Blob storage, not a “Fast Track” limitation or requirement.
- Once you will attach the last expected disk, the Power Shell script will exit the wait loop and proceed forward:
Waiting on new EMTPY disks size 1023 GB to be attached..., 0 out of 5 are Attached
Waiting on new EMTPY disks size 1023 GB to be attached..., 1 out of 5 are Attached
Waiting on new EMTPY disks size 1023 GB to be attached..., 2 out of 5 are Attached
Waiting on new EMTPY disks size 1023 GB to be attached..., 3 out of 5 are Attached
Waiting on new EMTPY disks size 1023 GB to be attached..., 4 out of 5 are Attached
Waiting on new EMTPY disks size 1023 GB to be attached..., 5 out of 5 are Attached
…..Start
- Now the script will create 2 distinct Windows Server 2012 Storage Pools, one for SQL Server data files and one for transaction log, then will create 2 logical volumes on them and then format using 64KB for NTFS Allocation Unit size and PartitionStyle="MBR":
Create new storage pool DwIaasData
Create new virtual disk DwIaasData
Format virtual disk DwIaasData
…………………
Create new storage pool DwIaasLog
Create new virtual disk DwIaasLog
- In addition to that, the script will assign drive letters “F:” to data volume and “G:” to log volume, and mounts the two volumes under “C:\Mount” using mount points called “Data” and “Log”;
- Now, he script will configure SQL Server default instance with a series of parameters as dictated by “Fast Track” reference architecture:
Configure SQL Server 'max server memory (MB)' to 26378;
Add startup flag -T1117;
Add “-E” flag to the startup parameter;
Alter default MODEL database recovery model to “SIMPLE”;
Add default locations for data and log files under “C:\Mount\Data” and “C:\Mount\Log”;
Modify the TEMPDB files location to “C:\Mount\Data\” and “C:\Mount\Data\”;
Add more TEMPDB data files in order to be equals to the number of cores (4 for A6 VM size);
Change the TEMPDB data file size to 25GB each, with auto-growth of 1GB;
- Be aware that TCP/IP Network library will be enabled for remote access;
- Be aware that system databases, with the exception of TEMPDB, will be still located on “C:” drive in the default location;
- Be aware that the installed default SQL Server database instance will be set for WINDOWS-ONLY authentication mode;
Now, let’s spend me some words on some interesting configuration parameters shown above:
- Trace flag ” –T1117” will cause all the TEMPDB data files to growth to the same time, avoiding unbalanced file space allocation;
SQL Server 2008 Trace Flag -T 1117: http://blogs.technet.com/technet_blog_images/b/sql_server_sizing_ha_and_performance_hints/archive/2012/02/09/sql-server-2008-trace-flag-t-1117.aspx
- Startup parameter “ -E” will augment the default allocation unit size to 512KB (default 64KB) that SQL Server will use when allocating space from the data files, before switching to the next file in the filegroup:
Focus on Fast Track : Understanding the –E Startup: Parameter: http://consultingblogs.emc.com/jamesrowlandjones/archive/2010/04/25/focus-on-fast-track-understanding-the-e-startup-parameter.aspx
File allocation extension in SQL Server 2000 (64-bit) and SQL Server 2005: http://support.microsoft.com/kb/329526
- The “Max Server Memory” configuration value will be set automatically to the 92% of VM available memory, depending on size;
- Why create mount points under “C:\Mount\ ” when basic disks have already assigned a drive letter? When asked to one of my good friend and colleague working on that, it seems that people using “Fast Track” used to place databases on “C:” drive… Nice!
At the end, you will find the report of the installation in a text file called “Summary.txt” under “C:\Program Files\Microsoft SQL Server\DwIaas\Log”. If you are curious about what different optimizations and configuration values are used for different VM sizes, give a look to the XML file “DwIaasConfigGeneral.xml” under “C:\Program Files\Microsoft SQL Server\DwIaas”.
Regarding the SQL Server setup, be aware that *all* SQL Server services will be installed and started automatically: SQL Server database engine, Fulltext, Reporting Services, Integration Services and Analysis Services! If you don’t need some of them, stop and disable. Note that SQL Agent and SQL Browser are stopped. Finally, before using this VM image, be sure to read the recommendations contained in section “Performance Recommendations” at the following link:
SQL Server Data Warehousing in Windows Azure Virtual Machines
http://msdn.microsoft.com/en-us/library/dn387396.aspx
That’s all folks!
Regards.