Manually adding a VPN Gateway to Azure Virtual Network
In this blog post, I’m going to show you how is possible to add a VPN Gateway, to an existing Azure Virtual Network, that is already used by some Virtual Machines. The entire procedure is not so complex, but due to the limitations of the Azure Portal GUI and Power Shell cmdlet, a specific procedure is required to export, manipulate and re-import manually the XML file needed to supply the desired virtual network configuration. Here is the detailed list of steps:
1) Go to the Azure Portal and be sure to operate on the desired subscription;
2) In the remaining sections, we’ll assume to operate on this subscription without repeating anymore;
3) Select “Networks” in the left pane, then select “Local Networks” tab:
4) In this instruction doc, we’ll create a dummy subscription to show the overall process, before executing for real virtual network scenario, delete it and use effective information from real production environment;
IMPORTANT: If a previous dummy/test local network is present, delete it and wait for operation completion before proceeding further;
5) Click “ADD LOCAL NETWORK” and proceed;
6) In the first screen, add a logical name and then the public IP address of the VPN gateway (1.1.1.1 is here reported as a non-valid example):
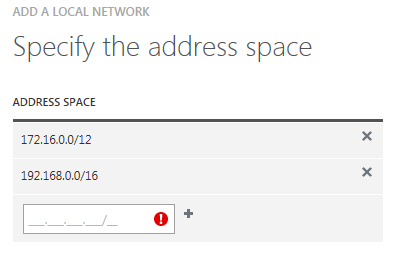
7) In the second screen, add the on-premise address-spaces/subnets, in CIDR notation, that Azure VMs will need to reach:
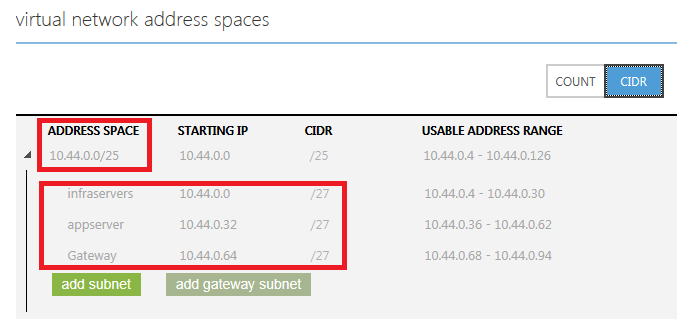
IMPORTANT: Be sure to do not overlap with Azure subnets already defined in the Virtual Network, you can check them looking at the Virtual Network already defined for production environment, in the “Configure” tab:
8) Confirm operation and wait for completion;
9) Now, go back to the list of defined virtual networks, select the existing one (without entering the properties) and click on the export button at the bottom:
10) Confirm the “Azure Production Subscription” and then provide a file name and save for later editing on your desktop:
11) Open the file with NOTEPAD or your preferred editing tool, below there is a sample of how it should appears:
<NetworkConfiguration xmlns:xsd="http://www.w3.org/2001/XMLSchema" xmlns:xsi="http://www.w3.org/2001/XMLSchema-instance" xmlns="http://schemas.microsoft.com/ServiceHosting/2011/07/NetworkConfiguration">
<VirtualNetworkConfiguration>
<Dns>
<DnsServers>
<DnsServer name="dns1" IPAddress="10.44.0.4" />
<DnsServer name="dns2" IPAddress="10.44.0.5" />
</DnsServers>
</Dns>
<LocalNetworkSites>
<LocalNetworkSite name="customeronpremnetwork">
<AddressSpace>
<AddressPrefix>10.255.161.64/27</AddressPrefix>
</AddressSpace>
<VPNGatewayAddress>94.125.19.129</VPNGatewayAddress>
</LocalNetworkSite>
</LocalNetworkSites>
<VirtualNetworkSites>
<VirtualNetworkSite name="prodnetwork" AffinityGroup="prodnortheurope">
<AddressSpace>
<AddressPrefix>10.44.0.0/25</AddressPrefix>
</AddressSpace>
<Subnets>
<Subnet name="infraservers">
<AddressPrefix>10.44.0.0/27</AddressPrefix>
</Subnet>
<Subnet name="appserver">
<AddressPrefix>10.44.0.32/27</AddressPrefix>
</Subnet>
</Subnets>
<DnsServersRef>
<DnsServerRef name="dns1" />
<DnsServerRef name="dns2" />
</DnsServersRef>
</VirtualNetworkSite>
</VirtualNetworkSites>
</VirtualNetworkConfiguration>
</NetworkConfiguration>
NOTE: The part in yellow is related to what you have done so far in steps [5-8].
12) Now is necessary to manually and carefully edit the file adding the portion below to define a Virtual Network Gateway subnet;
a.)Looking at the example provided later in step [13], add the following section in the right location to define a gateway subnet in the Azure Virtual Network:
<Subnet name="GatewaySubnet">
<AddressPrefix>10.44.0.64/27</AddressPrefix>
</Subnet>
b) IMPORTANT: “GatewaySubnet” is a reserved keyword and must be used; based on virtual network defined in the Production subscription, “10.44.0.64/27” is the real correct subnet to use and not a dummy example, in order to realize why, you can check the properties of the existing virtual network, tab “Configure” and look at the free subnets available in the defined address space, as shown below:
c) NOTE: Using any subnet inside (subnetted) the above address space (10.44.0.0/25) is fine, but must not overlap with existing ones.
d) Looking at the example provided later in step [13], add the following section in the right location to instruct Azure to connect to your on-premise local network:
<Gateway>
<ConnectionsToLocalNetwork>
<LocalNetworkSiteRef name=" customeronpremnetwork" />
</ConnectionsToLocalNetwork>
</Gateway>
NOTE: “customeronpremnetwork” is the real string to use, which is the same real local network name you defined in step [6].
13) At the end, the XLM file should look like as the one below, the part in red will show you where to place the previous two necessary additions (steps [12.a] and [12.d]):
<NetworkConfiguration xmlns:xsd="http://www.w3.org/2001/XMLSchema" xmlns:xsi="http://www.w3.org/2001/XMLSchema-instance"
xmlns="http://schemas.microsoft.com/ServiceHosting/2011/07/NetworkConfiguration">
<VirtualNetworkConfiguration>
<Dns>
<DnsServers>
<DnsServer name="dns1" IPAddress="10.44.0.4" />
<DnsServer name="dns2" IPAddress="10.44.0.5" />
</DnsServers>
</Dns>
<LocalNetworkSites>
<LocalNetworkSite name="customeronpremnetwork">
<AddressSpace>
<AddressPrefix>10.255.161.64/27</AddressPrefix>
</AddressSpace>
<VPNGatewayAddress>94.125.19.129</VPNGatewayAddress>
</LocalNetworkSite>
</LocalNetworkSites>
<VirtualNetworkSites>
<VirtualNetworkSite name="prodnetwork" AffinityGroup="prodnortheurope">
<AddressSpace>
<AddressPrefix>10.44.0.0/25</AddressPrefix>
</AddressSpace>
<Subnets>
<Subnet name="infraservers">
<AddressPrefix>10.44.0.0/27</AddressPrefix>
</Subnet>
<Subnet name="appserver">
<AddressPrefix>10.44.0.32/27</AddressPrefix>
</Subnet>
<Subnet name="GatewaySubnet">
<AddressPrefix>10.44.0.64/27</AddressPrefix>
</Subnet>
</Subnets>
<Gateway>
<ConnectionsToLocalNetwork>
<LocalNetworkSiteRef name="customeronpremnetwork" />
</ConnectionsToLocalNetwork>
</Gateway>
<DnsServersRef>
<DnsServerRef name="dns1" />
<DnsServerRef name="dns2" />
</DnsServersRef>
</VirtualNetworkSite>
</VirtualNetworkSites>
</VirtualNetworkConfiguration>
</NetworkConfiguration>
14) Now, you are ready to import back the modified XML file for the Virtual Network configuration, following the remaining steps;
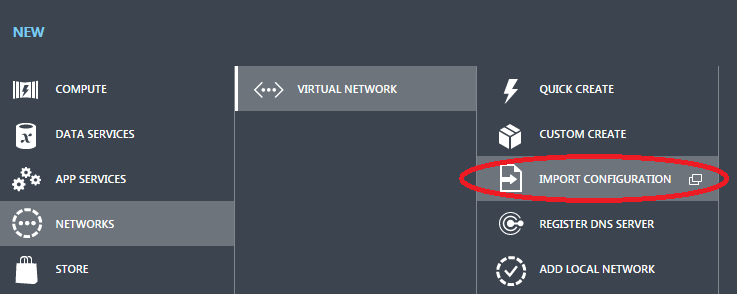
15) Go back to the main Azure Portal page, and then click on the “+ New” button in the bottom part of the page and select the option as shown below:
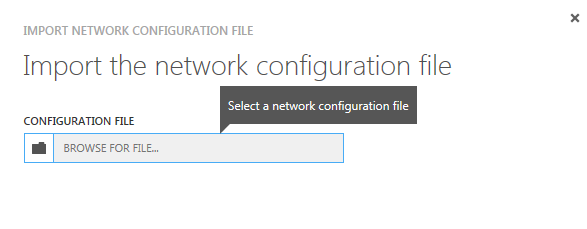
16) In the first screen, provide the XML file you just modified and proceed:
17) Review the proposed configuration changes and then confirm to proceed with the operation:
18) If the import operation will succeed, go back to the virtual network properties page, tab “Dashboard”, it should appears as the print screen below (it’s taken from my personal test subscription, not from your Azure environment):
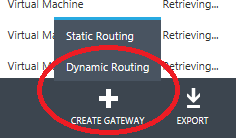
19) Now, you can proceed as probably you already know, that is click on the button in the bottom part of the page to create the Gateway with “Static Routing” or “Dynamic Routing”:
NOTE: For the scope and requirements of this project, also “Static Routing” is a viable option.
20) Wait for the operation to complete, it may takes up to 20 minutes;
21) At the end, the Azure side of the Gateway should be created and the “Dashboard” tab of “prodnetwork” virtual network, in the Azure portal, should appear as shown below:
NOTE: Please take note the Azure Gateway IP address that will be used by the customer to complete the VPN configuration procedure on the on-premise side;
22) Now, the on-premise VPN Administrator, on-premise, should follow the following instructions to complete the configuration procedure:
Configure a Virtual Network Gateway in the Management Portal
http://azure.microsoft.com/documentation/articles/vpn-gateway-configure-vpn-gateway-mp
-
- IMPORTANT: the first section titled “Start the virtual network gateway” has been already executed in the previous steps, then the VPN Administrator will have to execute the remaining parts, that is “Gather information for the network administrator” and “Configure the VPN Device”) that will include getting the shared key secret and downloading and executing the VPN configuration script on the on-premise VPN device.
- The requested information relating to “Address space and subnets for your virtual network” in step(5), in the link above, can be retried from the Azure portal, in the “Configure” tab of “prodnetwork” as shown below (use the CIDR visualization mode):
NOTE: The Gateway IP address is reported in step(21).
If, for some reasons, it will be necessary to modify or re-create the Azure VPN Gateway, follow the procedure below:
- Go the Azure Management Portal, click on the virtual network, dashboard tab, and push the button “Delete Gateway” from the bottom;
- Start from step(19) to complete the procedure, be sure to communicate the new public IP address of the Azure gateway to the VPN device administrator.
- IMPORTANT: If you have to delete the Azure VPN Gateway, when you will create again,there is no guarantee that you will be assigned the same previous public internet-facing IP address.
That's all folks! Regards...

.png)
.png)
.png)

.png)
.png)
.png)
