Authenticode in 2015
Back in 2011, I wrote a post explaining why and how software developers should use Authenticode to digitally sign their applications. While the vast majority of the original post remains relevant, in today’s post, I’ll share my most recent experiences with code-signing.
Shopping for a Certificate
In the past, I signed my code using a certificate from the Comodo Certificate Authority (CA), purchased through a popular reseller named Tucows. This time, I decided to shop around a bit. My first stop was GlobalSign, but after some back and forth, I learned that they no longer sell code-signing certificates for individuals. If I wanted to get a code-signing certificate from GlobalSign, I’d need to file formal legal paperwork with the state to register a business. Since I’m not really making money on my freeware, I decided to keep looking.
My next stop was DigiCert and it proved more fruitful. I’d heard a lot of good things about DigiCert because they offer discounted certificates for SysDevs and free certificates for Microsoft employees and MVPs.
I had initially hoped to get an Extended Validation Code Signing certificate to ensure that my users didn’t encounter any temporary “Unknown Reputation” warnings from SmartScreen Application Reputation when I first switch over to signing using the new certificate. Unfortunately, it turns out that EV Code-Signing Certificates are not available to individuals from any certificate authority, so I placed an order for a regular code-signing certificate instead.
While it’s unfortunate that some users might get some “Unknown Reputation” warnings, my software is popular enough that hopefully the reputation will build on my certificate in a few days or so. My new certificate is valid for three years, so a few days of user questions shouldn’t prove a huge burden.
Validating My Identity
In past years, validating my identity to obtain a certificate was a complicated, multi-day affair involving faxing personal documents like my passport, utility bills, bank statements to the CA. In one case, I even had to ping the CEO of a certificate authority (we had met during my work on EV for HTTPS) to get the process unblocked.
In contrast, my experience with DigiCert was much more straightforward. I simply uploaded a copy of my driver’s license to their secure portal, along with a scan of a notarized document containing my address, driver’s license information, and certificate information. I was initially worried about the expense and complexity of finding a notary to countersign my document, but this turned out to be very easy. The UPS Store has notaries on staff and they charge just $6 per page notarized; the entire process took less than 20 minutes. I've been told that some banks offer free notary services to their customers. After supplying my identity proof, I got a quick call from the CA validators and was granted permission to request a certificate.
Generating a Certificate
The DigiCert portal offers a simple push-button interface for requesting a certificate. At first, the button didn’t work and I was reminded that, for Internet Explorer’s Certificate Enrollment ActiveX Control to work properly, I should put the site in my Trusted Sites Zone (especially because I run in Enhanced Protected Mode). Unfortunately, even after trusting the site, I got the same error message:

Fortunately, I quickly realized the problem: I use ActiveX Filtering to reduce my attack surface (and block annoyances) and this was preventing my use of the necessary ActiveX interface. After unblocking ActiveX controls

…and refreshing the page, the control loaded properly. It requested permission to generate a private key and certificate request:

And after I chose Yes, the new certificate was generated and signed by the Certificate Authority. The new certificate is automatically placed in the Current User\Personal\Certificates store which can be found by launching CertMgr.msc or by following these steps.
Double-clicking the certificate shows the Certificate UI which confirms that Windows has the matching private key:

Exporting the Certificate
My current build process uses signcode.exe from the Windows SDK to sign code; I supply my certificate in a SPC file and the private key in a PVK file. In order to generate these files, I must first export my certificate to a CER and a PFX file. This also allows me to back up my key, since the only copy in existence is in my Windows Certificate store.
Doing so is simple: just right-click the certificate and choose Export. Choose Yes, export the private key and select the Personal Information Exchange - PKCS #12 (.PFX) format. Save as mycert.pfx.

You’ll be prompted for a password to protect the file: do NOT forget your choice! You should probably back up this file somewhere safe and offline (e.g. a USB drive or CD) in case your PC ever suffers from an unrecoverable problem.
After exporting the PFX file (which contains both the certificate and the private key) you can export a plain CER file, which contains only the certificate. In the Certificate Export Wizard, choose No, do not export the private key and choose DER encoded binary X.509 (.CER) as the format. Save as mycert.cer.
Converting Certificate and Key Files
Note: These steps are not always necessary, for instance if you use signtool or the DigiCert Certificate Utility to sign your code.
With the CER and PFX files in hand, you now need to convert the files into SPC and PVK files used by the signing tool.
PFX->PVK
Unfortunately, generating the PVK file containing the private key is a little tricky. Most of the tutorials on the web suggest you download a zip file containing a converter and run it. If the prospect of downloading an unsigned executable over HTTP and supplying it with your PFX and its password doesn’t set off your internal ZOMG no!!! alarms, perhaps you’re working in the wrong field.
So, if that approach is out, what do we do instead?
Here, OpenSSL comes to the rescue. First, convert to a PEM file:
openssl.exe pkcs12 -in mycert.pfx -nocerts -nodes -out mycert.pem
Then convert the PEM file to a PVK file:
openssl.exe rsa –inform pem –in mycert.pem –outform pvk -out mycert.pvk

CER->SPC
Generating the SPC file from the CER is comparatively easy. Simply use the Cert2SPC.exe utility included in the Windows SDK:
cert2spc.exe mycert.cer mycert.spc

In the unlikely event that you don’t have the Windows SDK installed, you can generate the SPC using OpenSSL:
openssl.exe pkcs12 -in mycert.pfx -nokeys -out mycert.pem
openssl.exe crl2pkcs7 -nocrl -certfile mycert.pem -outform DER -out mycert.spc
A word about Intermediates
The SPC file is a serialized certificate store that contains one or more certificates. The Cert2SPC command line I show above includes only my code-signing certificate-- it does not include the Certificate Authority's Root Certificate or the Certificate Authority's Intermediate Certificate. In contrast, the OpenSSL command shown will include ALL certificates in the SPC file.
Why do we care at all? Because if it does not have the intermediate certificate, Windows must download it using the information provided in the AIA extension of the code-signing certificate. That download will obviously fail if the PC is offline, and the user will get a "Cannot verify" warning on the signature and the file will behave as if it were unsigned. If we include the intermediate in the SPC, then the verifier doesn't need to worry about downloading it.
However... Windows also has a feature whereby not all root certificates ship with Windows; many roots are downloaded on-demand as they are encountered. So, if the end-user's computer doesn't have the necessary root installed, the signature verification logic will try to fetch it from WindowsUpdate, and if that fails because the system is offline, the user gets the same "Cannot verify" warning. As a signer, you can't simply put the root in the SPC file and avoid a network hit, however, because Windows won't trust the root until it checks with WindowsUpdate.
So, what to do? My recommendation is that you include the end-entity certificate and the intermediate certificate, but not the root. You can do this thusly:
cert2spc.exe mycert.cer CAIntermediate.cer mycert.spc
You can get the CAIntermediate.cer file by opening mycert.cer in the Certificate Viewer, clicking the Certification Path tab, selecting the Intermediate node of the tree, clicking View Certificate, clicking Details, and pushing the Copy to File button.
You can view the contents of the SPC file by double-clicking it:

Cleanup and Backup
Having completed your conversion process, you can now delete the PEM files. You should probably backup the PFX file somewhere safe (offline) before deleting it, and you should consider uninstalling your private key from the Windows Certificate store. Read on for more details.
Signing Files
With all files in the proper formats, you can now sign your code:
signcode -spc \src\mycert.spc -v \src\mykey.pvk -n "My App Name" -i "https://www.example.com/myApp/" -a sha1 -t https://timestamp.digicert.com MySetup.exe
I explicitly specify -a sha1 for my hash algorithm, because the default algorithm (MD5) is NOT safe. I still support a few Windows XP users, and unfortunately XP doesn’t support SHA256 for Authenticode, even with Service Pack 3 installed. In another year or two, I will stop using sha1 and will use SHA256 instead.
I always provide a timestamp URL using the -t parameter to ensure that my program’s signature will remain valid even after the signing certificate expires.
Improving Security with Hardware
As users and security software are increasingly looking for digital signatures, bad guys are now looking for ways to get their malware signed. Perhaps the simplest way for them to do so is to hack into software developers’ PCs and steal their private keys, or submit their malware into automated processes configured to sign anything they receive.
While I’ve never configured automatic signing of anything, I’ve long been worried about the threat of a bad guy stealing my private key and signing his malware with my good name.
Fortunately, it’s now relatively easy to raise the bar against attackers.
While EV-Authenticode requires use of a hardware token for signing, even non-EV signers like me can benefit from hardware-based signing. Below is a eToken 72K security token; this one and similar products are available online at prices ranging from a few dollars to about $40.

When you buy an EV code-signing certificate, you’ll get a token with the certificate and private key installed; you don’t need to do much beyond updating the password.
In contrast, when you’re setting up a token yourself, there are a few steps; my token didn’t come with instructions, but it was pretty easy to figure out.
First, you need to install the appropriate software to use the token; in my case, it was the Aladdin Knowledge Systems eToken PKI client. Next, you need to know that the default password for a new eToken is 1234567890. Supply this password and then pick a strong new password to replace it. Your new password should be memorable (if you forget it, you’ll be in a world of hurt) and probably should be relatively easy to type, as you’ll be typing it each time you sign anything.
In the left pane, select your token:

At first, I was a bit worried about the word “Java” here—was this only for signing JAR files or something? No—it’s that the token itself is running Java for its own internal operating system.
After selecting your token at the top, click the yellow gear icon to go to Advanced View:

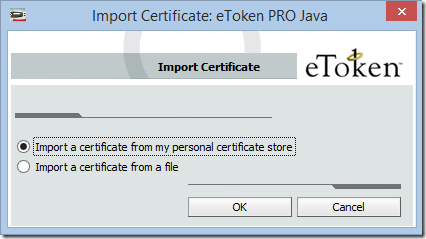
You can then right-click and choose Import Certificate.

Since we’ve left our certificate in the Windows Certificate Store, we’ll choose that option:
Next comes a very confusing prompt:

With fingers crossed, we click OK and get an error message:

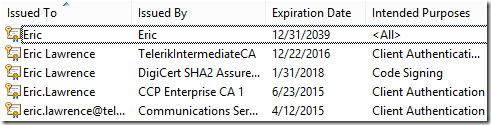
Hrm. So we click Cancel and voila, our certificate in the Windows Certificate store appears:

My guess is that the first “Smart Card” prompt was there in case we wanted to copy a certificate and key from a different smartcard to our token. When we hit Cancel, it then just shows the Windows Certificate stores. We select the desired certificate and click OK. After supplying our token’s password, the certificate is imported.
After we’ve moved the token to the token, the certificate still appears within the Windows Certificate manager (CertMgr.msc):
…until we unplug the token and hit F5. At that point, the code-signing certificate disappears:
Great!
Signing Files From the Token
Because we’re no longer going to use the private key file from disk, we obliterate the mycert.pvk file and update our command line as follows:
signcode -p "eToken Base Cryptographic Provider" -spc \src\mycert.spc -k df2852d2a58a1cc5ce82d186e0fb6eda_0b960da4-1609-44a5-bfa9-aac9caea8170 -n "My App Name" -i "https://www.example.com/myApp/" -a sha1 -t https://timestamp.digicert.com MySetup.exe
We first specify that the signing should use the eToken Base Cryptographic Provider; you can find the list of available providers by looking in your registry under the HKLM\Software\Microsoft\Cryptography\Defaults\Provider node.
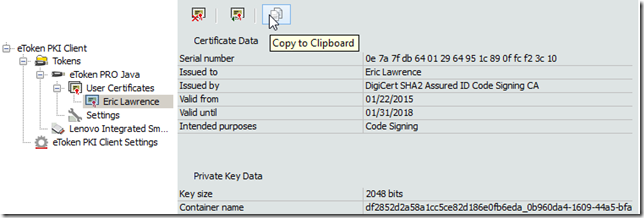
We next replace our reference to the PVK file with the name of the container containing the private key. Fortunately, the eToken software exposes the key’s Container name information directly in the UI:
Now, when we run the updated signcode command, the eToken software prompts for our password and returns the signature.
Here Be Dragons
At this point, I was pretty excited at how easy it was to use hardware to bolster security. For fun, I tried modifying my command line
signcode -spc \src\mycert.spc -k df2852d2a58a1cc5ce82d186e0fb6eda_0b960da4-1609-44a5-bfa9-aac9caea8170 -n "My App Name" -i "https://www.example.com/myApp/" -a sha1 -t https://timestamp.digicert.com MySetup.exe
…to omit the provider directive, and signing succeeded. And it didn’t prompt me for a password.
I had a bad feeling about this.
I unplugged my eToken from the PC and ran the command again.
And it succeeded, without either a password or the token.
What the what?!?
Fortunately, I have spent a few weeks banging my head against the wall with problems with Windows Certificate Key storage in the past, and I had a theory about what was going on—perhaps the process of importing the certificate to the token did remove the certificate from the Windows Storage, but did not properly blow away the private key? (That mistake recently got a bit of press because one high-profile piece of ransomware also left a copy of its RSA key locally.)
With this hunch, I searched my RSA keys folder for any files containing the key container name:

…and I got exactly one hit. After I deleted the key container file, signcode started behaving as expected: I could only sign the file using the eToken Base Cryptographic Provider and only when the token was inserted and the password supplied.
After having deleted my private key files (both the \Crypto\RSA\ file and the PVK file) from my hard disk, I ran cipher /w:C:\ to help ensure that the key files could not be recovered in the future.
While I feel pretty good about my new level of security, there’s no question that my private key would be more secure if I had been able to obtain an EV-Certificate token with a non-exportable key pre-installed.
Secure all the things!
-Eric Lawrence
MVP - Internet Explorer