Visual Studio 2013 Windows Store DirectX Templates
With the release of Visual Studio 2013 one of the very cool new things that might easily go unnoticed is that new templates that have been provided for Window Store DirectX applications. Templates are an incredibly important thing to get right. For new developers or for veteran developers looking to investigate new technology they provide a starting point to investigate, a best practices guide, as well as expansion points where they can be developed into different applications. With Visual Studio templates being the base for all different sorts of customer applications real care has to be put into how they are constructed. They need to demonstrate important new concepts, provide a broad base to be expanded into different application types, be extremely well organized, and on top of that they need to concise enough for easy comprehension.
To get to know these new templates better I’m going to take a post to tour around the new templates to introduce the overall architecture, point out a few interesting areas, and note the points where we expect users to replace or expand on the existing template code.
Getting Started
These new DirectX templates are included with the Professional, Premium and Ultimate editions of Visual Studio 2013 as well as the Visual Studio Express for Windows edition. If you want to start for free the Express Edition for Windows on Windows 8.1 is the place to start.
The new templates can be found after selecting New Project in the menus under the Visual C++ node in the Windows Store section. In that section there are two DirectX templates, one labeled “DirectX App” and one label “DirectX App (XAML).” The DirectX App template interfaces directly with CoreWindow and is the best place to start if your application is expected to have DirectX content always be full screen and not use things like the Windows Store app bar or show any other controls aside from the DirectX content. The DirectX App (XAML) template is a bit more complex, it hosts the DirectX content in a SwapChainPanel which allows the DirectX content to be placed into XAML controls as part of a bigger UI. Even if you intend on having your DirectX content always be fullscreen the XAML template allows you to use stuff like the AppBar for applications settings. In general, the XAML template is similar to the basic CoreWindow template with some interesting added complexity, so I’ll be using it as the base for this blog post.
Before looking at the code it’s best to just go ahead and compile and run the application so that you can see what the resulting output is going to be. What you should get is a 3D rotating cube with a framerate counter in the lower right and a small “hello” message in the upper right. If you use your mouse you can click and drag back and forth over the cube to rotate it around.
.png)
As a side note, the counters in the upper left with the white text are XAML specific framerate counters that help to show the current speed that your XAML content is rendering at. They are not specifically related to this template and you can turn them off by looking for the line “DebugSettings->EnableFrameRateCounter = true” and setting it to false. Just make sure that you don’t get them confused with the framerate counter in the lower right, which is a part of the code of this template and is showing you the current rendering speed of your DirectX content.
Template Tour
Before digging in too deep into any one specific area it’s best to take a quick high level look at the architecture of a freshly created DirectX (XAML) project, named MyApp for this example. Please forgive the informality of the diagram below, as it’s intended as just a quick overview and not any type of rigorous UML diagram.
Fig 1 – Architecture Overview
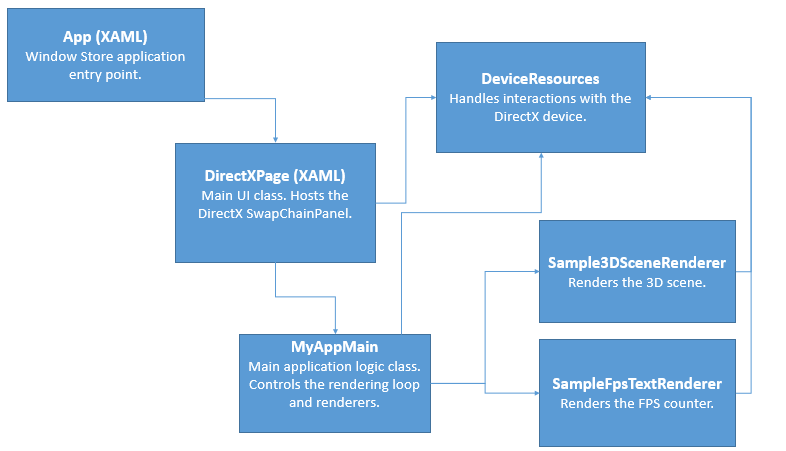
There are a few more small parts of this template, but the picture above captures the six main pieces of concern. Part of the design of the templates is to help make the correct break points to create separation between the various application components. In particular, care has been taken to break the update and render application engine in MyAppMain from the Window Store specific input / output code in the DirectXPage. Also, the renderers are created to be both independent of each other as well as keeping low level rendering code out of the MyAppMain engine so that they can easily be replaced or upgraded without messing with the main engine code.
Part by Part
Keeping the above graph in mind the template parts can be dug into with some more detail, both in what they provide as well as how they relate to each other.
App (XAML)
The App class does little but provide an entry point for application launching as well as handling events for when Windows suspends or resumes the application. When the application is launched, the App class creates an instance of DirectXPage and assigns it to the content of the current window. From then on DirectXPage handles most of the interactions (aside from the aforementioned suspend and resume events) with the user and with Windows.
DirectXPage (XAML)
Before getting into the DirectXPage code, it’s best to first familiarize yourself with the concepts of swap chains if you have not already. There is an excellent intro to them here, of which the basic summary is that swap chains represent both the front buffer of pixels current being displayed to the user as well as one (or more) back buffers. To keep up a smooth appearance to the user DirectX draws to the back buffers and then is able to instantly swap them with the front buffers when they are done drawing.
The two main controls of interest in the XAML file for the DirectXPage class are the SwapChainPanel and the AppBar class. If you have programmed for the Windows Store before the AppBar will be familiar, it’s a quick and easy place to place extra control and configuration buttons that you want to be hidden out of the way most of the time. The SwapChainPanel is a new control for Windows 8.1. Previously in Windows 8 the control to use for DirectX / XAML interop was the SwapChainBackgroundPanel. This control allowed for interop, but had a multitude of restrictions on how you could use it with XAML. For some examples of these limitations: you had to place it as the root XAML element, there could only be one SwapChain per window, and projection and transformation APIs would have no effect on its rendering. While SwapChainBackgroundPanel is still available to use it’s basically a Windows 8 legacy control at this point, the SwapChainPanel is far more flexible with its ability to be composed anywhere in to XAML layout, be resized and transformed, and to have multiple SwapChainPanels on the same page.
The SwapChainPanel provides an XAML target for DirectX swap chains so we need to tie that control together with the DirectX device that will actually draw our 3D content into that SwapChainPanel. The DeviceResources class, which I’ll detail later, is the class that sets up and manages the DirectX device, so in the constructor of the DirectXPage the DeviceResources class is created and the SwapChainPanel is set as its output target. As the final step of construction DirectXPage creates our MyAppMain (consider this our XAML independent game / app engine class) and passes in the DeviceResources class that we created.
 // At this point we have access to the device.
// We can create the device-dependent resources.
m_deviceResources = std::make_shared<DX::DeviceResources>();
m_deviceResources->SetSwapChainPanel(swapChainPanel);
…
m_main = std::unique_ptr<MyAppMain>(new MyAppMain(m_deviceResources));
m_main->StartRenderLoop();
After initialization the DirectXPage stays around looking for two main things: XAML composition changes and independent input. XAML composition changes are things like DPI changing, SwapChainPanel size changing, and orientation changes. When these events come in the DirectXPage updates the DeviceResources so that the DirectX device and device context can change for the new output parameters and also notifies the MyAppMain class so that the engine and any associated renders can also update or load new size dependent resources.
Independent input is a new concept that goes along with the SwapChainPanel and SwapChainBackgroundPanel controls. When you use independent input events come in and are processed on a background thread, this allows the engine to decouple from having input come in at the framerate that the XAML controls are running at. This rate can be different from your DX content in the SwapChainPanel, so your game is going to feel slow and laggy if your input is updating at 15fps along with XAML and your game is actually running at 60fps. In the code section below you can see the independent input source getting set up to run in a background thread and hooking up to a few pointer events which allow you to drag and rotate the cube back and forth. For another solid sample that uses independent input the Windows SDK provides an inking sample that uses independent input to maintain smooth performance while capturing ink stroke gestures on the screen.
 // Register our SwapChainPanel to get independent input pointer events
auto workItemHandler = ref new WorkItemHandler([this] (IAsyncAction ^)
{
   // The CoreIndependentInputSource will raise pointer events for the specified device types on whichever thread it's created on.
    m_coreInput = swapChainPanel->CreateCoreIndependentInputSource(
      Windows::UI::Core::CoreInputDeviceTypes::Mouse |
        Windows::UI::Core::CoreInputDeviceTypes::Touch |
        Windows::UI::Core::CoreInputDeviceTypes::Pen
        );

  // Register for pointer events, which will be raised on the background thread.
 m_coreInput->PointerPressed += ref new TypedEventHandler<Object^, PointerEventArgs^>(this, &DirectXPage::OnPointerPressed);
  m_coreInput->PointerMoved += ref new TypedEventHandler<Object^, PointerEventArgs^>(this, &DirectXPage::OnPointerMoved);
  m_coreInput->PointerReleased += ref new TypedEventHandler<Object^, PointerEventArgs^>(this, &DirectXPage::OnPointerReleased);

    // Begin processing input messages as they're delivered.
   m_coreInput->Dispatcher->ProcessEvents(CoreProcessEventsOption::ProcessUntilQuit);
});

// Run task on a dedicated high priority background thread.
m_inputLoopWorker = ThreadPool::RunAsync(workItemHandler, WorkItemPriority::High, WorkItemOptions::TimeSliced);
MyAppMain
MyAppMain is where we encounter the standard game development update render loop that is the heart of most games. As timing is of the upmost importance in real time graphics applications our DirectX templates contain a StepTimer class (covered in the next section) which is used to control rendering loop timing. Like with our independent input events the rendering loop will be run on a background thread. Keeping it on a background thread prevents the possibly expensive update and rendering functions from dragging down our UI responsiveness if they start to fall behind.
 // Create a task that will be run on a background thread.
auto workItemHandler = ref new WorkItemHandler([this](IAsyncAction ^ action)
{
  // Calculate the updated frame and render once per vertical blanking interval.
 while (action->Status == AsyncStatus::Started)
  {
       critical_section::scoped_lock lock(m_criticalSection);
      Update();
       if (Render())
      {
           m_deviceResources->Present();
        }
   }
});

// Run task on a dedicated high priority background thread.
m_renderLoopWorker = ThreadPool::RunAsync(workItemHandler, WorkItemPriority::High, WorkItemOptions::TimeSliced);
The work of the update function is quite simple. It first processes any per-frame input data that needs to be processed and then allows each renderer to perform their per-frame updates. The processing input step here is due to the independent input events coming in untethered from the visual framerate from the DirectX page. These event could be coming in much faster than the framerate, so instead of directly passing them to the renderers and forcing them to update much faster than we need to we store the state results of the input events in the engine, then we pass in that current engine state to the renderers to perform their per-frame updates.
 // Updates the application state once per frame.
void MyAppMain::Update()
{
    ProcessInput();

 // Update scene objects.
   m_timer.Tick([&]()
  {
       // TODO: Replace this with your app's content update functions.
        m_sceneRenderer->Update(m_timer);
        m_fpsTextRenderer->Update(m_timer);
  });
}
The Render function act similarly, only in this case it first gets the device context from the DeviceResources class, clears and sets the viewport, and then asks the renderers to perform their render functions.
 // Renders the current frame according to the current application state.
// Returns true if the frame was rendered and is ready to be displayed.
bool MyAppMain::Render()
{
    // Don't try to render anything before the first Update.
   if (m_timer.GetFrameCount() == 0)
  {
       return false;
  }

   auto context = m_deviceResources->GetD3DDeviceContext();

    // Reset the viewport to target the whole screen.
  auto viewport = m_deviceResources->GetScreenViewport();
 context->RSSetViewports(1, &viewport);

   // Reset render targets to the screen.
 ID3D11RenderTargetView *const targets[1] = { m_deviceResources->GetBackBufferRenderTargetView() };
  context->OMSetRenderTargets(1, targets, m_deviceResources->GetDepthStencilView());

    // Clear the back buffer and depth stencil view.
   context->ClearRenderTargetView(m_deviceResources->GetBackBufferRenderTargetView(), DirectX::Colors::CornflowerBlue);
  context->ClearDepthStencilView(m_deviceResources->GetDepthStencilView(), D3D11_CLEAR_DEPTH | D3D11_CLEAR_STENCIL, 1.0f, 0);

   // Render the scene objects.
   // TODO: Replace this with your app's content rendering functions.
 m_sceneRenderer->Render();
   m_fpsTextRenderer->Render();

 return true;
}
StepTimer
The StepTimer was not explicitly called out in the architecture diagram as it’s a smaller helper class, but as timing is the heart of any game loop it’s a very important component to understand. The timer provided with the templates was designed to cover a broad set of common features that are desired in a timer while still being concise and easy to understand. Before covering more of the StepTimer class it’s best to look back up the page just a little bit to the MyAppMain::Update function, where you can see the m_Timer.Tick function being called (this is the main point of usage of the StepTimer class).
The StepTimer is created during initialization of the MyAppMain class. By default it is created with a variable timestep mode. In this mode in the Tick function the StepTimer class will calculate the new amount of ticks elapsed since the last call to Tick and then without any checks directly call into the update function and then exit back out of Tick. Give the usage of the Tick function in MyAppMain::Update we can see that in this mode the logic updating of the Tick function is tied one to one with the Render() function of MyAppMain which is called after it. So in variable timestep mode the update and render functions will always be called as fast as possible and will always be called one after the other, with one update function called each time before each render function. Both of these will be called as fast as possible, with the framerate limited only by speed of update logic and speed of rendering.
At the initializing point of the StepTimer there is a bit of commented out code that illustrates the use of the fixed step mode of the timer.
 // TODO: Change the timer settings if you want something other than the default variable timestep mode.
// e.g. for 60 FPS fixed timestep update logic, call:
/*
m_timer.SetFixedTimeStep(true);
m_timer.SetTargetElapsedSeconds(1.0 / 60);
*/
This fixed step mode of the timer changes how the Tick function handles updates. If the above code is uncommented the calling of the update action from the Tick function is guaranteed a specific amount of times (and only that amount) per time period.
 if (m_isFixedTimeStep)
{
    <extra code snipped>
m_leftOverTicks += timeDelta;

while (m_leftOverTicks >= m_targetElapsedTicks)
{
m_elapsedTicks = m_targetElapsedTicks;
m_totalTicks += m_targetElapsedTicks;
m_leftOverTicks -= m_targetElapsedTicks;
m_frameCount++;

update();
}
}
In the above code if our time elapsed since the last call to update is not yet past our target amount we’ll add in the delta amount and exit out of the function without calling the update function. And if the amount of time is past the target amount we’ll call the update function as many times as needed based on the amount of time we are over the target interval. As such, with fixed time step we may call Render before running the update function or we might call the update function several times consecutively to catch up (if we are running slower than the target framerate) before calling the Render function once. It’s common for games to use either fixed or variable time step bases on other considerations on the engine such as how animations are handled or if the game is highly timing sensitive so both modes have been provided with the StepTimer.
DeviceResources
Before examining the DeviceResources class it’s best to be familiar with the DirectX 11 concepts of both devices and device contexts (more on creation of both here). The short answer if you don’t want to read up on those links is that a DirectX device represents the resources and capabilities tied to a display adapter while the device context controls the pipeline of how that device is used including stuff like setting data into buffers and loading shaders. Having at least a basic understanding of this is important as the DeviceResources class does much of the work for the template in managing and altering the device and device context.
As seen by the initial diagram, the DeviceResources class is used pervasively throughout the template. The DirectXPage, MyAppMain, and individual renderers all keep references to this class. What it contains is much of the heavy lifting required to create DirectX content to correctly output into the SwapChainPanel as well as providing all the DirectX setup needed for the renderers to do their work. Our hope with this class is that it will provide template users with a very good starting place for most types of games and applications and that by default they won’t have to edit it much for their specific applications. Still it’s always best to have a solid idea of what is going on under the covers in this class.
When created by the DirectXPage the DeviceResources class creates all the device independent resources as well as creating the initial device resources. The device independent resources are resources that will be held by DeviceResources for the life of the program and will not need to be recreated. On the other hand, device resource are resources that are tied to the DirectX device, so if the device is lost or needs to be recreated we have to recreate these resources. And finally, after construction of the DeviceResources class the DirectXPage passes in the target SwapChainPanel. At this point DeviceResources grabs window specific properties (orientation, dpi, logicalsize) and creates window size dependent resources. To keep these three classes of resources separate here is a table showing some examples of each type.
Device Independent Resources |
Device Resources |
Window Size Dependent Resources |
ID2DFactory2 |
ID3D11Device |
IDXGISwapChain1 |
IDWriteFactory2 |
ID3D11DeviceContext |
ID3D11RenderTargetView |
|
IDXGIDevice3 |
ID3D11DepthStencilView |
While all of the various resources are all worth knowing more about the important part here is there are the three categories of device independent, device, and window size dependent resources. The main function of the device resources class is to keep track of all these resources and to re-create them when needed. For an example, when the orientation of your device is changed the DirectXPage class gets an orientation changed event and passes it to the following function in DeviceResources.
 // This method is called in the event handler for the OrientationChanged event.
void DX::DeviceResources::SetCurrentOrientation(DisplayOrientations currentOrientation)
{
   if (m_currentOrientation != currentOrientation)
    {
       m_currentOrientation = currentOrientation;
      CreateWindowSizeDependentResources();
   }
}
The orientation state is updated and the window size dependent resources are recreated.
Renderers
The key point of the DirectX template renderers is their independence from each other and from the high level XAML and app code. The renderers main interactions are with the Update and Render functions called from the MyAppMain class. On update the renderers need to change any state for the current frame step. And on render they grab the D3DDeviceContext from the DeviceResources and draw all the text or primitives that they are responsible for. Because the DeviceResources class has taken care of all the swap chain sizing, orientation, dpi settings and such the renderers are free to be much smaller and cleaner and focused just on drawing their specific scene.
Just like DeviceResources, renderers can have device and window size dependent resources contained in them. In the Sample3DSceneRenderer::CreateDeviceDependentResources function the pixel and vertex shaders are loaded in and the mesh of the cube that we are going to draw is created. This function also provides a nice example of C++ Windows Store task continuation if you are interested in that.
 void Sample3DSceneRenderer::CreateDeviceDependentResources()
{
  // Load shaders asynchronously.
    auto loadVSTask = DX::ReadDataAsync(L"SampleVertexShader.cso");
   auto loadPSTask = DX::ReadDataAsync(L"SamplePixelShader.cso");

    // After the vertex shader file is loaded, create the shader and input layout.
 auto createVSTask = loadVSTask.then([this](const std::vector<byte>& fileData) {
        DX::ThrowIfFailed(
          m_deviceResources->GetD3DDevice()->CreateVertexShader(
                &fileData[0],
               fileData.size(),
                nullptr,
                &m_vertexShader
             )
           );

      static const D3D11_INPUT_ELEMENT_DESC vertexDesc [] =
     {
           { "POSITION", 0, DXGI_FORMAT_R32G32B32_FLOAT, 0, 0, D3D11_INPUT_PER_VERTEX_DATA, 0 },
          { "COLOR", 0, DXGI_FORMAT_R32G32B32_FLOAT, 0, 12, D3D11_INPUT_PER_VERTEX_DATA, 0 },
        };

      DX::ThrowIfFailed(
          m_deviceResources->GetD3DDevice()->CreateInputLayout(
             vertexDesc,
             ARRAYSIZE(vertexDesc),
              &fileData[0],
               fileData.size(),
                &m_inputLayout
              )
           );
  });
…<more loading code snipped here>
}
As this post is mainly concerned with the structure and use of the templates I’m not going to cover all of the drawing code included in these template files, as that topic is more of a general DirectX programming topic. But if you want to poke around in in the Sample3DSceneRenderer you can see the data being loaded in CreateDeviceDependentResources, the projection and view matrices being set up in CreateWindowSizeDependentResources, the model matrix being set via the Update function, and finally the vertex and index buffers being set and the primatives being drawn in the Render function. All of which makes perfect sense in the way that we’ve constructed these templates as the shader files and mesh data never needs to be updated, the view perspective needs to be updated when the window size or orientation changes, model matrix rotates the cube and thus is needed in when the engine updates, and the Render data needs to update once per frame drawn.
Where to modify these templates?
After getting a grip on the overall layout of the templates and the important classes within the next step is to start to expand them out for your particular game or application. If you search the solution for “todo:” you’ll get seven results in the MyAppMain class where template consumers are expected to start plugging in their initialization, state, input handling, and connections to custom renderers. Then by replacing out the template renderers with your own custom renders you can start to expand out on your own application with a very solid base already provided by the template update / render loop and the DeviceResources class’s handling of the XAML / DirectX interop connection.