How to digitally sign a strong named assembly
The following blog post demonstrates how to use a self-signed digital certificate to sign a strong named assembly.
Strong names guarantee name uniqueness by relying on unique key
pairs. No one can generate the same assembly name that you can, because an
assembly generated with one private key has a different name than an assembly
generated with another private key.
Strong names protect the version lineage of an assembly. A strong
name can ensure that no one can produce a subsequent version of your assembly.
Users can be sure that a version of the assembly they are loading comes from
the same publisher that created the version the application was built with.
Strong names provide a strong integrity check. Passing the .NET
Framework security checks guarantees that the contents of the assembly have not
been changed since it was built. Note, however, that strong names in and of themselves do not imply a
level of trust like that provided, for example, by a digital signature and supporting certificate.
https://msdn.microsoft.com/en-us/library/wd40t7ad.aspx
Creating a self-signed certificate using Makecert.exe
Create a self-signed certificate using Makecert.exe.
Open an elevated command prompt and navigate to C:\Program Files\Microsoft SDKs\Windows\v7.1\Bin>
Then run the following command to create a self-signed certificate.
C:\Program Files\Microsoft SDKs\Windows\v7.1\Bin>makecert –r –pe –n “CN=<cert name>” –b <beginning date> -e <end date> -sky <subject key type> -ss <cert store>
I have used an x.500 certificate name of “RezSign” but you can choose to use any name you like. (If you would like to know what each of the switches mean,
please view this article: https://msdn.microsoft.com/en-US/library/bfsktky3(v=VS.80).aspx)
Press enter and you should see a “succeeded” message as in figure 1.

Figure 1
Check if the new self-signed certificate exists in the certificate store
Run “mmc” from a run command and add the certificates snap in.
In the certificates window, select the Personal Store > Certificates and view the list of certificates in the “My User Account” store.
Find the newly created certificate via the CN name specified earlier and double click it to view the certificate details.
You should see something similar to the screenshot in Figure 2. Make sure the message “You have a private key that corresponds to this certificate.” exists as shown.
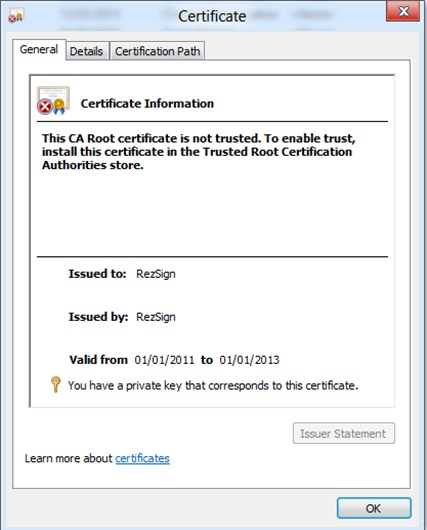
Figure 2
Click on the details tab and select “edit properties”.
You will notice in the general tab that you have a selection of certificate purposes. By default all certificate purposes will be selected but you can narrow down the scope as desired.
Note: we are only interested in the “code signing” purpose. So when requesting a certificate from a CA make sure you mention this. See figure 3 for more information.

Figure 3
Exporting the certificate
Right click this certificate > All Tasks > Export.
In the certificate export wizard, click next and select “Yes, export the private key” > Next
In the export file format screen, select “Personal Information Exchange –PKCS #12(.pfx) and check the “include all certificates in the certification path if possible” and “Export all extended properties” checkboxes > Next
Provide a password for the file in the next screen and give your file to export a name. Use the same naming format as used earlier > next > finish.
You should now see the exported .pfx file in the location you saved it in.
Importing the certificate with keyspec 2 (AT_SIGNATURE)
Note: we could have saved doing this stage if we ran the “–sky signature” during the self-signed certificate creation process.
However this is intended to be a guide to cover a scenario where you receive a certificate from a certificate authority that has specified the “-sky exchange” keyspec.
Backup your existing certificate in the certificate manager.
Open an elevated command prompt and import the pfx file we exported earlier using this command line:
certutil -importPFX -user <pfxfilename> AT_SIGNATURE
This will reimport the certificate we exported previously but will switch it from using KeySpec 1(AT_KEYEXCHANGE) to KeySpec 2(AT_SIGNATURE)
Enter the password for your certificate when prompted. You should then see the output as shown in figure 4.

Figure 4
Refresh the personal certificates store in the certificates console and make sure the newly imported certificate exists.
Now re-export this new certificate as you did earlier so we can use it to sign our assemblies.
Importing the certificate into your project
Open your solution in visual studio and right click the root > properties
Click on the signing selection and check the “Sign the assembly” box.
Choose your exported “.pfx” file under the “Choose a strong name key file” dropdown box. Enter the password for it when prompted.
Sign the assemblies with the certificate
Build the solution to generate a dll in your bin directory.
Right click the dll > properties and make a note of the tabs that display. You will notice there isn’t one listed for “digital signatures”.
Now open an elevated command prompt and run the following command:
C:\Program Files (x86)\Windows Kits\8.0\bin\x86>signtool sign /f “<location of pfx file>” /p “<password>” /v “<location of the dll to sign>”
You should see the following in Figure 5, if executed successfully:
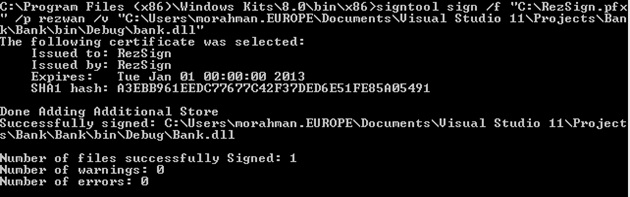
Figure 5
Now go back to the dll you signed and select properties. Notice that there is a “Digital Signatures” tab now. As shown in Figure 6.
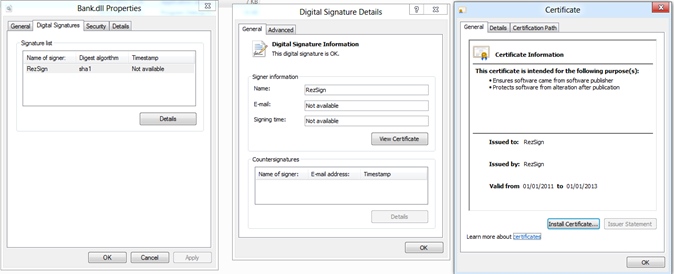
Figure 6
Note: When you obtain a certificate from a reputable certification authority they will have a timestamp server which you can use to populate the “signing time” field with.
Congratulations you now have a digitally signed assembly.
Summary
We created a self-signed certificate using makecert.exe.
We learnt how to change the key exchange property for the certificate using certutil.exe.
We checked the purpose of the certificate to determine if it’s eligible for code signing use.
We digitally signed our assembly using the signtool.exe.
HTH
Rezwan Rahman