Azure Resource Manager (ARM) and moving resources across resource groups
** Before you start reading:
- Long PowerShell scripts in this article have been wrapped to multiple lines to be readable, make sure you use a single line when you try to execute them
- Snapshots and scripts have been modified to remove account identifying information for security reasons
Now with the support of ARM (Azure Resource Manager) you can manage the lifecycle of a group of resources in Azure collectively with a group. That group is called an Azure Resource Group. This will make the management of Azure resources easier, the deployment and deletion of resources easier.
Although this concept is relatively new, I have already seen great implementations using that concept. For instance a developer created an Azure Automation runbook that will shutdown or start virtual machines that belong to a resource group that are tagged with a specific window of time in which it needs to be off …etc. You can check this out here.
There are few articles that talks about ARM and using PowerShell with ARM. I’m not going into details about that in this article. Here are few links to get you started:
- Resource groups in Azure Preview portal
- Using the Azure Preview Portal to manage your Azure resources
- Using Azure PowerShell with Azure Resource Manager
In this article, I will focus on moving resources across Azure Resource Groups. Before I get started, I like to remind you that you need to use the Preview Portal (https://Portal.Azure.com) in order to work with Resource Groups. The other option is to use PowerShell. And there too, I need to remind you that you need to make sure you have Azure PowerShell version 0.8.0 or later. You also need to switch from the regular Azure mode (Azure Service Management) to the Azure Resource Manager mode by running the following command:
PS C:\> Switch-AzureMode -Name AzureResourceManager
You can switch back as follows:
PS C:\> Switch-AzureMode -Name AzureServiceManagement
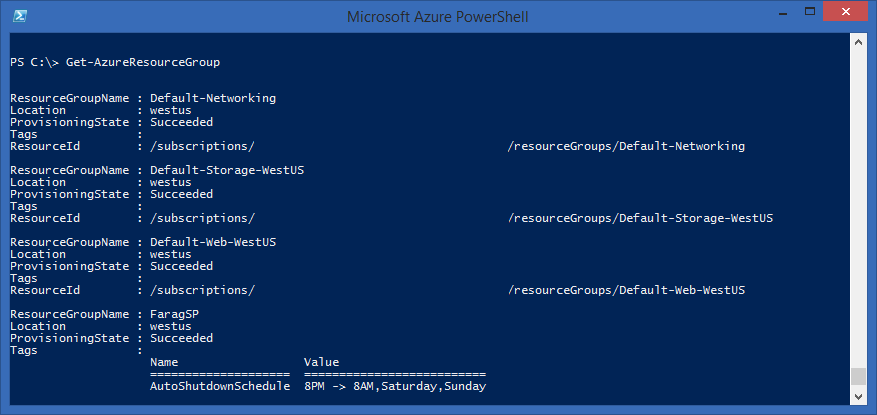
Now, if you haven’t created any Azure Resource Group yourself, which should be the case for all the Azure users who had Azure resources created prior the release of ARM, you will notice that Azure has created default Azure resource groups for each type of resources you have in your subscriptions. For instance, virtual networks will be grouped in a resource group “Default-Networking”.
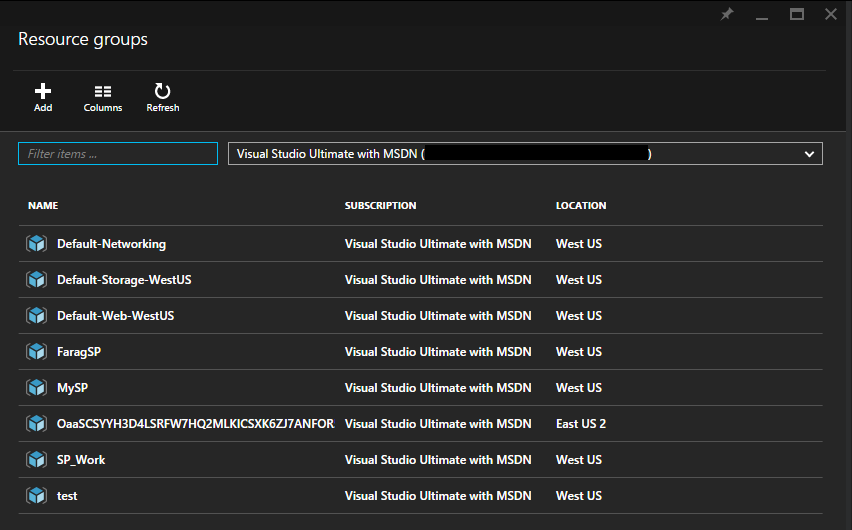
Storage accounts will be grouped into “Default-Storage-XXXX” (XXX=Location), Web resources will be grouped into “Default-Web-XXXX” (XXX=Location), If you had cloud service item created that hosts virtual machines you will see a group with the same name as the cloud service appear … etc.
It’s important to note that all these resources created on these default ARM groups are created with Azure Service Management and some articles will refer to them as v1.0 resources or also call them classic resource. These resources has some differences with resources you can create using ARM via PowerShell. Sometimes we call these resources v2.0 resources or ARM Resources.
To summarize here are the different names for each concept:
Azure Service Management mode |
Azure Resource Manager mode |
Classic resource |
ARM resource |
v1.0 resource |
v2.0 resource |
XML based resources |
JSON based resource |
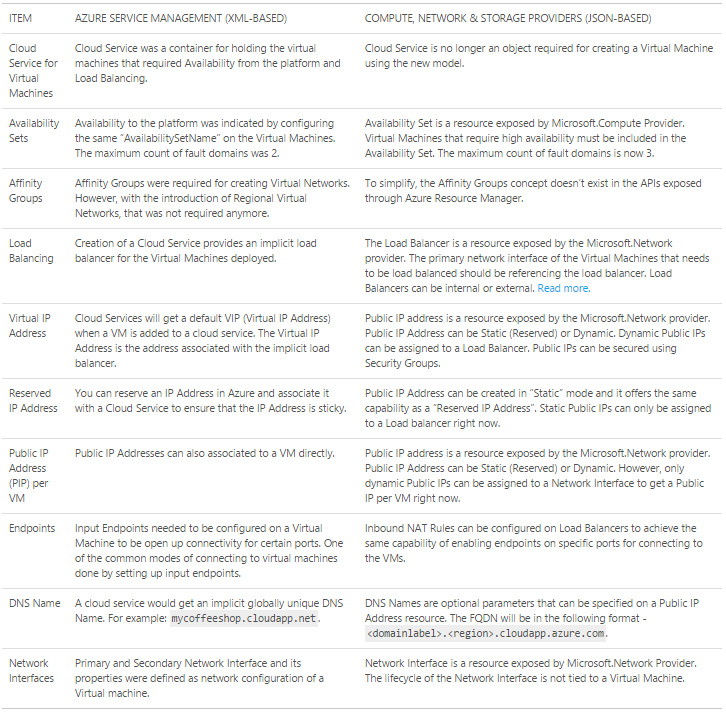
You can read more about the differences between resources created under a resource group via ARM and resources created using Azure service management here. Here is a comparison from that article:
What I want to discuss in this article is how you can move an existing Azure resource from one resource group to another. Whether it’s a default resource group or a group you have created yourself.
I will start with few basic stuff you need to know:
You need to make sure you have downloaded an Azure PS SDK of version 0.8.0 or higher. To do that go to here and you need to switch to the ARM mode via running the following command:
PS C:\> Switch-AzureMode -Name AzureResourceManager
And make sure you have added your azure subscription:
PS C:\> Add-AzureSubscription
Then enter your credentials.
For more info:
https://msdn.microsoft.com/en-us/library/dn654579.aspx
If you want to get a list of all the Azure Resources in your subscription, run the following command:
PS C:\> Get-AzureResource

Notice that each resource has:
- Name
- Resource Id
- Resource Name
- Resource Type
- Resource Group Name
- Location
- Subscription Id
Example of resource types are:
- Virtual Machines
- Domain Names
- Virtual Networks
Also notice the resource type string in PowerShell:
- “Microsoft.ClassicCompute/VirtualMachines”
- “Microsoft.ClassicNetwork/VirtualNetworks”
The above types are all v1.0 resources or we also refer to them as classic resources as indicated above. The v2.0 types will look like this: “Microsoft.Network/VirtualNetworks”:
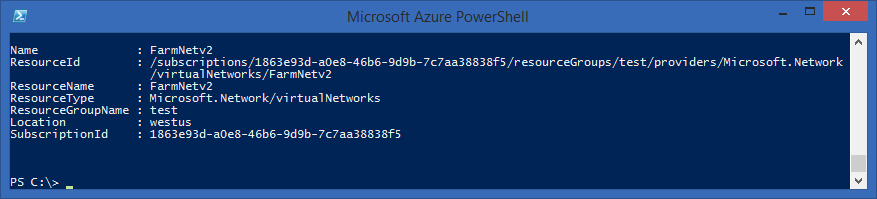
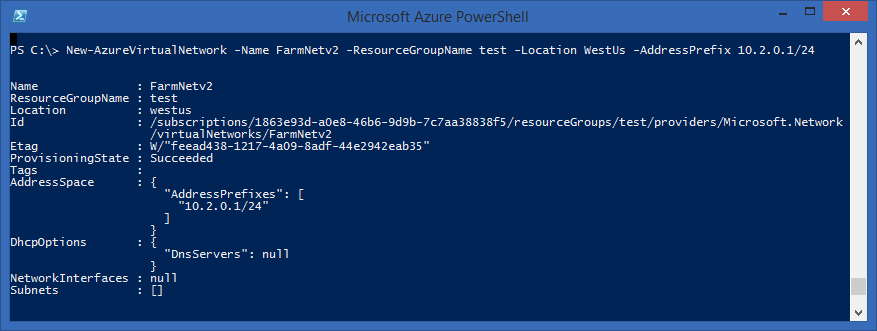
For example, if you want to create a new Virtual Network (v2.0) using the ARM mode, you run the following command (don’t forget to switch to ARM mode first as indicated above):
  PS C:\> New-AzureVirtualNetwork -Name FarmNetv2
 -ResourceGroupName test -Location WestUs
 -AddressPrefix 10.2.0.1/24
If you want to list all the existing Azure resource groups you running the following command:
PS C:\> Get-AzureResourceGroup
Now if I want to get all *Network Resources* only I can run the following command:
 PS C:\> Get-AzureResource |?{$_.ResourceType
 -like "*Networks"}
To get all *Virtual Machine Resources* only I can run the following command:
 PS C:\> Get-AzureResource |?{$_.ResourceType
 -like "*Machines"}
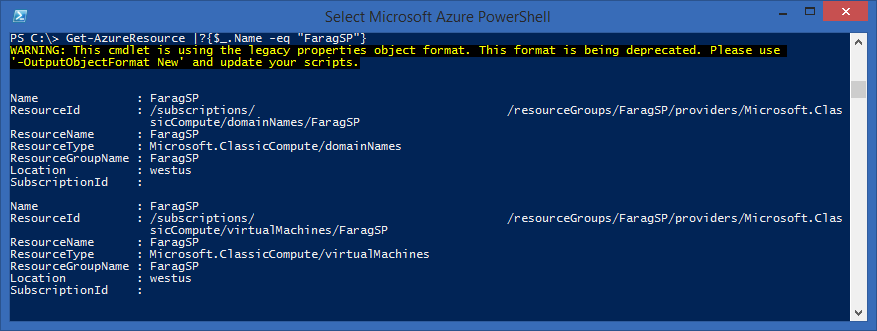
So you can change the where clause in the above script to fit your query needs. Now if I want to get one specific resource object (we will see later why this is useful) we can run the following query:
PS C:\> Get-AzureResource |?{$_.Name -eq "FaragSP"}
This assumes that your resource have a unique name across the subscription. If not you can get the resource object by Id:
  PS C:\> Get-AzureResource |?{$_.ResourceId
 -eq "/subscriptions/{XXXX}/resourceGroups/FaragSP/
 providers/Microsoft.ClassicCompute/virtualMachines
 /FaragSP"}
Moving resources between resource groups
Now we are ready to talk about how you can move resources between resource group. There is a PowerShell commandlet available on the ARM mode that will let you do just that. It is:
Move-AzureResource
So in order to move a virtual machine called “FaragSP” to a resource group called “test” we run this:
 PS C:\> Get-AzureResource |?{$_.ResourceId -eq
 "/subscriptions/{XXXX}/resourceGroups/FaragSP/
 providers/Microsoft.ClassicCompute/domainNames/
 FaragSP"} | Move-AzureResource
 -DestinationResourceGroupName test
If this is a classic Virtual Machine (v1.0) this command will fail beca
 PS C:\> Get-AzureResource |?{$_.ResourceId -eq
 "/subscriptions/{XXXX}/resourceGroups/FaragSP/
 providers/Microsoft.ClassicCompute/domainNames/
 FaragSP"} | Move-AzureResource
 -DestinationResourceGroupName test
use this Virtual Machine will be in a cloud service. You will get an error like this:
"Move request contains virtual machines but not the domain names."
You will have to move the cloud service first. Here is how you can do that:
  PS C:\> Get-AzureResource |?{$_.ResourceId
 -eq "/subscriptions/{XXXX}/resourceGroups/FaragSP/
 providers/Microsoft.ClassicCompute/domainNames/
 FaragSP"} | Move-AzureResource
 -DestinationResourceGroupName test
If that cloud service has resources associated with it, it will also fail (in our case it contains our Virtual Machine) with the following error:
"The move request must contain all the virtual machines associated with the domain name 'FaragSP'. The missing virtual machines are '/subscriptions/{XXXX}/resourceGroups/FaragSP/providers/Microsoft.ClassicCompute/virtualMachines/FaragSP'"
So the right thing to do, is to move the cloud service with all its content in a single move command, you can either use PowerShell tricks to do that or simply load all resources in that cloud service including the cloud service resource itself in a collection then move them together.
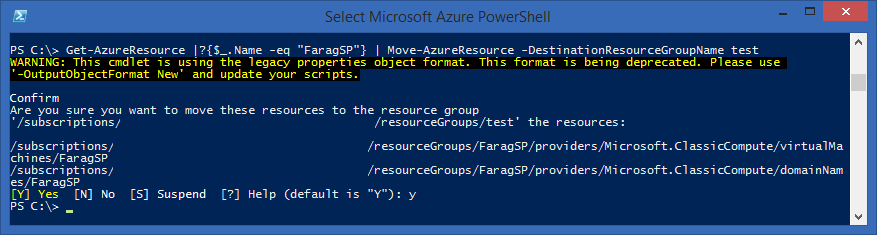
In my case I have both cloud service and the only VM in it called “FaragSP” so I can select them both and do the move command on them together:
If I run the following Get-AzureResource command, I get the desired list:
PS C:\> Get-AzureResource |?{$_.Name -eq "FaragSP"}
So now, all I have to do is add “Pipe” then the move command:
 PS C:\> Get-AzureResource |?{$_.Name -eq "FaragSP"}
 | Move-AzureResource -DestinationResourceGroupName test
And this executes successfully:
Moving Virtual Networks
Now let’s try moving a VNet from one resource group to another:
 PS C:\> Get-AzureResource |?{$_.Name -eq "FaragSP"} |
 Move-AzureResource -DestinationResourceGroupName test
This script will fail.
For a classic VNet you will get the following error:
"Resource move is not supported for 'Microsoft.ClassicNetwork'"
Or
“Bad request. Diagnostic information: timestamp”
Depending on what version of Azure SDK you have.
For ARM VNet you will get the following error:
"No HTTP resource was found that matches the request URI 'https://westus.network.azure.com:{XXXX}/130803144537698575/subscriptions/{YYYY}/resourceGroups/test/moveResources?api-version=2015-06-15'"
The reason behind this, is that it’s not supported to move Virtual Networks yet. The product group is working on adding support to that functionality soon. At the time of writing this article the commandlet Move-AzureResource will only move VMs and Storage accounts.
Workaround to move classic VNet
In order to move a classic VNet from one resource group lets say the “Default-Networking” resource group to new resource group of your choosing we can do the following:
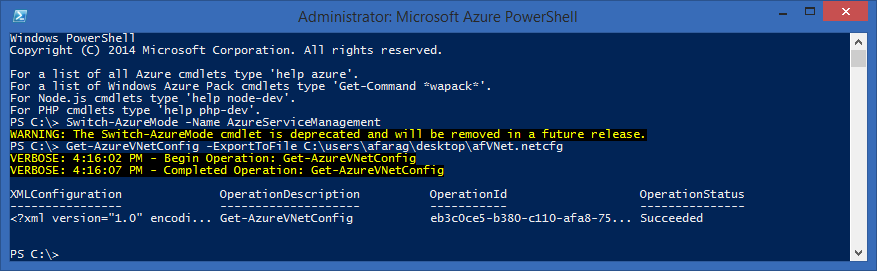
1- Export current Virtual Network configurations to an XML file
You can do that with the following command:
PS C:\> Switch-AzureMode -Name AzureServiceManagement PS C:\> Get-AzureVNetConfig -ExportToFile C:\users\afarag\desktop\afVNet.netcfg
2- Update the Azure Resource Group names in the exported config file
Open the exported file in notepad or your favorite XML editor. You will notice that all the VNets that are assigned to the “Default-Networking” resource group don’t have anything in front of their names in the name attribute in the VirtualNetworkSite tag:
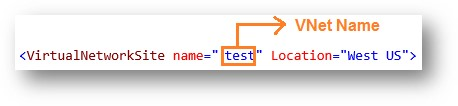
Change that to add the word “Group” then the resource group name you want to move your virtual network to as follows:
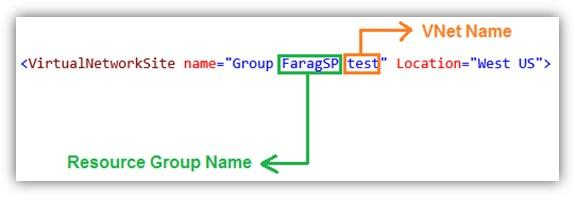
In my example above, I prepared my netcfg file to move the virtual network test from Default-Networking resource group to FaragSP resource group
If your VNet is already assigned to a resource group (other than “Default-Networking”) and you want to change the assigned resource group, just update the name after the word Group in the name attribute in the VirtualNetworkSite tag as shown above.
3- After the netcfg file is updated with all the resource group changes required run the Set-AzureVNetConfig to submit your changes to your Azure subscription
Run the following command:
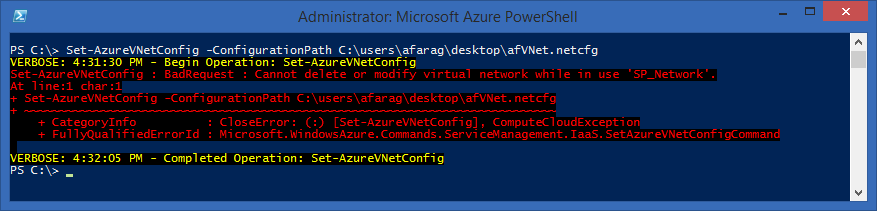
PS C:\> Switch-AzureMode -Name AzureServiceManagement PS C:\> Set-AzureVNetConfig -ConfigurationPath C:\users\afarag\desktop\afVNet.netcfg

Please note that this is only going to work if your VNet is not attached to any existing resource like VMs …etc. Otherwise you will get an error like this:
“Cannot delete or modify virtual network while in use 'SP_Network'.”
The only solution to this problem is to delete the VM that is using that VNet (keeping the VHDs) then moving the VNet to the desired resource group as explained above, and then recreating the VMs again.
Known errors and resolution
1- “Your Azure credentials have not been set up or have expired, please run Add-AzureAccount to set up your Azure credentials.”

Run Add-AzureAccount and then enter your credentials for more info click here.
I will add more errors and resolution items soon.
I hope this article helps.