Windows Azure IaaS - Upload a custom built VM template
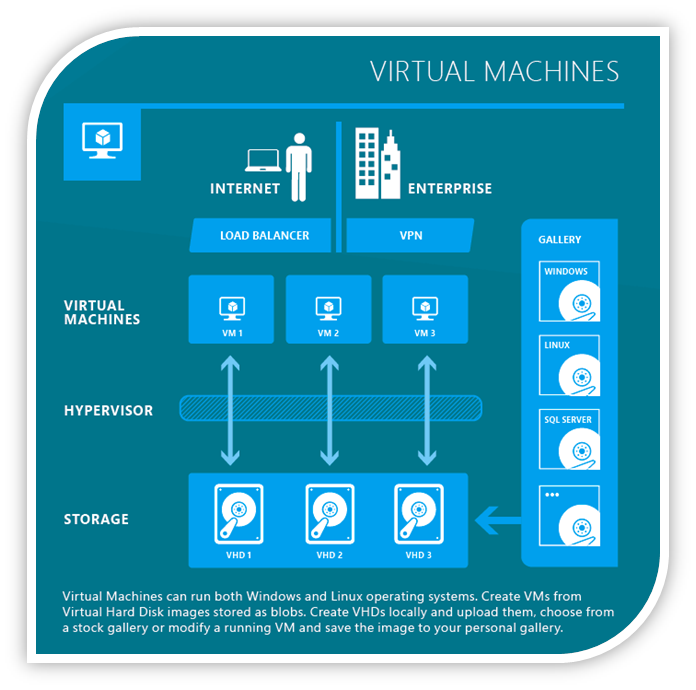
One of the new features of the Microsoft Azure Cloud services is the Virtual Machines service (Available in Beta now). This offers what is known as Infrastructure as a service IaaS. This service will allow you to host a virtual machine on the cloud running either Windows or Linux OS.
You can try this service for free now for 90 days Here
As soon as you sign up for the preview the virtual machine option will show up in your management page which will allow you to create new virtual machines:

This new feature will allow you to create new VMs from a gallery of pre-defined templates for both windows and Linux. You also get to create your own template, have it upload it and then use it moving forward. In this article I will explain in details the process of creating a VM and then having it uploaded to your Azure subscription to be used as a template.
The steps in summary are as follows:
1- Create your VM using Windows 2008 Hyper-v Manager
2- Prepare your VM to be used as a template (Generalize the VM aka sysprep)
3- Create and register a management certificate to be used to connect remotely to your Azure subscription
4- Connect and upload your VM to windows Azure
First: Create your VM that you will use as a template
In this step you will use Microsoft Windows Server 2008 Hyper-V manager or above to create a virtual machine and install the OS & Apps that you want to be present in your image. For more information on how to do that follow this link
There are few things you need to keep in mind:
1- Windows Azure IaaS up to version 1.7 Beta doesn’t support VHDX (windows server 2012) format
2- The drives capacity in your virtual machine shouldn’t exceed 64GB of total capacity for each drive
3- Virtual machines need to be syspreped before they are uploaded
1- VHD not VHDX
If you have created your VM using Windows server 2012 Hyper-v (.VHDX) you will not be able to upload it to Azure. Windows Azure version 1.7 and below doesn't support *.vhdx
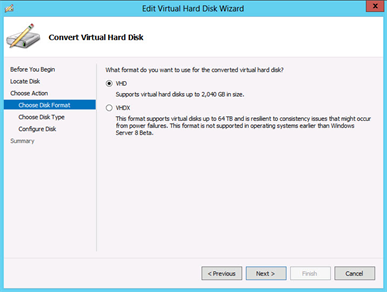
The good news is that you can convert your *.vhdx into *.vhd using the Hyper-v Manager in Windows Server 2012. Here are the steps:
1- Open Hyper-V Manager in Windows 2012 Server
2- Use the Edit Disk action within Hyper-V Manager.
3- Select the VHDX file, then select the Convert option.
4- In the Convert options screen, select VHD as the type, then continue with the rest of the conversion wizard and a VHD will be created
2- Drive maximum capacity
The maximum size of your VHD drive shouldn't exceed 64GB. So for instance if your VHD C drive is set to 80GB capacity you will not be able to upload the VM to Azure (Azure VM Role) and you will get the following error message:
The VHDs Logical Size Exceeds the System Maximum of 66560MB
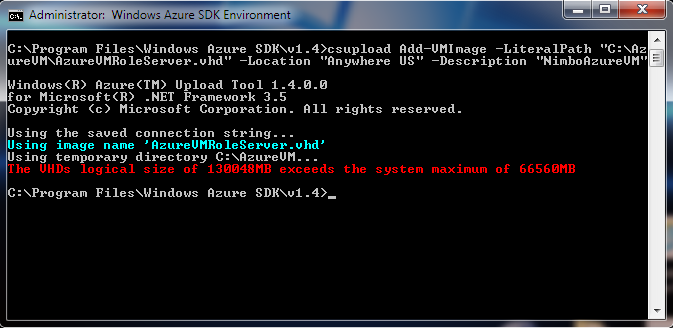
That is the case even if you are not utilizing the whole space in that drive. So let’s say you have an 80GB drive in the VHD. But you are only using 40GB out of the 80GB. You will still get the error message and won't be able to upload your VHD to Azure. The good news is, you can fix that VHD and make it smaller so you can use it with Azure. Here are the steps:
1- Shut down the VM.
2- Create a copy of the VHD you want to adjust its size
3- Attach locally copied VHD from Disk Management Console.
4- Right Click and select option as “Attach VHD”.
5- Select locally copied VHD file and click ok.
6- Right click on newly attached Disk and select “Shrink Volume” Option.
7- Provide the size of the disk you want to shrink. In your case the VHD to be less than 65GB. Let’s set it to any number equal or below 63GB
8- Detach the VHD after completion of the shrink.
9- Download and install VHDResizer application. Then open the VHDResizer application and provide the VHD file path of above shrank VHD in Source. Then provide destination path and new size as 63GB and click on Resize button.
10- Now your virtual machine disk capacity has been decreased to an acceptable size
3- Sysprep or Generalize the VM
- Open a Command Prompt window as an administrator.
- Change the directory to %windir%\system32\sysprep, and then run sysprep.exe.
- In the System Preparation Tool dialog box, select Enter System Out-of-Box Experience (OOBE) for the System Cleanup Action.
- Ensure that Generalize is selected.
- Select Shutdown for the Shutdown Options.
- Click OK.
Second: Prepare your VM to be used as a template (Generalize the VM aka sysprep) [Check previous section]
Third: Create and register a management certificate to be used to connect remotely to your Azure subscription
In order to be able to manage your Windows Azure subscription in general and more specifically any administration work that will require you to communicate with windows Azure remotely you will need to use a certificate installed on the machines you are using for the communication. That certificate should be added to your management certificate in your Windows Azure settings so it trusts the machines you will use to manage your account.
The management certificates enable client access to Windows Azure resources when using the Windows Azure SDK tools, the Windows Azure Tools for Microsoft Visual Studio, or the Windows Azure Service Management REST API. You can add as many as 25 management certificates to a subscription.
In our case (later in this article) you will see that we will use the Windows Azure ASK tools to upload the created VM Image.
Here are the steps to do that:
- Create a new certificate as follows:
- Open command prompt with elevated privileges
- Execute the following command:
- makecert -sky exchange -r -n "CN=<CertificateName>" -pe -a sha1 -len 2048 -ss My "<CertificateName>.cer"
Example:
makecert -sky exchange -r -n "CN=Ahmed Farag Azure MGR" -pe -a sha1 -len 2048 -ss My "AF_Azure_MGR.cer"
MakeCert is available as part of the Windows SDK, which you can download from https://go.microsoft.com/fwlink/p/?linkid=84091.
5. This command will create a certificate on the machine were you run the command from. If you are going to use a different machine you need to make sure that you export that certificate to that machine or create a new certificate for that other machine.
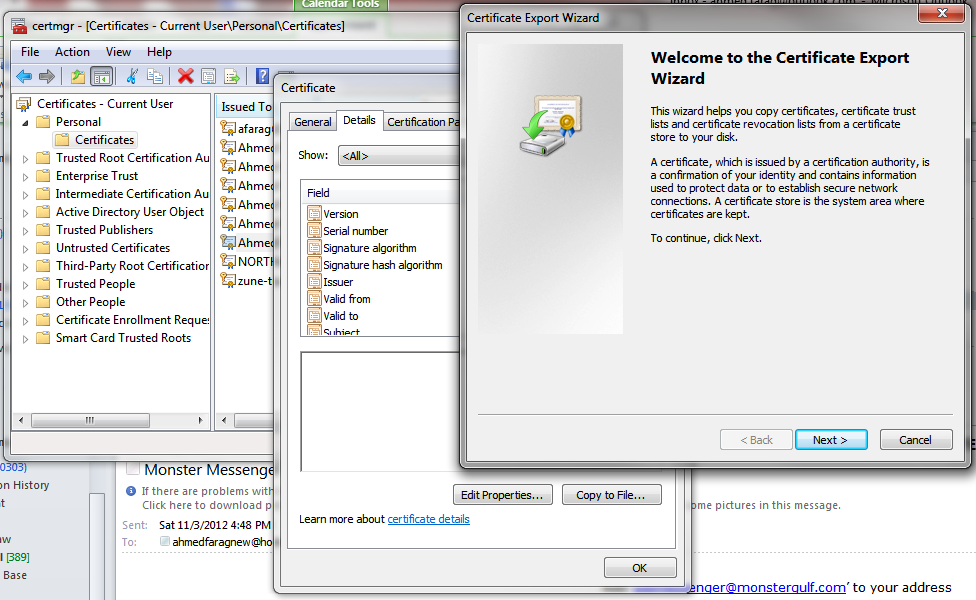
6. To Save the certificate to a file run the following command in the opened elevated privileges command prompt window: ertmgr.msc
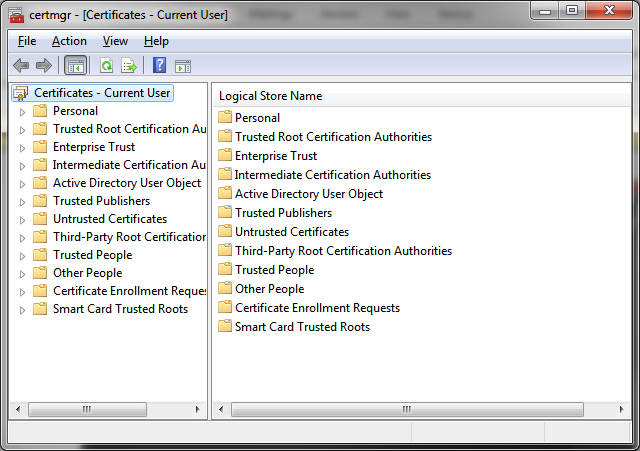
7. Under the node ‘Personal’ --> ‘Certificates’ select the created certificate
8. Right click on the selected certificate then select open from the context menu
9. Switch to the ‘Details’ tab then click on the ‘Copy to’ button
10. Make sure ‘DER encoded binary X.509 (.CER) is selected then click next
11. Select the file name and location where you want to export the certificate
12. No you are ready to upload the certificate to your Azure subscription to establish the trust with your machine.
Steps to upload the management certificate:
- Sign in to the Windows Azure Management Portal at https://manage.windowsazure.com , and click Settings.
- On the Settings page, click Upload.
The Upload management certificate dialog box opens.
3. In File, select the .cer file that contains the x.509 v3 certificate which you exported in at step 11 in the previous section
4. In Subscription, select the Windows Azure subscription that you plan to use the management certificate with.
5. Click OK
Fourth: Connect and upload your VM to windows Azure
In this step you will connect to your Windows Azure Subscription account and upload the created VM Image. We will use the Windows Azure SDK to accomplish that.
You will need to download the latest Windows Azure SDK. It can be found here
First thing you need to do is to set the connection string of your Windows Azure SDK session to point to your subscription. Then after that you can call the command that will start your upload process.
Before your start
You need to make sure you have three pieces of information that will be required for the connection string and the upload command.
1- Subscription ID
2- Management Certificate Thumbprint
3- Windows Azure Blob storage account
If you already know your Azure Subscription ID & Blob storage account info you only need to get the Cert thumbprint. You can get it as follows:
Open the Certificate Management Console:
- Hit Start
- Run certmgr.msc
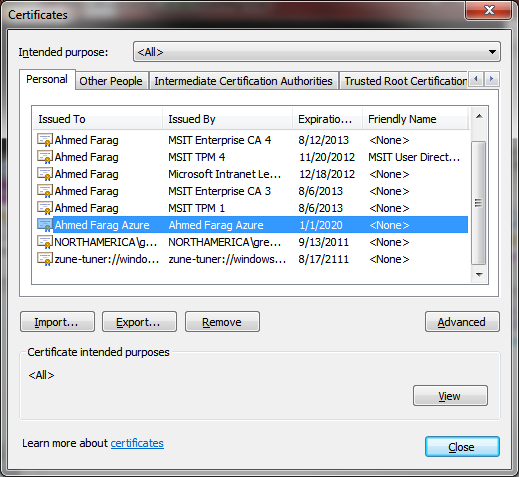
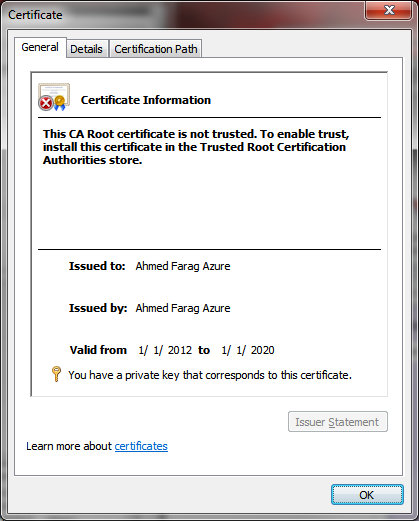
- Select your Azure Management Certificate
- Click "View"
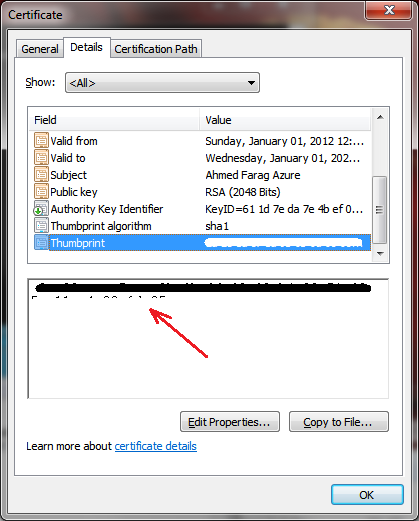
- Go to the "Details" tab and scroll down until you find the "Thumbprint" field. Click on it and copy the value shown in the bottom box
If you have neither your subscription id nor your certificate thumbprint you can get them both from your account settings online from the Windows Azure Management portal:
1- Open your internet browser and navigate to https://manage.windowsazure.com
2- Login with your Microsoft Account
3- Select the ‘Settings’ page from the bottom of the left nav
4- This will display all the uploaded management certificates along with the required info
5- Expand the ‘Subscription Identifier’ & ‘Thumbprint’ columns if required and copy the values to a safe location
To get the address of the available Blob storage accounts do the following:
1- Open your internet browser and navigate to https://manage.windowsazure.com
2- Login with your Microsoft Account
3- Select the ‘Storage’ page from the bottom of the left nav
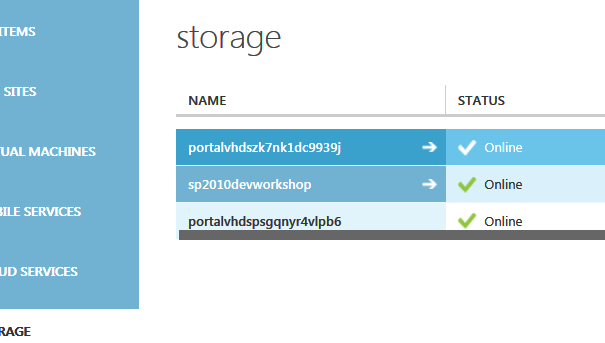
4- Click on the desired storage name
5- This will load the dashboard page of the selected storage account
6- At the bottom you will see a table of the services and their end points. Copy the Blobs endpoint. That’s the address you will need later to upload your VM Image
Now you are ready to start the upload process.
Here are the steps in details:
- Go to the Start Menu
- Open "Windows Azure Command Prompt"
- Set the connection string:
- Use the following command:
csupload Set-Connection "SubscriptionId=SubscriptionId;CertificateThumbprint=CertThumbprint;ServiceManagementEndpoint=https://management.core.windows.net"
SubscriptionId: Is the unique identifier bound with your Windows Azure subscription. Follow the steps in the previous section to learn where to find it
CertificateThumbprint : The management certificate thumbprint for the certificate that you trusted in your Windows Azure Account. Follow the steps in the previous section to learn where to find it
5. If it’s successful you should see the message: "Updated the default connection string."

6. Now we will run the upload command:
7. Run the following command:
- Add-PersistentVMImage –Destination [DESTINATION] –Label [LABEL] -LiteralPath [VM_PATH_ON_DISK] –OS [OS_WINDOWS_OR_LINUX] [-Overwrite]
-Destination - Specifies the blob storage account where the VHD file is stored. The destination includes the endpoint of the account, the container in the account where the file is stored, and the name of the VHD file. For example,https://auxpreview146imagestore.blob.core.azure-preview.com/mydisks/mydisk.vhd. Check the previous section to learn how to get the address of the your Windows Azure Blob account.
-Label - Specifies the identifier that is used for the disk in the Management Portal.
-LiteralPath - Specifies the location and name of the VHD file to upload as a disk.
-Name - (Optional) specifies the name to be used for the VHD file that is being uploaded.
-OS - (Optional) If the VHD file that is being uploaded contains an operating system to be used with a virtual machine, you must include this parameter with the value of Windows or Linux depending on the type of operating system that is installed.
-Overwrite – (Optional) Indicates that you intend to overwrite an existing VHD file with a new file.
You have to specify a container which is the folder where the VHD will be stored at hence it cannot be stored at the root
For Example:
csupload Add-PersistentVMImage -Destination https://SPVMSStorgae.blob.core.windows.net/VHDS/SP2010DevVM.VHD -Label SP2010DevWorkshop -LiteralPath "C:\Software_Temp\SP2010Dev\VM\SP2010Dev.vhd" -OS Windows
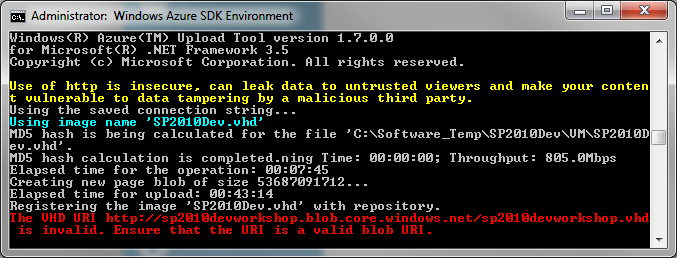
If you don't specify the container\folder you will get an error like this at the end of the upload:
The VHD URI https://YOUR_BLOB_URL is invalid. Ensure that the URI is a valid blob URI
After the upload is successful you should see something like this:
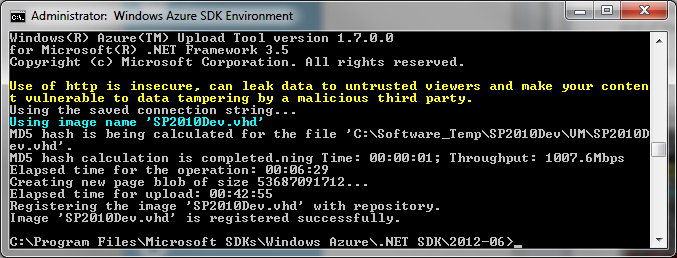
Note: Usually the VHD files are large and unless you have a very fast internet connection with a fast up stream (fastest I reached was 79 Mbs) your upload can take days. The good news is that the upload supports resumes. So If your upload times out or fails in the middle run the same Add-PersistentVMImage again (without -Overwrite) and it will resume from where it dropped. I once had a slow connection (1.8 GBs upstream and it took 1 day and 19 hours to upload a 35GB VHD).
Resources