WPF UIコンポーネントを3D内で使う
WPFの特徴の一つは3Dと2Dの融合で、ボタンなどの2DのUIコンポーネントを3Dジオメトリに貼り付けることができます。しかし、これをUIとして使うことはできません、ビジュアルとして貼り付けられているだけです。
WPF 3Dチームのブログにこれを解決するためのツールが紹介されています。つまり、3Dに貼り付けた2DのWPF UIコンポーネントをそのまま使えるようにするためのライブラリです。codeprexのサイトからダウンロードでき、ソースコードも公開されています。
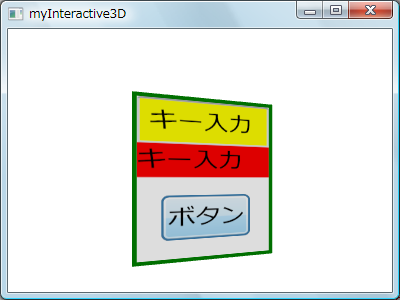
これを使って、以前紹介した入力を3Dに表示させるサンプルを修正し、3Dに入力した結果を3Dに表示させるサンプルを作ってみました。このツールを使うには、ダウンロードした3DTools.dllを参照設定に追加し、XAMLでViewport3DをInteractive3DDecoratorで囲みます。すると、モデルの指定に InteractiveVisual3Dが使え、この例のように座標変換、ジオメトリ、Visualやマテリアルをプロパティとして指定できます。ここでは明確にするためにリソースを使っていますが、特にリソースでなければいけないわけではありません。
<Window x:Class="myInteractive3D.Window1"
xmlns="https://schemas.microsoft.com/winfx/2006/xaml/presentation"
xmlns:x="https://schemas.microsoft.com/winfx/2006/xaml"
xmlns:local="clr-namespace:_3DTools;assembly=3DTools"
Title="myInteractive3D" Width="400" Height="300"
>
<Window.Resources>
<!-- Transform -->
<RotateTransform3D x:Key="myTransform">
<RotateTransform3D.Rotation>
<AxisAngleRotation3D Angle="30" Axis="0 1 0" />
</RotateTransform3D.Rotation>
</RotateTransform3D>
<!-- Geometry -->
<MeshGeometry3D x:Key="myPlaneMesh"
Positions="-1,1,0 -1,-1,0 1,-1,0 1,1,0"
TextureCoordinates="0,0 0,1 1,1 1,0"
TriangleIndices="0 1 2 0 2 3"/>
<!-- Visual -->
<Border x:Key="myVisual" BorderBrush="Green"
BorderThickness="2" Background="White">
<StackPanel Orientation="Vertical" Width="Auto" Height="Auto"
HorizontalAlignment="Stretch" VerticalAlignment="Stretch">
<TextBox x:Name="myInput" Text="キー入力" Background="Yellow" />
<TextBlock Text="{Binding ElementName=myInput, Path=Text}"
Background="Red"/>
<Button Content="ボタン" Margin="10"/>
</StackPanel>
</Border>
</Window.Resources>
<Canvas>
<local:Interactive3DDecorator>
<Viewport3D Width="400" Height="300">
<!-- Camera -->
<Viewport3D.Camera>
<PerspectiveCamera Position="0, 0, 6" FieldOfView="45" />
</Viewport3D.Camera>
<!-- Light -->
<ModelVisual3D>
<ModelVisual3D.Content>
<DirectionalLight Color="White" Direction="0,0,-1" />
</ModelVisual3D.Content>
</ModelVisual3D>
<!-- Model -->
<local:InteractiveVisual3D
Transform="{StaticResource myTransform}"
Geometry="{StaticResource myPlaneMesh}"
Visual="{StaticResource myVisual}" />
</Viewport3D>
</local:Interactive3DDecorator>
</Canvas>
</Window>
内部的にはちょっと変わったことをやっていて、ユーザーは3Dのボタンを押しているように見えますが、非表示の2D Visualがあり、そのUIを実は操作しています。3Dにはその結果を張り付けているだけです。マウスの位置が2Dと3Dで同じになるように非表示2Dを平行移動させたり、裏側がクリックされないようにしたりなど、けっこう苦労しています。詳細はWPF 3D チームのブログとchannel9を参照してください。