Animation and Trigger, Loose XAML
先日、息子が通っている中学校の先生に、数学の二次関数の授業の導入用のデモアプリを作ってほしいと依頼されて、四角形の辺上を2点が移動するときの面積(とそのグラフ)を表示するアプリケーションをWPFで作ってみました。
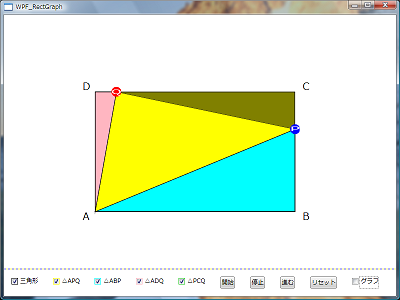
お題は、次のようなものでした。「幅10cm高さ6cmの長方形があり、左下の点Aから点Pが2cm/秒で横に、点Qが1cm/秒で上に、四角形の辺上を移動します。そのときの三角形APQの面積をアニメーションで表示したい。その他の三角形の面積も塗りつぶし表示したい。できれば三角形APQの面積のグラフも(最後に)アニメーション表示したい。」2Dだし、アニメーションとトリガーなので、WPFを使えば簡単だなと思い、引き受けました。
レイアウトとしてグリッドで上下2分割しボタン類を下に配置しました。グラフや三角形の塗りつぶしの表示・非表示は次のように Style と Triggerで設定しました。
<!--三角形APQ-->
<Style x:Key="MyFillStyleAPQ" TargetType="{x:Type Path}">
<Setter Property="Fill">
<Setter.Value>
<SolidColorBrush Color="White" />
</Setter.Value>
</Setter>
<Setter Property="Visibility" Value="Hidden" />
<Style.Triggers>
<DataTrigger Binding="{Binding ElementName=StrokeColor, Path=IsChecked}" Value="True">
<Setter Property="Path.Visibility" Value="Visible" />
</DataTrigger>
<DataTrigger Binding="{Binding ElementName=APQfill, Path=IsChecked}" Value="True">
<Setter Property="Path.Fill">
<Setter.Value>
<SolidColorBrush Color="Yellow" />
</Setter.Value>
</Setter>
</DataTrigger>
</Style.Triggers>
</Style>
三角形の形状の描画はPathを使いました。Bindingを使ってP,Qの位置座標を取得できたので、それほど複雑にならずに済みました。
<!--三角形APQ-->
<Path StrokeThickness="1" Name="TriAPQ" Style="{StaticResource MyFillStyleAPQ}" Stroke="Black" >
<Path.Data>
<PathGeometry>
<PathGeometry.Figures>
<PathFigureCollection>
<PathFigure IsClosed="True" StartPoint="50,290">
<PathFigure.Segments>
<PathSegmentCollection>
<LineSegment Point="{Binding ElementName=P, Path=Center}" x:Name="TriP"/>
<LineSegment Point="{Binding ElementName=Q, Path=Center}" x:Name="TriQ"/>
</PathSegmentCollection>
</PathFigure.Segments>
</PathFigure>
</PathFigureCollection>
</PathGeometry.Figures>
</PathGeometry>
</Path.Data>
</Path>
点P,QのアニメーションはEventTriggerとStoryboardを使いました。停止、進行、リセットもPauseStoryboardやResumeStoryboardなどが使えたので、楽でした。
<!--P-->
<EventTrigger RoutedEvent="Button.Click" SourceName="StartButton" x:Name="AtoB" >
<BeginStoryboard Name="MyBeginStoryBoard_P">
<Storyboard >
<PointAnimationUsingKeyFrames Storyboard.TargetName="P" Storyboard.TargetProperty="Center" >
<PointAnimationUsingKeyFrames.KeyFrames>
<LinearPointKeyFrame KeyTime="0:0:0" Value="50,290" />
<LinearPointKeyFrame KeyTime="0:0:5" Value="450,290" />
<LinearPointKeyFrame KeyTime="0:0:8" Value="450,50" />
<LinearPointKeyFrame KeyTime="0:0:16" Value="450,50" />
</PointAnimationUsingKeyFrames.KeyFrames>
</PointAnimationUsingKeyFrames>
</Storyboard>
</BeginStoryboard>
グラフは実際に計算するのではなく、あらかじめ計算しておいて、Storyboardを使ってクリップ領域をアニメーションさせました。
<BeginStoryboard Name="MyBeginStoryBoard_Graph">
<Storyboard>
<RectAnimationUsingKeyFrames Storyboard.TargetName="MyClipRect" Storyboard.TargetProperty="Rect" >
<LinearRectKeyFrame Value="0,0,30,500" KeyTime="0:0:0" />
<LinearRectKeyFrame Value="0,0,430,500" KeyTime="0:0:16" />
</RectAnimationUsingKeyFrames>
</Storyboard>
</BeginStoryboard>
当初C#を使ってコールバックでとか考えていましたが、結局XAMLだけですべてのイベントハンドリングも実装できたので、LooseXAMLとして実装できてしまいました(下の画像はWindowsアプリとして実装したものです)。XAML恐るべし...