Custom Developed Home Alarm System
Introduction: It all started from a break in
A few weeks ago, an intruder broke into my house. My neighborhood was known for no break-ins in the past 11 years. No neighbors had break-ins since the community was built.
I did not activate the home alarm system or pay for ADT security service. Suddenly, security became an important subject in my life. Modern security systems are similar to the n-tier online service system I engineer at work. I heard that ADT’s installation would cost more than $1000. So, I decided to build one myself.
First step: iSpy with a Microsoft Lifecam
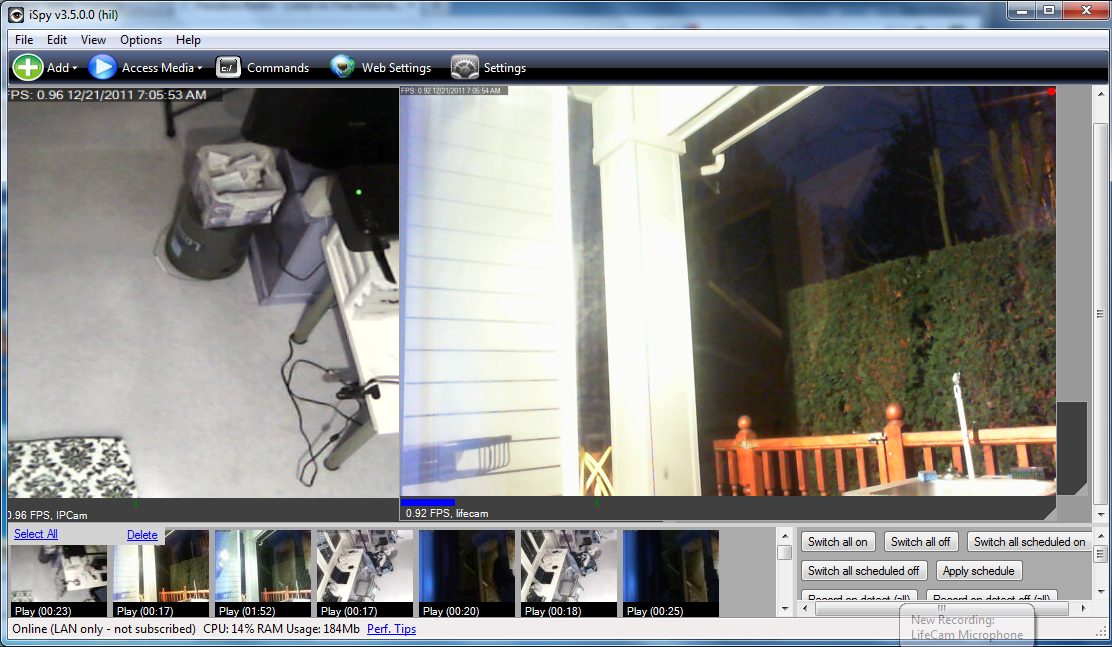
I searched on the internet to find a good monitoring software system. The paid security motion detection monitoring software had impressive features but the prices were around $70 dollars. It’s no big deal for small to medium businesses but pricy for typical families. I found a paid by service solution called iSpy. Their business model was based on using their iSpy connect website to monitor the webcam you set up at home. You need to create your login to use that service. However, if you used the iSpy Windows application, there was no charge. It allowed you to use your locally connected webcam and microphone for motion and sound detection based monitoring and recording. I configured iSpy on a PC close to my back dining room window as an application server. iSpy supported saving the recorded video in encoded .wmv files on a remote share. So, I used my Opteron workstation as the file server which had 210GB space on E drive. Based on the estimation of recording HD quality video, it would take about 1 year to fill the drive.
Adding a IP Camera
Amazon and eBay sell lots of IP cameras for security monitoring. All of them seem to be built on top of the same web API using CGI (old web technology). I bought one for $60 which
had OK reviews. The biggest concern from the reviews was the bad translation from Chinese to English. I thought since I could read Chinese, there would be no problem. It turned out the problem was the poorly designed web interface with IE using active X. The recording UI feature was difficult to use. The UI was messy and the camera reset to the default position at least once a day, which was very bad. I searched online and found the web API to change the camera's position using HTTP GET. Since the position could be specified using the query string, I wrote a PowerShell script to rotate between 3 positions I pre-configured on the camera every 2 minutes. There was no monitoring or motion based recording features with the camera but the web API supported static image and video using 2 different HTTP URLs and basic authentication. iSpy luckily supported integrating with IP Cameras. All I had to do was to specify the IP
camera's IP and username/password for basic authentication. iSpy then did motion detection based recording.
Linksys and DDWRT V24 connected to Ademco 4110
My friend Dr. Kleemann used DDWRT v24 firmware with customized scripts on an old Linksys WRT54G v 3.1 router to hook into the Ademco 4110 security alarm system at my house. The Ademco system's 3rd pin on the main circuit board sends a 12 volt signal when the alarm is triggered. He wrote an alarm status polling script reading one of the general purpose IO lines on the router’s main processor, using a GPIO read command in a script on the the Linux router to poll if the IO port connected to the alarm system. To read the alarm system’s status, users would have to telnet to the router and execute the polling script. The challenge was how to automate running the telnet command to execute the custom script, read the GPIO responses, and thereby capture the alarm status from the script output. The final goal was to send a text message to my phone if the alarm was triggered.
Automating the polling of the alarm
I used Send-TcpRequest.ps1 (https://www.leeholmes.com/blog/2009/10/28/scripting-network-tcp-connections-in-powershell/)
to automate sending telnet commands to the router. To review, Telnet is basically sending commands over TCP to the host's port 23. It's an ancient technology with security concerns but it works great in this scenario. It took me some effort to figure that Send-TcpRequest.ps1 actually supports sending a string array as a series of commands to the TCP port 23. The string array
consisted of the login username, password, and the alarm polling script. With PowerShell, capturing the output is easy. Just assign the command to a variable and that variable has the output from the telnet session. I only wanted to check if the output contains Alarm or OK so I checked if the output contained those status strings. The PowerShell script runs in a while loop reporting the last alarm status and writes to SQL Server using sqlcmd.exe. When the alarm is triggered, it sends emails using Blat (a command line emailing tool) to multiple people who can respond to the emergency. The only problem so far is that there is no way to tell if the alarm system is armed. That is a limitation on the alarm system, and the current plan is to attempt reading Serial Data off the keypad lines to capture this status information; this work is in progress. The script for reading the alarm status, though, is complete, and available at AlarmReport.Web.zip\AlarmReport\Alarm.ps1
SilverLight UI with asynchronous WCF and ASP.NET
I had the SQL server set up for the PowerShell script to log alarm status every 7 minutes. The next
step was to design a UI to report the alarm status. My home Linksys router just
like every other router supported port forwarding. I forwarded port 8080 to my
IP camera, port 80 to my Opteron workstation which I used for hosting the
Silverlight and ASP.NET website. I wanted to create both websites so I can
learn more about web UI development. The solution file is at AlarmReport.Web.zip\AlarmReport\AlarmReport.sln
SilverLight 5
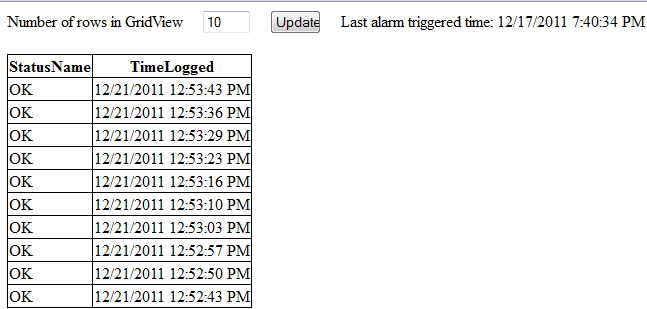
To create the richest web experience, I had to install Visual Studio 2010 SP1 and SilverLight 5 for Visual Studio 2010 to create a SilverLight project. SilverLight uses model view-view model design pattern which separates the UI view from the business logic (method callbacks). The UI view is basically a XML file and the business logic is in C# or .NET code. What I created was a simple page with 1 DataGrid, 2 labels, 1 textbox, and 1 button. The DataGrid bound to a WCF method which returned the query data from the past 10 alarm status logs. The button and the textbox allowed user to specify the number of rows to show in the DataGrid. The other label showed the time that the last alarm had been triggered. SilverLight UI uses asynchronous WCF with event callback to populate the UI controls. So in the constructor, I assigned the methods that populated the DataGrid to event handlers. Using this approach, developers are compelled to
design a UI that's not blocking (say the WCF invocation times out, the DataGrid would be blank instead of the whole page).

ASP.NET
ASP.NET came out with .NET framework 2.0. It's an older technology and the designer in Visual Studio 2010 was hard to use. I had to manually create asynchronous WCF methods
when I added service references to WCF. Somehow I had to add Async="true" attribute in <%@ Page on Default.aspx to use asynchronous WCF. The easy part of ASP.NET was the SqlDataSource in toolbox. It allowed me to configure the data source to the result set from a stored procedure which returned the last n alarm status based on a textbox's value. That was 2 birds in 1 stone. I set it up to bind the SQL data to the GridView without writing any code. If you are on a iPhone or Android, you can only access a ASP.NET website, not SilverLight. So, ASP.NET has its advantage of mobile compatibility.