How to Add Command Line Support with Your .MSI
One of the requirements in building setups was to allow the Operations team to execute the .msi file from the command line. GUI is not for expert! :)
If you are familiar with Visual Studio setup, each of the UI element has a property, and you pass this property to your custom action, or use it as condition in your setup (whether to install the documentation, help, or whether to install to the gac or not, etc.).
msiexec.exe allows you to pass some parameters to override those properties. Unfortunately the .msi file that Visual Studio generates always set the default values, default value being the values that the developers set during design time.
After inspecting the .msi, there are some custom actions that will set the property value to the default. This custom actions are always executed, whether the users sets the property via command line parameter or not. That means, if the user pass some parameters to override the property, the setup will execute the custom action, reassign the property value to the original default value.
So what needs to be done is to prevent the custom action from executing when the property is overridden by the user. This can be done quite easily with text box dialogs, checkbox dialogs are a little bit more difficult, I will cover it in other post.
The property has blank value/null in the beginning, if the user overrides the property via command line parameter, this value will not be null. By giving custom actions a condition, to execute only if the property is blank, the value that the user gave via command line will not be overridden.
You need to set the conditions in two different tables in your .msi file, InstallExecuteSequence and InstallUISequence. One to support GUI mode (interactive) and the other to support quiet/passive mode.
This is the example on how to do it, repeat the steps for every property that you want to be able to override:
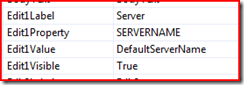
- Identify the property that you want to override. From within Visual Studio, writes down the property that you want to be able to override. For example, you set a property SERVERNAME, related to Edit1Property on Textboxes (A) , and the default value is 'DefaultServerName'.
- Check the InstallUISequence and InstallExecuteSequence tables in the .msi using Orcas, you should see something like this:

You know this is the action that you want from the Action name, it is CustomTextA, corresponds to the Textboxes (A), and it is the Edit1 control. If you check the CustomAction table, you will see something like this:

- To prevent the custom action from executing, add this condition on both InstallUISequence and InstallExecuteSequence tables, SERVERNAME = "" .

This tells, if the SERVERNAME is blank (the user did not override), execute the custom action to assign the default value. Please pay attention that the condition is for an empty string (two double quotes). - Save the .msi and close Orcas.
- Execute the .msi using this command:
msiexec /i [The msi name].msi SERVERNAME="HELLOWORLDSERVER"


After executing those steps, the UI will show HELLOWORLDSERVER in the text box.
To set this condition automatically as part of your build process, we need to use a script to modify the setup. This can be done by setting the post build event for your project.
Create a .js script. Call it CommandLineSupport.js, repeat the update statement for every property that you want to be able to override.
//This script adds command-line support for MSI build with Visual Studio 2008.
var msiOpenDatabaseModeTransact = 1;if (WScript.Arguments.Length != 1)
{
WScript.StdErr.WriteLine(WScript.ScriptName + " file");
WScript.Quit(1);
}WScript.Echo(WScript.Arguments(0));
var filespec = WScript.Arguments(0);
var installer = WScript.CreateObject("WindowsInstaller.Installer");
var database = installer.OpenDatabase(filespec, msiOpenDatabaseModeTransact);var sql
var viewtry
{
//Update InstallUISequence to support command-line parameters in interactive mode.
sql = "UPDATE InstallUISequence SET Condition = 'SERVERNAME=\"\"' WHERE Action = 'CustomTextA_SetProperty_EDIT1'";
view = database.OpenView(sql);
view.Execute();
view.Close();//Update InstallExecuteSequence to support command line in passive or quiet mode.
sql = "UPDATE InstallExecuteSequence SET Condition = 'SERVERNAME=\"\"' WHERE Action = 'CustomTextA_SetProperty_EDIT1'";
view = database.OpenView(sql);
view.Execute();
view.Close();database.Commit();
}
catch(e)
{
WScript.StdErr.WriteLine(e);
WScript.Quit(1);
}
Save the CommandLineSupport.js in the same folder with your setup project file, and set PostBuildEvent for the setup project.

Make sure .msi name matches your .msi file name.Build the project.

Standard disclaimer applies, no warranty, use it at your own risk, always test the changes. Wow, this post is longer than what I thought it would be....