Data Binding in Windows 8 compared to Android
In data driven apps, developer has to write a lot of boiler plate code to bridge the impedance mismatch between the business objects and the way the information is viewed by the end users. A business object model generally represents the semantics of the relationships between various business entities while the visualization of the information requires a more denormalized model in the context of the activity being performed by the end users. In distributed systems, the impedance mismatch also occurs due to the differences in the messaging model (serialized entities that are wire friendly) and the way the information is visualized through user interface.
MVVM (Model/View/ViewModel) pattern brings the user interface and business object model a step closer through flattening of the object hierarchy into ViewModel data sets which can easily be bound to the UI elements. Let us take a look at this concept from the following simple UI requirement perspective where an application (say Learning Management app) requires the information to be displayed as shown below:
Figure 1: User Interface
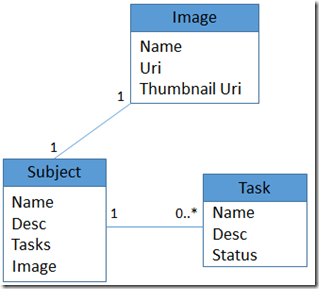
The object model that represents this business domain semantics of the entities can be as shown below:
Figure 2: Business Object Model
The Subject class has a 1:1 association with the Image and a 1:many relationships with the Task classes. This business object model helps in coping with the complexity of the application by encapsulating business rules through the strongly typed abstractions. However, it is obvious that this model requires some adaptation before it can be bound to the fields in the UI. Code for displaying business object model into a flat UI model can be tedious and boring. If proper care is not taken, this hand written code can introduce tight coupling between the business/messaging model and the UI. The logic for processing the business model to make it display requires the following work once data is read in the form of the business object instance.
- Convert the business model into a flatter object model for servicing the UI needs
- Display the converted model by setting the widget properties
if the developer is not rigorous about separation of concerns one can end up with spaghetti code due to the inadvertent commingling of Step 1 and Step 2. Platforms like Windows 8 helps with Step 2 through the declarative data binding language that can be embedded into XAML. However, it is still the developer’s responsibility to construct the object model that is more friendlier towards data binding.
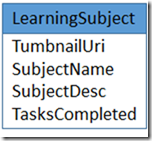
Here is the ViewModel class that comes very close to enabling the display shown in Figure 1:
Figure 3: View Model
If you carefully look at the View Model, it prefixes the names appropriately so as to avoid any name collisions. arising from flattening the business model. Creation of the View Model requires the thorough understanding of the mental model of the user reflected through screen comps.
Windows 8 Implementation
You can see how Windows 8 helps with binding of the ViewModel to the UI markup through the following code snippets:
Step 1: create the markup
<Page x:Class="LearningMgmt.MainPage”>
<ListView Name="subjectListView" ItemsSource="{Binding}" >
< ListView.ItemTemplate>
< DataTemplate>
< StackPanel Orientation="Horizontal">
<Image x:Name="tnail" Source="{Binding ThumbNailUri}" />
< TextBlock Text="{Binding SubjectName}"/>
< TextBlock Text="{Binding TasksComplete}"/>
</StackPanel>
</DataTemplate>
</ListView.ItemTemplate>
</ListView>
</Page>
If you notice, the above skeletal mark up uses XAML data binding language which requires the data binding expression to be enclosed by curly brackets. The data binding context flows top down from the container to the contained objects. the ListView.ItemSource =”{Binding}” indicates that the ListView should expect data from its DataContext property. The DataContext is set inside the code-behind file in Step 3. Image and TexBlock controls that actually display the content is set with the actual field names of the View Model shown in Figure 3.
Step 2: create the View Model
public class LearningSubject
{
public int SubjectID { get; set; }
public string SubjectName { get; set; }
public string SubjectDesc { get; set; }
public string ThumbNailUri { get; set; }
public int TasksComplete { get; set; }
}
public class SubectDB
{
public static ObservableCollection<LearningSubject> GetSubjectViewModel();
{
ObservableCollection<LearningSubject> subjects = new ObservableCollection<LearningSubject>();
//build the view model from the data returned
//from business object model processing on the server
}
}
Composition of the ViewModel code not shown as that is not our concern now. However, it is worthy to mention that LINQ expedites the process of automatically populating ViewModel objects directly from the messaging/business model object collections.
Step 3: extract data and attach it to the ListView
Once the View Model is implemented, the code-behind page simply need to set the DataContext of the ListView instance.
public sealed partial class MainPage : Page
{
public MainPage()
{
InitializeComponent();
subjectListView.DataContext = SubjectDB.GetSubjectViewModel();
}
}
The above code is sufficient for displaying the UI snippet shown in Figure 1. All the boiler plate code is encapsulated into the data binding language that is the integral part of XAML implementation. The data binding language can be used for binding the data as well as static and dynamic resources of the application. The usage of ObservableCollection ensures that the data bound to the ListView gets refreshed if the view model were to change due to the out of band data refresh.
Android Implementation
Let us go through the similar steps to implement the UI in Figure 1 for Android. The Android layout XML doesn’t support data binding language similar to Windows 8 XAML. Due to this reason, the boiler plate code that extracts data and binds it to the widgets is unavoidable. This is accomplished through the adapter model shown in the code snippets below. The work necessary for creating the view model and the mark up more or less remains the same. I used Java for the Android implementation while the markup is in the Android XML format. I also focused on the ArrayAdapter to reduce the complexity of the scenario. One could uses
Step 1: create the mark up
The mark up creation effort doesn’t vary much between Windows 8 and Android. Please not that I have removed all the attributes from XML tags except the “id” attribute for readability. For the usage of adapter model for data binding, Android markup must contain a Listview with the reserved name “list” defined at the system level.
<RelativeLayout xmlns:android="https://schemas.android.com/apk/res/android" >
< ListView android:id="@android:id/list"/>
< LinearLayout android:id="@+id/linearLayout1" android:orientation="horizontal" >
< ImageView android:id="@+id/tnail" />
< TextView android:id="@+id/subjectName" />
< TextView android:id="@+id/tasksComplete" />
</LinearLayout>
< /RelativeLayout>
Step 2: create the view model
Since our focus is data binding, we will ignore the code necessary for mapping the data from server or local storage to the view model object and consider the effort necessary for this more or less similar to Windows 8.
public class LearningSubject {
private int subjectId;
private String subjectName;
private String subjectDesc;
private String thumbNailUri;
private int tasksComplete;
public LearningSubject(){super();}
public LearningSubject(int id, String name, String desc, String uri, int tasksComplete) {
this.subjectId = id; this.subjectName = name; this.subjectDesc = desc;
this.thumbNailUri = uri; this.tasksComplete = tasksComplete;
}
public int getSubjectId() {
return this.subjectId;
}
public String getSubjectName() {
return this.subjectName;
}
public String getSubjectDesc() {
return this.subjectDesc;
}
public String getThumbNailUri() {
return this.thumbNailUri;
}
public int getTasksComplete() {
return this.tasksComplete;
}
}
public class SubjectDB {
public static ArrayList<LearningSubject> GetSubjectViewModel() {
ArrayList<LearningSubject> subjects = new ArrayList<LearningSubject>();
//build the view model from the data returned
//from business object model processing on the server
return subjects;
}
}
[Note: In Windows 8, generating collections that are ready for data binding using LINQ avoids lot of boiler plate code that maps the field from the source to the view model.]
Step 3: create the adapter for data binding
In Android implementation, a child object of the ArrayAdapter is created for mapping the view model to the UI layout fields. This is necessary due to the lack of support for declarative data binding support in the XML markup. Due to some bug in my code or the layout issue ImageView doesn’t display the thumbnail which I will fix it in the next post. In spite of the bug, the LearningSubjetAdapter is structurally accurate and hence correctly depicts the extra work required in Android for displaying application data.
public class LearningSubjectAdapter extends ArrayAdapter<LearningSubject> {
private Context _context;
private int _layoutResourceID;
public LearningSubjectAdapter(Context context, int layoutResourceId,
List<LearningSubject> subjects) {
super(context, layoutResourceId, subjects);
this._context = context;
this._layoutResourceID = layoutResourceId;
}
@Override
public View getView(int position, View convertView, ViewGroup parent) {
View displayRow = convertView;
if (displayRow == null){
LayoutInflater inflater = ((Activity)_context).getLayoutInflater();
displayRow = inflater.inflate(_layoutResourceID,parent, false);
}
TextView tvSubject = (TextView)displayRow.findViewById(R.id.subjectName);
TextView tvDesc = (TextView)displayRow.findViewById(R.id.tasksComplete);
ImageView iView = (ImageView)displayRow.findViewById(R.id.tnail);
LearningSubject ls = (LearningSubject)getItem(position);
tvSubject.setText(ls.getSubjectName());
tvDesc.setText(ls.getSubjectDesc());
iView.setImageURI(Uri.parse(ls.getThumbNailUri()));
return displayRow;
}
Step 4: attach data to the ListView
The effort for attaching the adapter along with the view model to the UI for data binding can be considered as similar to its Windows 8 counterpart that is Step 3 of the Windows 8 implementation.
public class SubjectListActivity extends ListActivity {
@Override
protected void onCreate(Bundle savedInstanceState) {
super.onCreate(savedInstanceState);
setContentView(R.layout.activity_subject_list);
LearningSubjectAdapter sa =
new LearningSubjectAdapter(this,R.layout.activity_subject_list,SubjectDB.GetSubjectViewModel());
this.setListAdapter(sa);
}
}
In summary, due to the declarative data binding capability, Windows 8 programming model seems to make a developer more productive by reducing the number of lines of code required per each unit of display. Please note that I only focused on out of the box features in both the platforms; there may exist 3rd party frameworks that will make data binding in Android a lot easier. If I have represented data binding in Android incorrectly, please drop a comment so that I can fix the post.
Technorati Tags: Windows 8,Windows store,Android,Data Binding,MVVM


