Windows Phone lockscreen
Windows Phone 8 brings with it the ability for a program to set the lockscreen picture; there are already a bunch of apps in the store that cycle through images (including the built in ability to grab pictures from the Bing home page) - however, none of those I've found so far were really usable with the pictures I had to hand... When you choose a picture for the lockscreen, the phone automatically darkens it a little, so that you can read the white text overlay (to see this in action, for example, create a completely white image and set it as the lockscreen background - it becomes a little bit dim. My pictures, though, are all a little bit busy as well, making it more effortful than I really want to read the lockscreen text and notifications. Now, I could manually touch up all my images before copying them to the phone but that's far too much like hard work - and it's much more fun to write an app to do it instead (and it's educational).
What I set out to do was create something to load selected images, darken the bottom third or so and a smidge at the top, where all the lockscreen text and notifications go, and then cycle through those images on the lockscreen: this involves making use of a background agent and, of course, functionality for setting the lockscreen background. Oh, and I also wanted to write it in a hurry and not worry too much about tidying up all the rough edges!
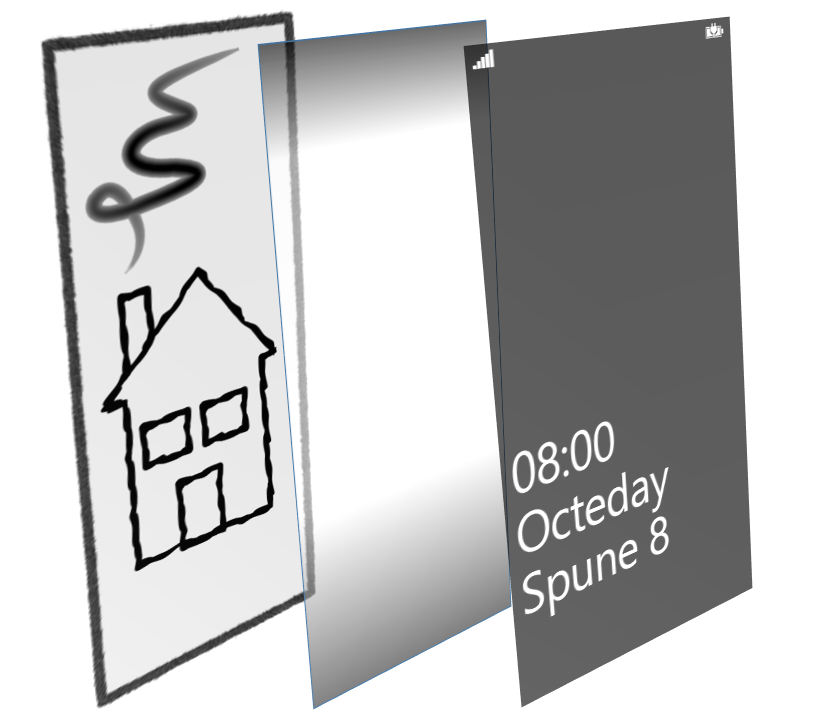
First, I'll deal with the image manipulation: the basic flow is to load an image from the pictures library on the phone, apply an opacity mask to darken parts of it (having placed the image on a black background), allow the user to tweak the amount of darkening, and then save it somewhere that can be used as the source of lockscreen background images - that final point is significant, because the lockscreen cannot be set directly to a file in the pictures library, but can take sources only from the app's resources or local file system. The Xaml below shows my image editing page, and the diagram that follows illustrates how the image layers fit together - ImagePicture at the bottom, then the opacity mask, and the overlay on the top (the slider isn't shown in the diagram).
 <Grid x:Name="ContentPanel" Grid.Row="1" Margin="12,0,12,0">
  <Viewbox>
    <Grid Background="Black" Width="480" Height="800">
      <Viewbox Stretch="UniformToFill" HorizontalAlignment="Center" VerticalAlignment="Center">
        <Image x:Name="ImagePicture">
          <Image.OpacityMask>
            <LinearGradientBrush StartPoint="0.5,0.0" EndPoint="0.5,1.0">
              <GradientStop Offset="0.0" Color="{Binding ElementName=SliderDarkness, Path=Value, Converter={StaticResource AlphaConverter}}" />
              <GradientStop Offset="0.2" Color="Black" />
              <GradientStop Offset="0.4" Color="Black" />
              <GradientStop Offset="0.7" Color="{Binding ElementName=SliderDarkness, Path=Value, Converter={StaticResource AlphaConverter}}" />
            </LinearGradientBrush>
          </Image.OpacityMask>
        </Image>
      </Viewbox>
      <Image HorizontalAlignment="Center" Source="Assets/overlay.png" />
    </Grid>
  </Viewbox>
  <Grid HorizontalAlignment="Right">
    <Grid.RowDefinitions>
      <RowDefinition Height="Auto" />
      <RowDefinition />
    </Grid.RowDefinitions>
    <TextBlock Style="{StaticResource PhoneTextSmallStyle}" Text="Darkness" />
    <Slider x:Name="SliderDarkness" Grid.Row="1" HorizontalAlignment="Center"
               Minimum="0.0" Maximum="255.0"
               Orientation="Vertical" Value="90" />
  </Grid>
</Grid>
I found I needed the mix of ViewBoxes and Grids to get the picture to size correctly and align with the overlay. (I had expected to be able to use Stretch=UniformToFill on the image itself, but I always ended up with an unscaled chunk of image, don't know why.) The opacity of the mask is connected to the slider, and I've got a small converter to change the slider value into a Color as required in the mask:
 public sealed class NumberToAlphaColorConverter : IValueConverter
{
  public object Convert(object value, Type targetType, object parameter, CultureInfo culture)
  {
    byte alpha = (byte)System.Convert.ToInt32(value);
    return System.Windows.Media.Color.FromArgb(alpha, 0, 0, 0);
  }

  public object ConvertBack(object value, Type targetType, object parameter, CultureInfo culture)
  {
    throw new NotImplementedException();
  }
}
On entry to this page, I fire up an image picker and, once that returns, set ImagePicture's source:
 private void PhotoChooser_Completed(object sender, PhotoResult e)
{
  if (e.TaskResult == TaskResult.OK)
  {
    var bmp = new BitmapImage { CreateOptions = BitmapCreateOptions.None };
    bmp.SetSource(e.ChosenPhoto);
    this.ImagePicture.Source = bmp;
  }
}
Once the user has set the darkness appropriately and hits OK, I need to persist this on-screen image to a file and, in order to display the smoothest gradient, I want to save the image at the same resolution as the screen - which isn't quite as obvious as it seems... Although Windows Phone 8 screens come in a number of pixel sizes, the operating system lies to the application and pretends it's always (close to) 800x480 , so I need to do a little digging to get the real size. The Importer class that follows does the heavy lifting, invoked via: importer.Import((BitmapImage)this.ImagePicture.Source, (byte)this.SliderDarkness.Value);
 internal class Importer
{
  internal Importer()
  {
    this. brush = new LinearGradientBrush
          {
            StartPoint = new Point(0.5, 0.0),
            EndPoint = new Point(0.5, 1.0),
            GradientStops = new GradientStopCollection
               {
                 new GradientStop { Offset = 0.0 },
                 new GradientStop { Offset = 0.2, Color = Colors.Black },
                 new GradientStop { Offset = 0.4, Color = Colors.Black },
                 new GradientStop { Offset = 0.7 }
               }
          };
    var ui = App.Current.Host.Content;
    int w = (int)(ui.ActualWidth * ui.ScaleFactor / 100), h = (int)(ui.ActualHeight * ui.ScaleFactor / 100);
    this.image = new Image
          {
            Width = w,
            Height = h,
            HorizontalAlignment = HorizontalAlignment.Center,
            VerticalAlignment = VerticalAlignment.Center,
            Stretch = Stretch.UniformToFill,
            OpacityMask = this.brush
          };
    this.wbmp = new WriteableBitmap(w, h);
  }

  internal void Import(BitmapImage sourceImage, byte alpha)
  {
    using (var store = IsolatedStorageFile.GetUserStoreForApplication())
    {
      var darkness = Color.FromArgb(alpha, 0, 0, 0);
      brush.GradientStops[0].Color = brush.GradientStops[3].Color = darkness;
      this.image.Source = sourceImage;
      // Make sure the background is black before drawing the picture
      var pixels = wbmp.Pixels;
      for (int i = 0; i < pixels.Length; ++i)
        pixels[i] = unchecked((int)0xFF000000);
      this.wbmp.Render(this.image, null);
      this.wbmp.Invalidate();

      string imageFileName = Guid.NewGuid().ToString() + ".jpg";
      using (var dest = new IsolatedStorageFileStream(imageFileName, FileMode.Create, store))
      {
        wbmp.SaveJpeg(dest, wbmp.PixelWidth, wbmp.PixelHeight, 0, 90);
      }
    }
  }

  private LinearGradientBrush brush;
  private Image image;
  private WriteableBitmap wbmp;
 }
This creates a layered structure similar to the Xaml for the screen, but (a) sets the image size to be the actual screen size in pixels (note use of Content.ScaleFactor above) and (b) spits the resulting image to a file in the application's private store via WriteableBitmap. I do it as a two stage operation so that I can reuse the same resources for multiple images (see later) which is a lot lighter on instantaneous memory usage than creating an Image and WriteableBitmap every time. Note that this isn't a particularly efficient way to alphablend the image, but it is pretty close to the fewest lines of code and least thinking on my part!
Having got some images into the store, the next job is to get them on to the lockscreen - that's actually pretty easy, just a call to LockScreen.SetImageUri. However, in order to be allowed to do this, the application must have requested permission from the user, which is a two step operation. First, the application manifest must include the lockscreen extension:
<Extension ExtensionName="LockScreen_Background" ConsumerID="{111DFF24-AA15-4A96-8006-2BFF8122084F}" TaskID="_default" />
Second, the application has to ask the user (and if the user denies permission, attempts to set the lockscreen background will fail). My main page's Loaded event handler includes the following:
 if (!LockScreenManager.IsProvidedByCurrentApplication)
  await LockScreenManager.RequestAccessAsync();
And the place where I set the lockscreen also checks that permission has been granted before performing the set:
 if (LockScreenManager.IsProvidedByCurrentApplication)
{
  using (var store = IsolatedStorageFile.GetUserStoreForApplication())
  {
    var images = store.GetFileNames("*.jpg");
    if (images.Length > 0)
    {
      var imagePath = images[rand.Next(images.Length)];
      LockScreen.SetImageUri(new Uri("ms-appdata:///Local/" + imagePath, UriKind.Absolute));
    }
  }
}
(rand is a System.Random class member.)
Whew, almost there. Time to look at background agents. On Windows Phone, you can request that small bits of additional processing happens periodically. PeriodicTask is one of the options and seems to run roughly every half hour or so. There's another ResourceIntensiveTask class which gets to do a bit more work, but is scheduled less often. (In fact, I couldn't get one of these to happen automatically over a few days to testing, so I reverted to PeriodicTask!) Note that normally background tasks silently expire after a couple of weeks if you don't use the associated application (the assumption being that if you don't use the app, you probably don't need the background agent) - however, lockscreen setting applications (and apps pinned to the start screen) get special dispensation on WP8 to keep on going. There are two parts to getting a background task to run (I seem to be saying a lot of things happen in two steps here - hmmm). First, we need the agent itself: this is a separate class library, with an object derived from ScheduledTaskAgent. Here's my unimaginatively named SceduledAgent:
 public class ScheduledAgent : ScheduledTaskAgent
{
  protected override void OnInvoke(ScheduledTask task)
  {
    ...the lockscreen background setting code from above...

    NotifyComplete();
  }
}
And the final step is to schedule the thing:
 private void StartScheduledTask()
{
  var t = ScheduledActionService.Find(ScheduledActionName) as ScheduledTask;
  if (t != null)
    ScheduledActionService.Remove(ScheduledActionName);
  if (LockScreenManager.IsProvidedByCurrentApplication)
  {
    t = new PeriodicTask(ScheduledActionName) { Description = "Change lock screen" };
    ScheduledActionService.Add(t);
  }
}
For tidyness I only want to schedule the task if the app is allowed to set the lockscreen background, hence the two-step (two again!) to remove the task and then only (re)schedule if permitted. Yes, I could optimise that a bit, but it works.
And that's pretty much all. Except for one extra little bit... It is a chore to set each image individually, wouldn't it be much more convenient to select an entire picture album? I've got another page in the app which lists all albums - the following code snippet populates the list:
 using (var library = new MediaLibrary())
{
  var albums = library.Pictures.GroupBy(p => p.Album).Select(g => g.Key);
  this.ListAlbums.ItemsSource = albums;
}
When the user selects an item from the list, I iterate over all pictures in the album, calling Import above:
 var album = (PictureAlbum)this.ListAlbums.SelectedItem;
foreach (var pic in album.Pictures)
{
  using (var stream = pic.GetImage())
  {
    var bmp = new BitmapImage { CreateOptions = BitmapCreateOptions.None };
    bmp.SetSource(stream);
    importer.Import(bmp, 90);
  }
  pic.Dispose();
}
Actually, that's a bit of a lie... Importing a large number of pictures can take quite a while, and the code above would lock the UI, so I handle the loop on a background thread. However, the WriteableBitmap processing must occur on the UI thread, so I end up marshalling each image back to the foreground - but at least the UI isn't frozen, and the user can cancel the operation if desired. The relevant code looks like this (with error handling removed for brevity):
 protected override void OnNavigatingFrom(NavigatingCancelEventArgs e)
{
  // When leaving the page, cancel any import in progress
  this.cancel.Cancel();

  base.OnNavigatingFrom(e);
}

private async void ListAlbums_SelectionChangedAsync(object sender, SelectionChangedEventArgs e)
{
  var album = (PictureAlbum)this.ListAlbums.SelectedItem;
  if (album != null && album.Pictures.Count > 0)
  {
    this.PanelPleaseWait.Visibility = Visibility.Visible;
    await Task.Run(() =>
       {
         ImportAlbum(album, this.cancel.Token);
       });
  }
  NavigationService.GoBack();
}

private static void ImportAlbum(PictureAlbum album, CancellationToken cancellationToken)
{
  var dsc = new DispatcherSynchronizationContext(App.RootFrame.Dispatcher);
  foreach (var pic in album.Pictures)
  {
    if (cancellationToken.IsCancellationRequested)
      return;

    dsc.Send((opic) =>
       {
         using (var stream = pic.GetImage())
         {
           var bmp = new BitmapImage { CreateOptions = BitmapCreateOptions.None };
           bmp.SetSource(stream);
           importer.Import(bmp, 90);
         }
       }, null);
    pic.Dispose();
  }
}

private CancellationTokenSource cancel = new CancellationTokenSource();
And that's it. (There's still plenty more that could be done - allowing the user to scale the incoming images, crop them, even rotate them - but it happens that my images are all roughly the right shape - just the wrong colours!)
For anyone who's interested, the app's in the store now.