Doppler One
Professor Chris Bishop is well known round here for giving entertaining science talks aimed at young people - a few years ago he presented the Royal Institution Christmas Lectures. Every so often Chris pops into my office to talk about a bit of software for a particular demo he wants to show - these are normally very simple bits of software, intended to illustrate some particular idea in a very clean and clear way, and one such application is the "doppler demonstrator" I'll describe here.
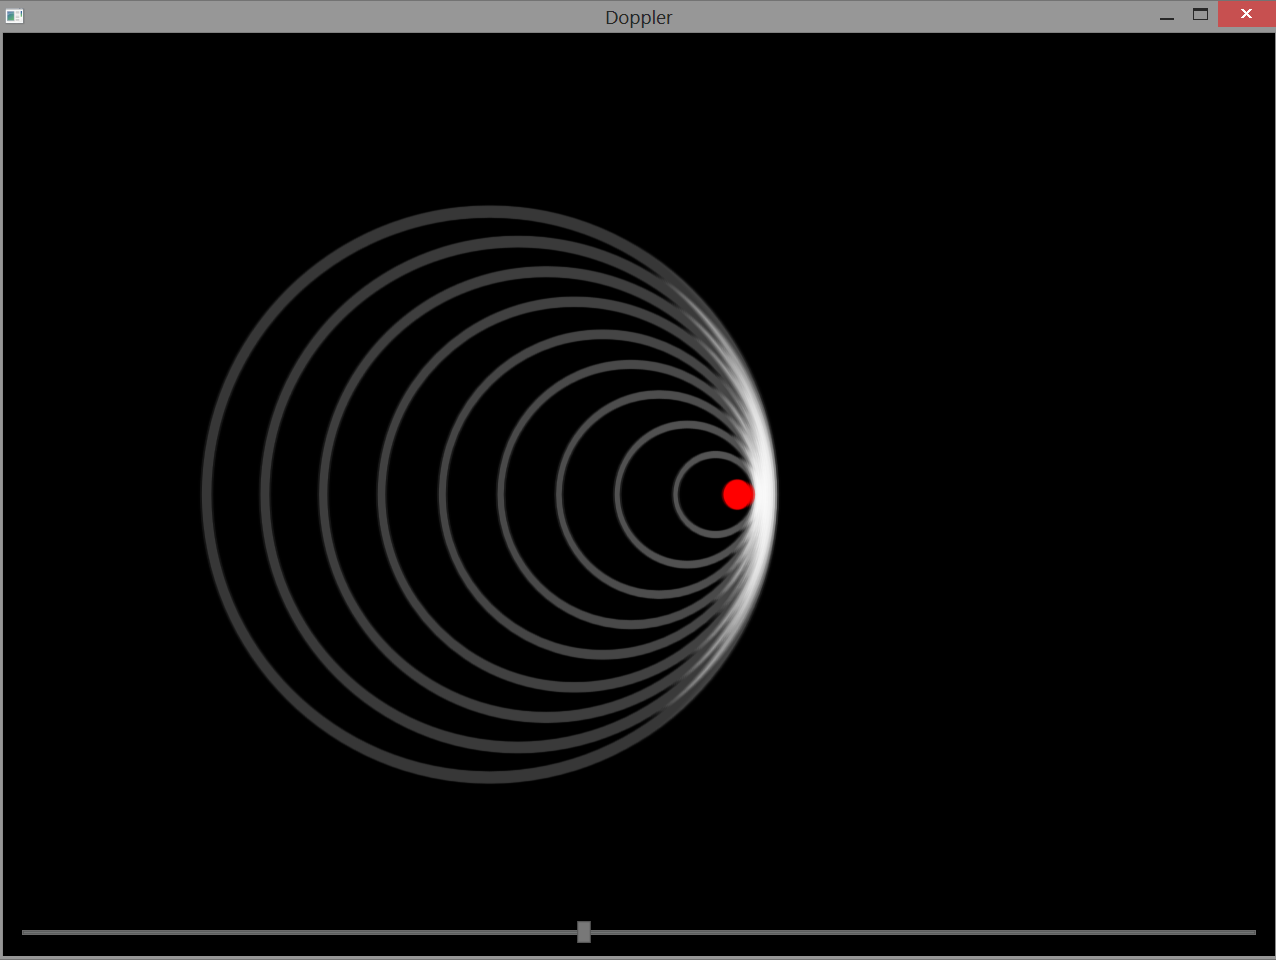
The basic idea is to have a small blob traverse the screen, emitting circular growing "waves" as it goes. When the blob is stationary, the screen looks a bit like ripples spreading from a stone dropped in a pond; when the blob moves, the wavefronts in the direction in which it's travelling are compressed and the wavefronts behind are spaced out further, indicating how, for example, sound frequency of an approaching car is higher than when it's moving away. (As the blob gets faster, it catches up with the leading wavefronts and breaks the "sound barrier.") Below is a picture of the program in action:
(Actually, the version used in the talk had no title bar nor visible slider, but this'll do for the time being.)
There are many ways this could have been written but, being fairly lazy, I chose WPF. The main window Xaml definition is very short:
 <Window x:Class="Doppler.MainWindow"
        xmlns="https://schemas.microsoft.com/winfx/2006/xaml/presentation"
        xmlns:x="https://schemas.microsoft.com/winfx/2006/xaml"
        xmlns:local="clr-namespace:Waves"
        WindowState="Normal"
        Title="Doppler" Width="1024" Height="768">
    <Grid Background="Black" KeyUp="Grid_KeyUp">
        <Viewbox Stretch="UniformToFill" VerticalAlignment="Center" HorizontalAlignment="Center">
            <Canvas x:Name="Surface" Height="600" Width="800">
                <Path Fill="Red">
                    <Path.Data>
                        <EllipseGeometry x:Name="Source" Center="400,300" RadiusX="10" RadiusY="10" />
                    </Path.Data>
                </Path>
            </Canvas>
        </Viewbox>
        <Slider x:Name="SliderSpeed" Grid.Row="0" VerticalAlignment="Bottom" Margin="10" Orientation="Horizontal"
                Minimum="0" Maximum="3" LargeChange="1" SmallChange="0.5"
                IsMoveToPointEnabled="True" Opacity="0.5" />
    </Grid>
</Window>
The blob (the ellipse called "Source") moves across the containing canvas, which is squeezed into a view box such that it easily scales to any size of screen, and the slider at the bottom controls the speed. Movement is triggered by a timer, which executes the following every 100th of a second:
         private void Tick(object sender, EventArgs e)
        {
            var x = this.Source.Center.X;
            x += this.SliderSpeed.Value;
            if (x > this.Surface.Width)
                x = 0;
            else if (x < 0)
                x = this.Surface.Width - 1;
            this.Source.Center = new Point(x, this.Source.Center.Y);

            if (++period > 12)
            {
                period = 0;

                CreateWave(this.Source.Center);
                CreateWave(new Point((this.Source.Center.X - this.Surface.Width), this.Source.Center.Y));
            }
        }
Move the blob right some amount taken from the slider, wrapping at the right edge. Every so often, emit a new ripple via CreateWave. Why two waves? I want the display to look as if everything's wrapped, not just the red blob, so I pretend there's another wave emitting source a screen width behind this one; as wavefronts expand off the right, wavefronts from this extra phantom blob come is at exactly the right place on the left.
CreateWave is fairly straightforward, but a bit fiddly. I set up some WPF animations to take care of the wavefront expanding without me having to control them step by step. (I did wonder if I could do the same for the blob motion, but couldn't come up with a clean solution in the few hours I gave myself to write this app.)
         private void CreateWave(Point c)
        {
            var wave = new Path
            {
                Stroke = Brushes.White,
                Data = new EllipseGeometry { Center = c }
            };

            this.Surface.Children.Insert(0, wave);
            waves.Add(wave);

            var d = new Duration(TimeSpan.FromSeconds(2));
            var sb = new Storyboard { Duration = d };

            const double max = 200;

            var sizeAnimX = new DoubleAnimation(11, max, d);
            sb.Children.Add(sizeAnimX);
            Storyboard.SetTarget(sizeAnimX, wave);
            Storyboard.SetTargetProperty(sizeAnimX, new PropertyPath("(Path.Data).(EllipseGeometry.RadiusX)"));

            var sizeAnimY = new DoubleAnimation(11, max, d);
            sb.Children.Add(sizeAnimY);
            Storyboard.SetTarget(sizeAnimY, wave);
            Storyboard.SetTargetProperty(sizeAnimY, new PropertyPath("(Path.Data).(EllipseGeometry.RadiusY)"));

            var strokeAnim = new DoubleAnimation(5, 9, d);
            sb.Children.Add(strokeAnim);
            Storyboard.SetTarget(strokeAnim, wave);
            Storyboard.SetTargetProperty(strokeAnim, new PropertyPath("StrokeThickness"));

            var opacityAnim = new DoubleAnimationUsingKeyFrames();
            opacityAnim.KeyFrames.Add(new LinearDoubleKeyFrame(0.7, KeyTime.FromTimeSpan(TimeSpan.FromSeconds(0))));
            opacityAnim.KeyFrames.Add(new LinearDoubleKeyFrame(0.6, KeyTime.FromTimeSpan(TimeSpan.FromSeconds(1.8))));
            opacityAnim.KeyFrames.Add(new LinearDoubleKeyFrame(0.0, KeyTime.FromTimeSpan(TimeSpan.FromSeconds(2))));
            sb.Children.Add(opacityAnim);
            Storyboard.SetTarget(opacityAnim, wave);
            Storyboard.SetTargetProperty(opacityAnim, new PropertyPath("Opacity"));

            sb.Completed += (sender, e) =>
            {
                var w = this.waves[0];
                this.waves.RemoveAt(0);
                this.Surface.Children.Remove(w);
            };

            sb.Begin();
        }
The important features here are the first couple of animations, growing the wave horizontally and vertically. The other critical parts of the routine are adding the wave to the canvas (note, inserted at the beginning, so that the red blob stays on top) and the storyboard completion handler to remove the no longer required wave. I couldn't figure out an easy way to identify the wave from the event arguments, so have a separate list of waves - I know that the expiring one is the first on this list, since they're appended in the order in which they're created.
The rest of the animations here (wave thickness, opacity and, in earlier versions, colour) are the result of Chris and I trying various ideas to see what looked good on a projector screen. The result of the application is shown below.
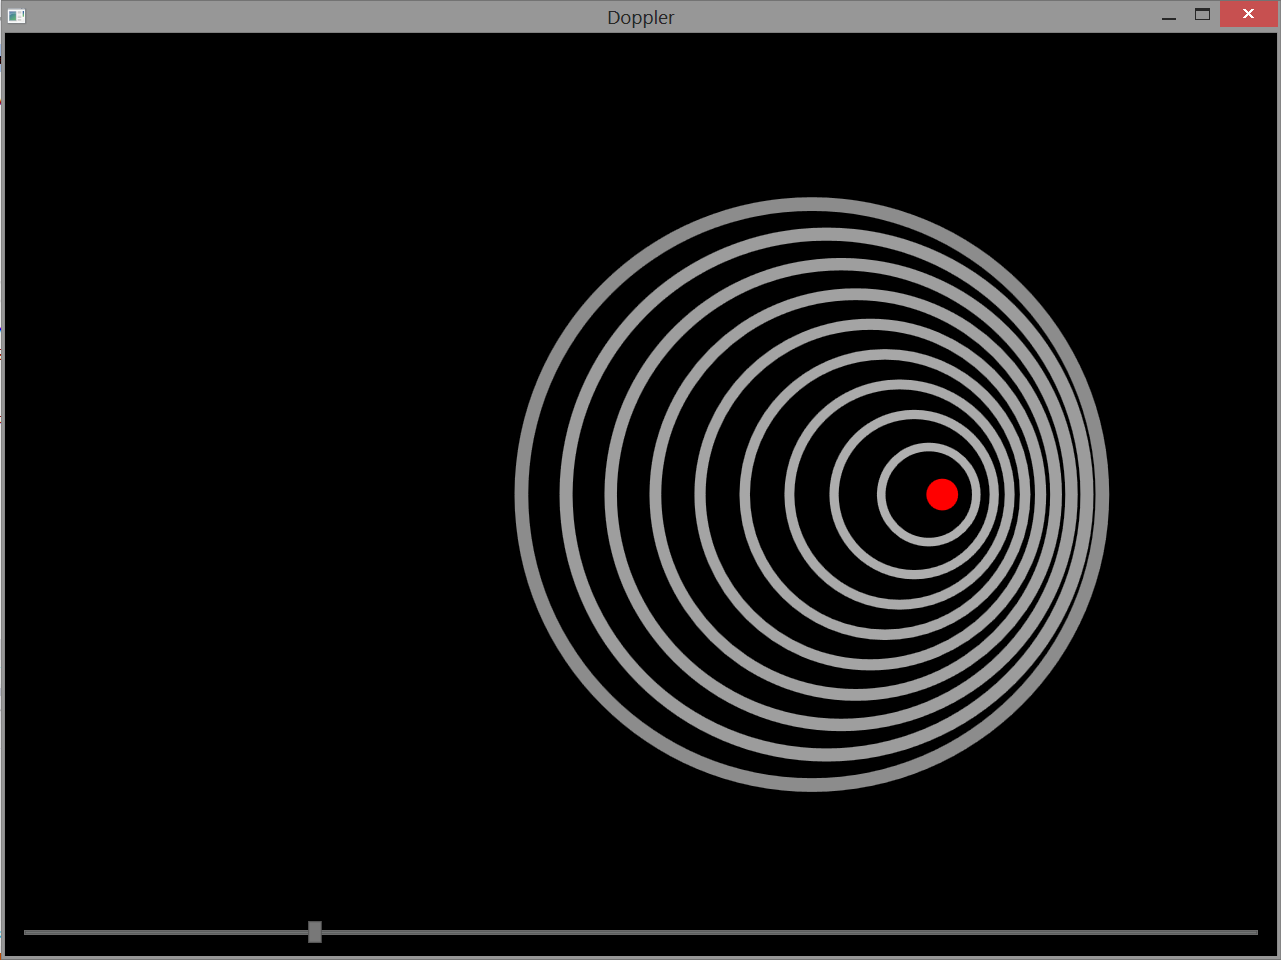
If you look carefully, you'll notice that this is quite different to the first picture: the lines are all much sharper. We did want something smoother, and adding a blur effect to the canvas almost did the right thing. However, we also really wanted to exaggerate the sound barrier breaking brightness, so I wrote a custom effect which did a little blurring and then increased the contrast a lot. The canvas Xaml fragment was modified to:
             <Canvas x:Name="Surface" Height="600" Width="800">
                <Path Fill="Red">
                    <Path.Data>
                        <EllipseGeometry x:Name="Source" Center="400,300" RadiusX="10" RadiusY="10" />
                    </Path.Data>
                </Path>
                 <Canvas.Effect><br>                     <local:ContrastEffect /><br>                 </Canvas.Effect>
            </Canvas>
The new bit (in bold) refers to the custom effect. There are numerous shader tutorials on the internet, such as this particularly good one so I won't waste time talking about how to define a customshader to use in WPF. However, below is the short fragment of HLSL which I used:
 sampler2D implicitInput : register(s0);
float4 main(float2 uv : TEXCOORD) : COLOR
{
  float2 sampleOffsets[9] =
    {
      0,0, -1,0, 1,0, 0,-1, 0,1, -1,-1, -1,1, 1,-1, 1, 1
   };

 float scales[9] =
    {
     1, 0.8, 0.8, 0.8, 0.8, 0.7, 0.7, 0.7, 0.7
   };

 // Very crude and simplistic blur
  float4 c = 0;
   for(int i = 0; i < 9; ++i)
      c += scales[i] * tex2D(implicitInput, uv + 0.001 * sampleOffsets[i]);
  c /= 7;
   c = saturate(c);

 // Increase the contrast greatly
   float4 c0 = c * c * c;
  c0.a = c.a;

  return c0;
}
The first part is a simple blur: add fractions of pixels neighbouring the target one, and average - smooths the texture a little. The last few lines really boost the contrast, such that bright colours (as with overlapping waves) really stand out, as you can see in the top image.
And that's it. Now, one question is: why am I bothering to describe this quite old and really very simple application? Well, it's been a month since I last posed and I needed to show that I was still alive! Nonono - the reason is that I'm starting to write some modern Windows apps, and thought that something like this would be interesting to port, to be covered in the next post or two...