Animation with the HTML Canvas Tag and the IE9 Preview in Expression Web 4
In this post I will walk through the steps necessary to create basic animation using the HTML canvas element, some of the capabilities of the canvas context and how to configure Expression Web 4 to preview with the IE9 Platform Preview.
The HTML canvas element has been available and implemented in most browsers for years now and is going to be implemented in the Internet Explorer 9 Platform Preview (IE9). And with the new focus on the creation of Rich Internet Applications (RIAs) using HTML 5, CSS3 and JavaScript the canvas element is going to become a lot more useful.
The canvas element provides a location in an HTML document with the web page author can draw shapes and text using JavaScript. Because authors can control what is drawn exactly, the canvas element provides pixel perfect rendering of what needs to be displayed. Drawing on the canvas element in JavaScript is performed through a proxy object called a context. The context allows you to draw on the canvas element using X and Y coordinates, and setting things like line styles and colors.
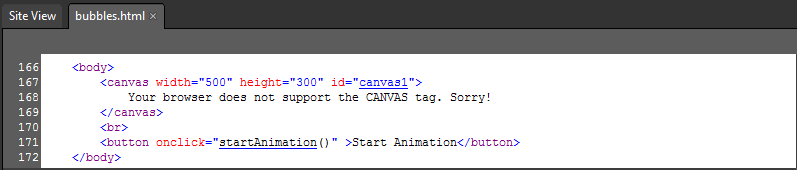
First, declare the canvas element in your HTML markup.
Then, when the animation starts a context is created which is then used to draw on the canvas.

Now that the context has been created it may be used to perform basic drawing. To draw a rectangle, first enter line style and color on the context, then call strokeRect() or fillRect() to draw the rectangle.

The context is used to control more than just the color used with the wind style used; it also allows control over opacity using the globalAlpha property. And when drawing text, the context may be used to control the font and text alignment. Once the settings are made on the context, calling field text or stroke text draws the text on the canvas.

Other effects include gradients, both linear and radial, where you can define your own custom color stops.

Now that we know how to do basic drawing on the canvas using the context object, we can create an animation effect by drawing slightly different images over time. Using the JavaScript setTimeout() function, we can create an animation loop:

The function above is called every 50 milliseconds, and invokes the render() function which does the work a drawing the each frame. By making small changes from one frame to the next we can create the illusion of motion.
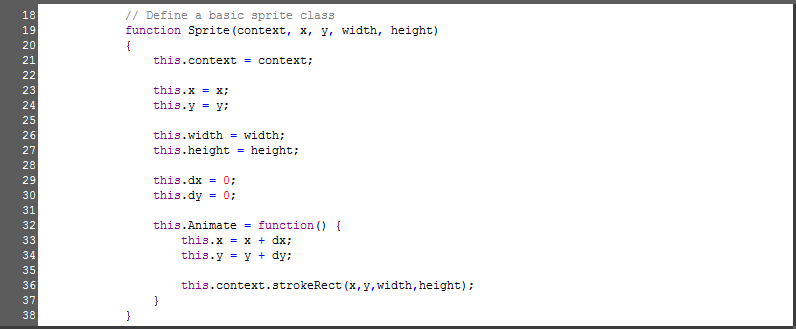
Because the canvas element doesn’t remember anything about what we have drawn on it before, we keep track of what we want to draw in JavaScript and erase the entire canvas before we draw each frame. Traditionally in computer animation, elements that represent graphical objects on the screen are referred to as sprites.
JavaScript objects can support the basic properties needed to implement a sprite: an X and Y position with a width and height. For animation purposes we also want to include information about the objects movement along the X and Y axis, which are DX and DY in the code below.
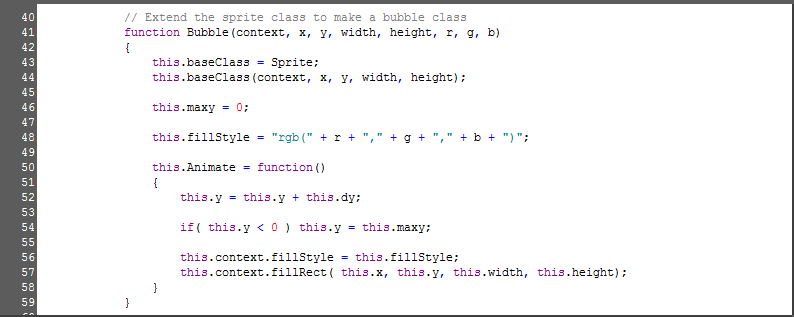
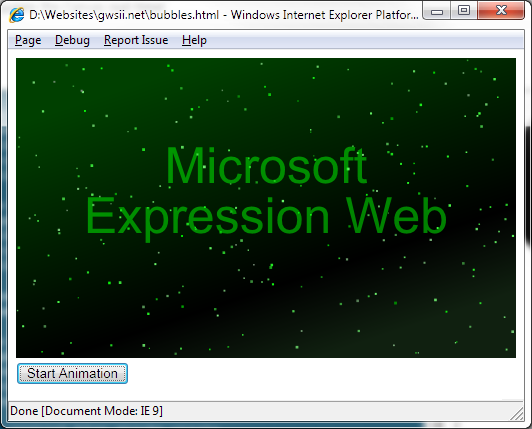
For my animation, I wanted to show bubbles floating up from the bottom of the canvas. So using JavaScript I was able to extend the sprites functionality to draw my bubbles. Notice how I define bubble to have a color associated with it and I overwrite the animate function to use that color when drawing the bubble.
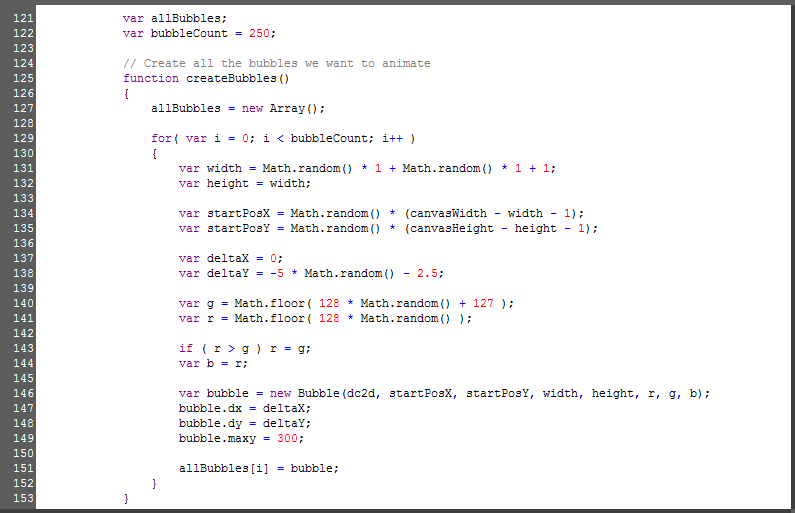
To keep track of all of the bubbles that we will be animating, we create an array called allBubbles were a place the new bubbles as they are created. Each bubble we make is given a random location, green color and vertical motion then added to the array.
For the text and the background gradient, it’s not necessary to use JavaScript objects to keep track of their state, so they can be drawn by themselves
inside of the render loop for simplicity. For a little more pizzazz I am also animating the gradient using a simple sine wave.

Here’s the final version of my page containing the gratuitous canvas animation. I developed this example using Expression Web 4 and tested it in Firefox, Opera, Chrome and Safari. These browsers have had longstanding support for the canvas element and my example works well.
<!DOCTYPE html>
<html>
<head>
<meta content="text/html; charset=utf-8" http-equiv="Content-Type">
<style type="text/css" >
canvas {
background-color:black;
}
</style>
<script type="text/javascript" >
var canvasWidth = 500;
var canvasHeight = 300;
var canvas;
var dc2d;
// Define a basic sprite class
function Sprite(context, x, y, width, height)
{
this.context = context;
this.x = x;
this.y = y;
this.width = width;
this.height = height;
this.dx = 0;
this.dy = 0;
this.Animate = function() {
this.x = x + dx;
this.y = y + dy;
this.context.strokeRect(x,y,width,height);
}
}
// Extend the sprite class to make a bubble class
function Bubble(context, x, y, width, height, r, g, b)
{
this.baseClass = Sprite;
this.baseClass(context, x, y, width, height);
this.maxy = 0;
this.fillStyle = "rgb(" + r + "," + g + "," + b + ")";
this.Animate = function()
{
this.y = this.y + this.dy;
if( this.y < 0 ) this.y = this.maxy;
this.context.fillStyle = this.fillStyle;
this.context.fillRect( this.x, this.y, this.width, this.height);
}
}
// Main animation loop.
function animationLoop()
{
render();
setTimeout("animationLoop()", 50);
}
var theta = 0;
var angle = Math.PI / 1028;
// Draws a single frame on the canvas
function render()
{
theta = theta + angle;
if( theta > 2 * Math.PI ) theta = theta - 2 * Math.PI;
dc2d.clearRect(0, 0, 500, 300);
var sine = Math.sin(theta);
var gradient = dc2d.createLinearGradient(200,0,300,300);
gradient.addColorStop(0,"rgb(0,64,0)");
gradient.addColorStop(0.25*sine+0.5,"rgb(0,0,0)");
gradient.addColorStop(1,"rgb(16,32,16)");
dc2d.fillStyle = gradient;
dc2d.fillRect(0,0,500,300);
for( var i = 0; i < bubbleCount; i++ )
{
allBubbles[i].Animate();
}
dc2d.fillStyle = "rgb(0,255,0)";
dc2d.font = "50px sans-serif";
dc2d.textAlign = "center";
dc2d.globalAlpha = 0.5;
dc2d.fillText( "Microsoft", 250, 125 );
dc2d.fillText( "Expression Web", 250, 175 );
dc2d.globalAlpha = 1.0;
}
// Gets the canvas and 2D context
function getCanvas()
{
canvas = document.getElementById("canvas1");
if( canvas )
{
dc2d = canvas.getContext("2d");
}
else
{
alert("Failed to get canvas element");
return;
}
}
var allBubbles;
var bubbleCount = 250;
// Create all the bubbles we want to animate
function createBubbles()
{
allBubbles = new Array();
for( var i = 0; i < bubbleCount; i++ )
{
var width = Math.random() * 1 + Math.random() * 1 + 1;
var height = width;
var startPosX = Math.random() * (canvasWidth - width - 1);
var startPosY = Math.random() * (canvasHeight - height - 1);
var deltaX = 0;
var deltaY = -5 * Math.random() - 2.5;
var g = Math.floor( 128 * Math.random() + 127 );
var r = Math.floor( 128 * Math.random() );
if ( r > g ) r = g;
var b = r;
var bubble = new Bubble(dc2d, startPosX, startPosY, width, height, r, g, b);
bubble.dx = deltaX;
bubble.dy = deltaY;
bubble.maxy = 300;
allBubbles[i] = bubble;
}
}
// Starts the animation for the canvas
function startAnimation()
{
getCanvas();
createBubbles();
animationLoop();
}
</script>
</head>
<body>
<canvas width="500" height="300" id="canvas1">
Your browser does not support the CANVAS tag. Sorry!
</canvas>
<br>
<button onclick="startAnimation()" >Start Animation</button>
</body>
</html>
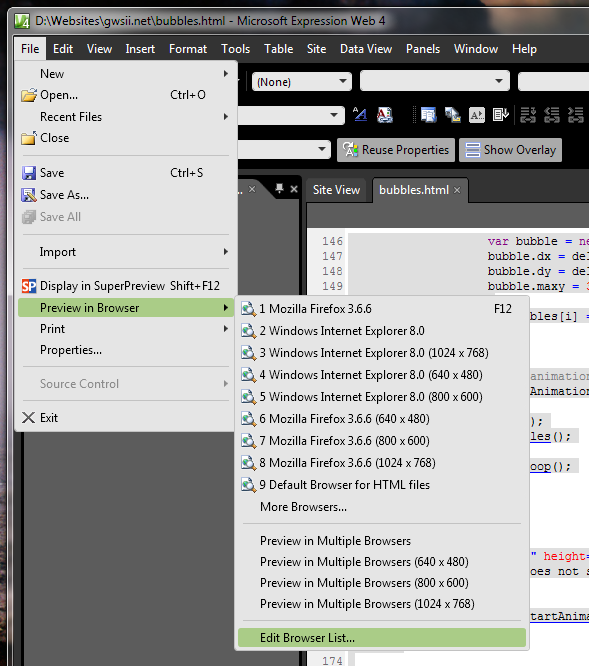
The new Internet Explorer 9 Platform Preview also supports the canvas element, and you can configure Expression Web 4 to use IE9 preview as another browser in which you can preview a page. From Expression Web, open the File menu, then select “Preview in Browser” then “Edit the Browser List…”
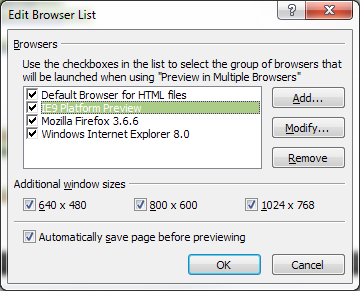
In the Edit Browser List dialog click on the “Add…” button, browse for the IE 9 Platform Preview program (iepreview.exe), select it and make sure it’s checked in the Edit Browser List window and click OK.
Now you can setup Expression Web to launch the IE 9 just by clicking the Preview in Browser button (F12).
In this post we discussed how to perform basic drawing with the HTML canvas element and provided basic tips on animation. I hope that you enjoyed this post and continue exploring the new capabilities in the IE 9 Platform Preview and using Expression Web 4. I’d like to thank John Allsopp for his great HTML 5 Live course at Sitepoint.com which provided my first introduction to the canvas element and many more HTML 5 features.