A More Useful Multi-Input Effect
In my last post, I introduced multi-input effects, where you can send in arbitrary WPF brushes that are interpreted as samplers in the shader. The example I did just showed simple image combination via linear combination of pixel values -- illustrative, but not very useful.
In this post, I'm going to demonstrate a more useful application of multi-input effects. One of the things that TV networks and local stations do to identify themselves as programs are airing is display a little image that looks like a bit like a watermark in the lower portion of the screen. This is subtle enough to not be distracting, but also clearly identifies the source. This sort of subtle branding can be quite powerful.
Some do this watermarking just via a translucent icon (trivial to do in WPF without Effects). Others use the icon in a more sophisticated way. We're going to show a more sophisticated way here.
Here is a screenshot of the sample app that's included in this post. Note the rose logo in the lower right hand corner of the image.
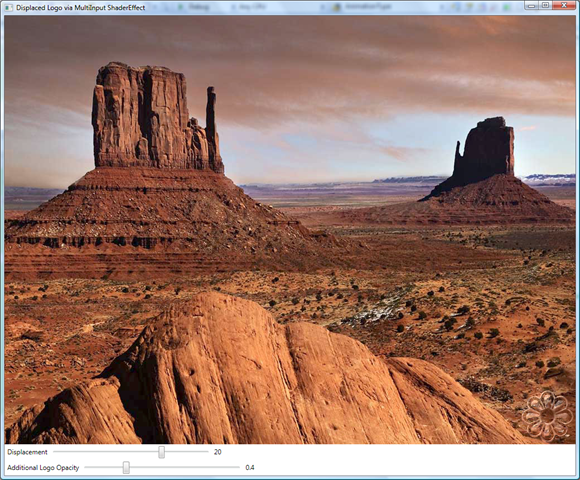
If you look closely at this close up, you may be able to see that the rose icon is really shifting the underlying pixels.
This is known as "displacement mapping", and makes for a subtle yet distinctive effect as opposed to simply alpha blending the icon on top. Note that here we use it on top of a static image. However, this can be used on live video, on UI, atop DirectX content, etc.
Using the LogoDisplacer effect
The attached project includes a "LogoDisplacer" Effect. The above is modeled as so in XAML:
 <Image Source="desert.jpg" Stretch="None" Loaded="Image_Loaded">
    <Image.Effect>
        <lds:LogoDisplacer Logo="{StaticResource logoImage}"
               Displacement="20" AdditionalLogoOpacity="0.4" />
    </Image.Effect>
</Image>
(For simplicitly, I've elided the databinding syntax that hooks the Displacement and AdditionalLogoOpacity properties to sliders.) The "Logo" property itself is the secondary sampler input, and comes in as a reference to an ImageBrush resource in this case, defined as:
 <Window.Resources>
    <ImageBrush x:Key="logoImage" ImageSource="LogoImage.png" />
</Window.Resources>
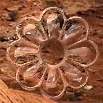
Here, LogoImage.png looks like this, but yours could be anything:

This is a snapshot from Photoshop where the checkerboard represents fully transparent background pixels. (I created this in Photoshop just by using a character from the Zapf Dingbats font, and then having the Layer Blending options set to Bevel & Emboss with Contouring.)
The LogoDisplacer shader effect uses this logo image to displace the content under it. It does so by, for each pixel, seeing how far the red channel is from 0.5, and offsetting in x the lookup of the pixel from the input image by that fraction of the "Displacement" property (in pixels). It will do the same with the green channel and the y offset. Thus if the image is grayscale (as in this example), red and green are the same, and the x and y displacement will be the same. This is all modulated by the alpha channel of the logo, so where there are transparent pixels in the logo, no displacement occurs.
After this potentially displaced lookup into the original image happens, the corresponding pixel from the logo image itself is blended in with "AdditionalLogoOpacity" alpha, to make the logo more apparent. AdditionalLogoOpacity should be small enough to not overshadow the displacement, but big enough to allow the overlay to be discernible.
When I apply the LogoDisplacer effect as constructed above, my result looks like this:
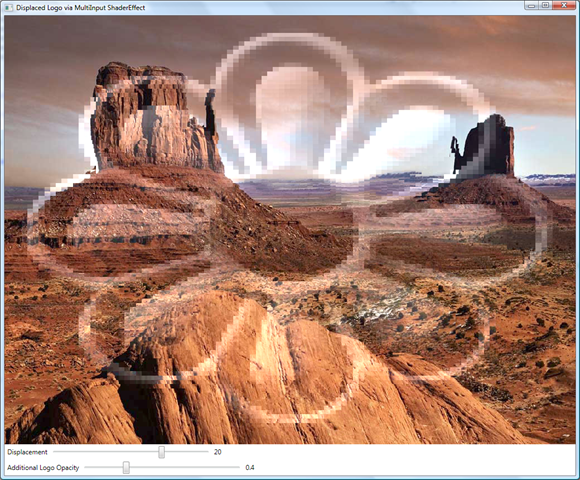
Not quite the result we were hoping for, since we want the rose just in the lower right hand corner, and at it's original pixel size.
The reason the rose takes up the whole image was discussed in the last post. The sampler inputs are always sized to match the render size of the UIElement that the effect is being applied to. So even though our logo image is 100x100, it gets scaled up to the size of the desert image (1024x768), and that's why it's pixellated.
We need to do something that prevents this resize/pixellation. Since we know that whatever input we provide will be scaled to the size of the UIElement, we can't do a predetermined scaling -- that is, we can't create a 1024x768 image and just put the rose in the lower right hand corner, because if I apply to a UIElement of a different size, the scaling will be wrong again.
Using the Viewbox property
What we do instead is rely on the Viewbox property of ImageBrush. By default, Viewbox is the unit-rect ([0,0,1,1]) that the image fills. If we make the Viewbox larger, we can in effect position the unit-rectangle (and thus the logo) anywhere within that larger viewbox. If I make the Viewbox be [0,0,2,2], then the logo will fill the upper left quadrant. If I make it (-1,-1,2,2), then it will fill the lower right quadrant.
A little math then lets us figure out how to size the Viewbox so that it fits in the lower right 100x100 pixels (or whatever the logo's pixel size is), based on the actual width and height of the UIElement. The following is the event handler invoked when the desert image above completes loading:
 private void Image_Loaded(object sender, RoutedEventArgs e)
{
    ImageBrush logo = (ImageBrush)this.Resources["logoImage"];

    // Create a viewbox so that the original logo image is in the
    // lower right hand corner at its original pixel size (relative
    // to the image element).
    Image thisImage = (Image)sender;
    BitmapSource bms = logo.ImageSource as BitmapSource;
    double scaleX = (double)thisImage.ActualWidth / bms.PixelWidth;
    double scaleY = (double)thisImage.ActualHeight / bms.PixelHeight;

    // Choose viewbox to move it into the lower right.
    logo.Viewbox = new Rect(1.0 - scaleX, 1.0 - scaleY, scaleX, scaleY);
}
Now, when we run the app, we get the first image shown in this post, with the logo at its correct pixel size in the lower right hand corner of the image.
Note also that since the logo is just an ImageBrush, it can be made dynamic. The attached solution has the logo slowly rotating about its center.
A note about performance
The performance impact of a sample like this can be deceiving, since we're only showing the lower right hand corner of the element being affected. However, remember that all pixels in the element are being examined..., but only those within the logo are being modified. Thus, any modifications to the element itself will cause the entire effect to be re-run over the element. So, while the GPU is incredibly fast, there are still limits, and one should be aware of the implications.
Writing the LogoDisplacer effect
Let's move on to how the LogoDisplacer effect gets written.
The C# file
The C# file, LogoDisplacer.cs, doesn't really have anything very interesting. It just sets up the DependencyProperties that are bound to shader registers, as we've seen with other shaders. In this case, there's Input (Sampler Register 0), Logo (Sampler Register 1), Displacement (Constant Register 0), and AdditionalLogoOpacity (Constant Register 1). We also include this mellifluous property setting, which we discuss in the Appendix of this posting:
this.DdxUvDdyUvRegisterIndex = 6;
The FX file
This is where things get more interesting. Here's the entire .fx file:
 //-----------------------------------------------------------------------------------------
// Shader constant register mappings (scalars - float, double, Point, Color, Point3D, etc.)
//-----------------------------------------------------------------------------------------

float  displacement : register(C0);
float  additionalLogoOpacity : register(C1);
float4 ddxDdy : register(C6);

//--------------------------------------------------------------------------------------
// Sampler Inputs (Brushes, including ImplicitInput)
//--------------------------------------------------------------------------------------

sampler2D implicitInputSampler : register(S0);
sampler2D logoSampler : register(S1);


//--------------------------------------------------------------------------------------
// Pixel Shader
//--------------------------------------------------------------------------------------

float4 main(float2 uv : TEXCOORD) : COLOR
{
   // Pull the sample from the logo.
   float4 logoSample = tex2D(logoSampler, uv);

   // See how far away the the red and green channels are from "gray".  Use this
   // value to shift.
   float2 fracShift = float2(0.5,0.5) - logoSample.rg;

   // But first modulate the shift by the alpha in the logo.  Most of the logo is
   // transparent, so this will zero out fracShift anywhere other than the logo.
   fracShift *= logoSample.a;

   // Calculate coordinate to sample main image at, by displacing by the logo's
   // "distance from gray".  ddxDdy is used to ensure that "displacement" is treated
   // in pixel units (it maps from pixel units to [0,1] units).
   float2 displacedCoord = uv + fracShift * displacement
                              * float2(length(ddxDdy.xy), length(ddxDdy.zw));

   // Now get the main image's color at that displaced coordinate.
   float4 color = tex2D(implicitInputSampler, displacedCoord);

   // And mix in that color with a portion of the logo, to make the logo more clearly
   // visible.  Modulate it with "additionalLogoOpacity".
   float4 finalColor = color + logoSample * logoSample.a * additionalLogoOpacity;

   return finalColor;
}
The first sections (up until "main") are just setting up the register associations that we showed in the C# file. Then, the main() entry point:
- Pulls out the color value from the logo and sees how far red and green are from 0.5 (modulating by the alpha value so it will be zero for transparent pixels).
- Figures out where to sample the main input image based upon the distances from 0.5, multiplied by the incoming "displacement" value that was in a DependencyProperty. (The DdxDdy thing is mentioned here... we'll get there soon...)
- Now samples the main input sampler at this potentially displaced coordinate, arriving at a color.
- Finally adds in some portion of the logo pixel itself on the displaced color from the main input sampler, based upon the value of the AdditionalLogoOpacity DependencyProperty.
This results in the subtle but visible displacement effect we see in the above images. A running solution is attached to this post (note that it requires the ShaderBuildTask from here.)
That's all for now!
Appendix: Advanced - a little about DdxUvDdyUvRegisterIndex
(Note that this is a fairly complicated topic that I'm not going to do full justice to in this post.)
Recall that the PixelShader system samples textures within a unit square, [0,0,1,1]. However, our Displacement value is provided in pixels (which makes sense, since we typically want to display the logo at its original pixel size). We need a way of converting from these pixel values into the unit square. That's where DdxUvDdyUvRegisterIndex comes in. You set it in the C# file to a constant register index, then in your shader, you access that register constant. This constant is a float4, representing the increment in unit coordinates that the GPU needs to move when sampling to get to the next pixel to process. The components are as follows:
- ddxDdy.x - the unit coord distance in x to move one horizontal pixel in the destination sampler.
- ddxDdy.y - the unit coord distance in y to move one horizontal pixel in the destination sampler.
- ddxDdy.z - the unit coord distance in x to move one vertical pixel in the destination sampler.
- ddxDdy.w - the unit coord distance in y to move one vertical pixel in the destination sampler.
Thus, in the above code, we multiply the Displacement by "float2(length(ddxDdy.xy), length(ddxDdy.zw))". We take the length of x & y combined to tell us about the horizontal, the z & w combined to tell us about the vertical. It's necessary to use all of these because if, for instance, I just used the primary components (x & w), but then rotated my source 90 degrees, these values would be 0, since horizontal movement no longer translated to x-coord movement in unit space.