PhoneGap on WP7 Tip #4: The Application Bar
“So two applications walk into a bar…”
One of the user interface constructs that’s unique to Windows Phone is the Application Bar. The App Bar (as we affectionately call it) gives users a standard place to find buttons for commonly used tasks within an application, and menus for lesser used but still necessary tasks.
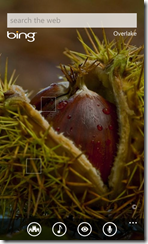
Here’s a screenshot of the Search screen where you can see the App Bar at the bottom.
While it’s possible to create something inside your HTML in PhoneGap that mimics the look and behavior of the native one, in my opinion it makes more sense to use the native Windows Phone one since it’s already there. There are a lot of advantages to using the native App Bar:
- It doesn’t scroll with your content.
- It automatically rotates the icons when the user changes from portrait to landscape orientation.
- It will recolor the icons if the user switches between light and dark themes.
- The buttons have descriptions to help the user realize what they are for.
- It will make your application look like it belongs on Windows Phone!
Because of the ability to communicate between the hosting Silverlight page and the HTML content in the PhoneGap control, you can do all the coding for the button or menu functionality in JavaScript and just invoke those functions when the button is clicked.
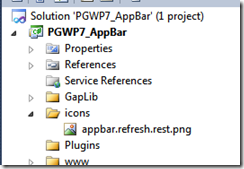
Start by creating a new project using the GapAppStarter template I described in Tip #1. We’re going to add the icon for the button to the project. There are several that can be found on your system after you install the Windows Phone developer tools. They’re stored in your Program Files folder (typically C:\Program Files (x86)\Microsoft SDKs\Windows Phone\v7.1\Icons). Create a folder in the project called Icons (right click on the project in Solution Explorer and chose Add, New Folder. Let’s call it Icons. Then, right click on the Icons folder and choose Add Existing Item. Browse to the Dark folder beneath the one mentioned above and pick your favorite. I’m using the refresh icon. Make sure you click on the png file and, in the Properties window, change Build Action to Content.
Now we’re ready to add the App Bar to the page. Open up mainpage.xaml and scroll to the bottom in source view. Add this XAML in below the </Grid> tag.
 <phone:PhoneApplicationPage.ApplicationBar>
     <shell:ApplicationBar IsVisible="True" IsMenuEnabled="True" Opacity="0.5">
         <shell:ApplicationBarIconButton IconUri="/icons/appbar.refresh.rest.png"
         x:Name="AppbarButtonRefresh"  Text="Refresh"/>
     </shell:ApplicationBar>
 </phone:PhoneApplicationPage.ApplicationBar>
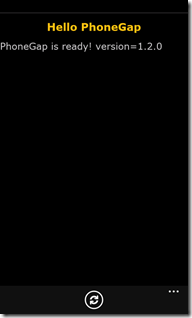
This will result in an App Bar having 50% opacity, with one button on it. If you want more buttons, just add more ApplicationBarIconButton lines. If you run the app in the emulator, you’ll see the button on the App Bar at the bottom. In addition to ApplicationBarIconButtons you could also add ApplicationBarMenuItems which show up when the user expands the App Bar by tapping the ellipses.
Clicking the button doesn’t do anything yet, so let’s add the code. First, inside the PhoneGap portion, let’s add some JavaScript to call. Here’s an example.
 function appbar_refresh() {
     var currentTime = new Date();
     document.getElementById("welcomeMsg").innerHTML = "You clicked refresh at " + currentTime.toString();
     }
To call this from our Silverlight code, just add an event handler for the button in XAML and put some code in. Go back to the MainPage.xaml page, put your cursor just inside the closing tag /> for the ApplicationBarIconButton element, type Click= and chose New Event Handler from the dropdown. Then in the C# code, just pass control into your JavaScript by typing PGView.Browser.InvokeScript("appbar_refresh");
Run the project again, and every time you click the button, the time should update on the page. Note that in this approach, we’re putting all the logic to handle the button click in JavaScript, so if you have the same PhoneGap application on other platforms, you would just need buttons in the HTML in that version to invoke that functionality.
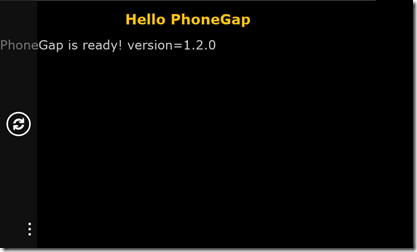
If you want to experience the App Bar in landscape mode, just follow the instructions in Tip #1 to make your application able to rotate when the user changes device orientation. The app bar will automatically adjust for landscape. You will note that in Landscape the App Bar is covering part of the PhoneGap output. You could adjust that by changing the layout within the HTML when the screen rotates. But it’s useful here because here we get to see the semi-opacity of the bar as we configured it.
It’s worth mentioning that sometimes applications need to change the App Bar, like hiding it, changing or hiding or disabling buttons or menus, etc. You can create an event handler for the ScriptNotify event as in Tip #2 and invoke that from JavaScript to manipulate the App Bar. The steps for manipulating the App Bar in code can be found in this MSDN article.
Now let’s see some great PhoneGap apps with App Bars!


