Dynamics CRM Identity Federation Demo Setup
One of the benefits of the new CRM Online identity platform is the ability to federate user identities so that end users can use their Active Directory (AD) credentials to logon to CRM Online without having to use a separate set of username and password. This is also referred to as single sign-on (SSO) wherein a user signs in once and can access many applications including CRM Online, Office 365, local on-premises applications and more.
I often get asked how can one setup a demo/test environment to showcase this functionality with CRM Online so I spent a little bit of time putting together the list of steps required to have a CRM Online demo environment with federated identity. In the end, it is a "no drama" demo as all you are doing is just signing in but there are plenty of things happening behind the scenes to enable this magic!
The list of steps might seem long because I cover everything from setting up active directory from the ground up to adding users in AD. End-to-end, it'll take about 2 to 3 hours to setup. . I pretty much followed the video walkthrough by Planky to put together my demo environment however there are few steps missing in planky's videos that I've included here. Please note that these instructions are strictly for demo environments and not recommended for production environments. In typical production environments, much of this would be done in advance and you'd need backup/redundant servers for failover, etc. In short, you're better off following the official documentation for production environment setup
The post assumes that you have already created a new CRM Online trial and have a fair bit of knowledge on Windows Server and Active Directory setup. If you don't have that background, you can easily search the terms I mention on your favorite search engine and you can find plenty of articles to help.
CRM Online Identity Federation Demo Setup Steps
Create a Window Server Hyper-V Virtual Machine with external network connectivity. I generally use the Windows Server evaluation VMs provided by the Windows team. In this setup, I'm running the VMs locally on my machine but you could also host the VMs in the cloud with Windows Azure
- Rename the machine appropriately, say CRMOFedDC
- I generally disable Internet Explorer Enhanced Security Configuration (IE ESC) for administrators & users within the server manager for my demo VMs.
- Run windows updates to install all the updates
While the updates are installing, register for a new domain name at your favorite provider. In this example, I'm using godaddy.com and the new domain name I registered for the purpose of this demo is crmpmg.com
Promote the VM to domain controller using dcpromo
- Pick an FQDN of the forest domain. The one I use in this guide is crmpmg.com and you need to pick your own. Optionally you can also use crmpmg.local but you'll have to add the .com UPN suffix at a later step.
- Chose Windows Server 2008 R2 and above only
Add the "Active Directory Certification Services" role and set up the VM as the Enterprise Root Certification authority as per the instructions here: https://technet.microsoft.com/en-us/library/cc772393(v=ws.10).aspx#BKMK_AS1
- Choose "Certificate Authority" in Role Services screen
- Choose "Enterprise" in setup type
- Choose "Root CA" in CA type
- Choose all the defaults in Private Key and database locations screens and finish the wizard to configure the machine as the enterprise root certification authority.
Download 64-bit ADFS 2.0 setup for Windows Server 2008 R2 (RTW\W2K8R2\amd64\AdfsSetup.exe) and install as a stand-alone federation server
- This will automatically install IIS, PowerShell, Windows Identity Foundation (WIF) and other required components
- Restart the machine at the end of the ADFS 2.0 setup if prompted.
Open "ADFS 2.0 Management" under administrative tools and run the ADFS 2.0 federation server configuration wizard.
- Choose " Create a new federation service"
- Choose "Stand-alone federation server" since this is a demo environment.
- New SSL certificate will automatically be created and displayed for you since the same machine is the certificate authority. Click next a couple of times and complete the wizard.
Download and install the Microsoft online services sign-in assistant: https://www.microsoft.com/en-us/download/details.aspx?id=28177
Download and install the Microsoft Online Services Module (64-bit): https://onlinehelp.microsoft.com/en-us/office365-enterprises/ff652560.aspx
If you used a local name for the AD forest domain (like yourdomain.local) and haven't added yourdomain.com (for example crmpmg.com) as the forest domain in dcpromo setup earlier, go to "Active Directory Domains and Trusts"
- Follow this article (https://technet.microsoft.com/en-us/library/cc772007.aspx) and add a UPN suffix for crmpmg.com
Note: Do the above setup only if you haven't added yourdomain.com as the forest domain in AD. For example if you added crmpmg.local during dcpromo, this UPN addition is necessary, otherwise not required.
Login to the Microsoft Online services portal (portal.microsoftonline.com) with the administrator credentials of your demo account. This is typically the first user that was used to provision the trial such as admin@crmpmg.onmicrosoft.com.
Add the yourdomain.com (e.g., crmpmg.com) domain name to the "Domains" under Management.
This can be done using the portal web UI or using PowerShell command New-MsolFederatedDomain: https://onlinehelp.microsoft.com/en-us/office365-enterprises/ff637620.aspx
See godaddy specific steps here: https://onlinehelp.microsoft.com/en-us/office365-enterprises/gg584185.aspx.
A visual walkthrough of this specific step is available in this youtube video: https://www.youtube.com/watch?v=JQbdWXFTJfw
Create a TXT entry in the zone file within godaddy.com with the values provided for your subscription in the portal.

Wait for a few minutes and go back to the Microsoft online portal and click "Verify" button at the bottom of the instructions page.
Select Exchange Online & Lync Online in the "Specify domain services" step.
If you choose SharePoint Online, it is primarily for the public website hosting on office365.com as explained here. https://onlinehelp.microsoft.com/en-us/office365-enterprises/jj128104.aspx?CompanyType=CompanyTenant&DapEnabled=0&HasLiteSKU=0&HasAdminPermissions=1
Also see "Specify the services you'll use with your domain name" within https://onlinehelp.microsoft.com/en-us/office365-enterprises/f86db0a2-5713-4106-b90a-edd09ff898a2#bkmk_intent?CompanyType=CompanyTenant&DapEnabled=0&HasLiteSKU=0&HasAdminPermissions=1
Add a user in the Active Directory Users and Computers ensuring that the UPN suffix is the FQDN suffix (for example testuser@crmpmg.com).
Enable Remote Desktop on the box and add the above user to Remote Desktop users.
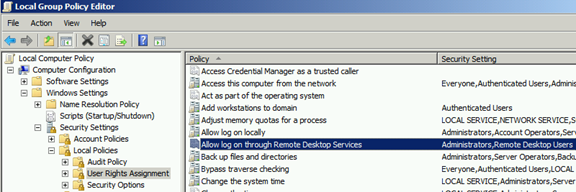
Open Group Policy Editor (gpedit.msc) and allow login through terminal services for remote desktop users as shown in the screenshot below.
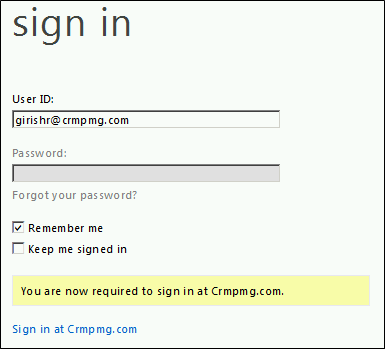
Go into the online services portal and manually add domain users like girishr@crmpmg.com. It will provide a temporary password but you won't use it as you'll use the domain credentials after next step.
Note: Manually adding domain users is not recommended however the reason we're doing this is because we can test and verify identify federation with just one box without setting up directory synchronization. If you don't add this user now, the only way to add domain users after federation conversation is through directory synchronization.Next step is to convert the domain name to federated (Convert-MsolDomainToFederated -DomainName crmpmg.com) by running the set of commands in https://onlinehelp.microsoft.com/en-us/office365-enterprises/ff652560.aspx.
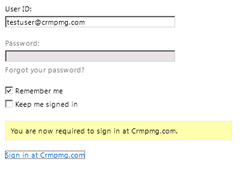
Remote desktop into the VM using CRMPMG\testuser and login to CRM or the portal (portal.microsoftonline.com). When a domain user tries to sign-in, the office365 login page, automatically redirects to the federated login page.
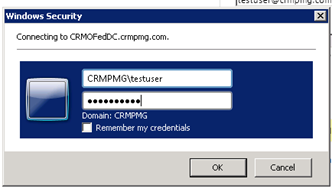
Active directory then prompts for credentials
Once you sign-in using AD, you'll immediately login to the portal/CRM.
You can disable this secondary authentication prompt by doing the below steps.
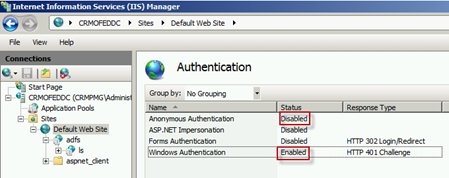
- Disable Anonymous Authentication and enabling Windows Authentication in IIS as shown in the below screenshot. Restart IIS to ensure the changes have been refreshed.
- Add https://crmofeddc.crmpmg.com to the "Local Intranet Zone" within IE for the windows credentials to be passed automatically.
- Now if you visit the portal (or CRM), you just enter your username and you'll be automatically signed-in using your domain credentials.
- Disable Anonymous Authentication and enabling Windows Authentication in IIS as shown in the below screenshot. Restart IIS to ensure the changes have been refreshed.
You can also create single sign-on URL that allows users to login to CRM directly without even entering the username. This is done by appending the CRM URL with whr query string: https://crmpmg0.crm.dynamics.com/?whr=https://crmofeddc.crmpmg.com/adfs/services/trust
DirSync
Note that once you've enabled federation, you cannot add AD users through the portal UI. AD users have to be synchronized from AD to the online portal through a tool called DirSync.
Visit https://portal.microsoftonline.com/DirSync/DirectorySynchronization.aspx and click "Activate" (step 3) to active directory synchronization.
Create a second virtual machine (Windows Server 64-bit image) and join the VM to the CRMPMG AD domain. As always it is certainly a good idea to install all the latest windows updates before proceeding further.
Note: In Hyper-V, you might want to create an additional network switch (Internal or Private) to bridge the VMs together to able to domain join. This network setup is similar to the 2010 IW VM.
Install the pre-requisites for dirsync tool
- .NET 3.5 SP1
In the second VM, install the DirSync tool: https://onlinehelp.microsoft.com/en-us/office365-enterprises/ff652545.aspx
Note: Office 365 supports synchronization of up to 50,000 objects (users, groups, etc). To synchronize more than 50,000 objects, contact Office 365 Support.
At the end of the install, make sure that the configuration wizard checkbox is selected to start the configuration right after the install.
Enter the online services tenant administrator credentials (admin@crmpmg.onmicrosoft.com) followed by domain admin credentials (CRMPMG\administrator).
Leave the "Synchronize directories now" checkbox as check and finish the wizard.
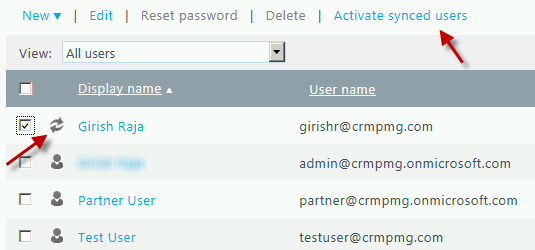
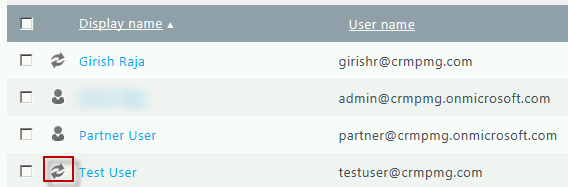
After a few minutes, you can see that users from Active Directory are now available within the Microsoft Online Services users. You can also verify directory synchronization by following the steps here: https://onlinehelp.microsoft.com/en-us/office365-enterprises/ff652541.aspx. You can easily distinguish domain users as they have a special "Refresh" icon next to them. Select the synchronized users and active them. You'd also want to assign them security roles with CRM for those users to access CRM Online.
You will also see an error email regarding testuser@crmpmg.com stating that there is conflict during directory synchronization. This is expected since we manually added testuser instead of synchronizing from the directory. You can delete the user within the portal and it'll get added back to CRM after a few hours via synchronization.
You can also force directory synchronization using PowerShell (Start-OnlineCoexistenceSync) or using configuration wizard as per the instructions here: https://onlinehelp.microsoft.com/en-us/office365-enterprises/ff652557.aspx.
And you're done! You now have CRM Online demo environment with federated identity and directory synchronization.