Bots as Chat Agents, with Escalation to Live Agents
Update, Jul. 2018: With the QnA Maker service now in GA, it is now necessary to pass in an additional parameter to the QnAMakerDialog if using a GA QnA Maker Service: "endpoint hostname" ; see this link (scroll to QnAMakerDialog heading, and CSharp code sample for details)
Update, Feb. 2018: This post has been updated to reflect the new Bot Channels Registration process in the Azure Portal.
Bots offer organizations a means of scaling customer service and customer engagement through natural and intuitive conversational experiences, as we’ve seen in some of our earlier posts. But bots will not always be able to meet all of our customers’ needs during an interaction. Being able to seamlessly transition a customer from a conversation with a bot to an actual live agent can be a key capability in realizing scale while also ensuring high-quality customer engagements.
In this post, we will see how we can implement seamless escalations from bots to live agents leveraging the capabilities of Live Assist from Microsoft partner CafeX.
This one-minute video (no sound) shows our intended functionality in action:
[video width="1920" height="1040" mp4="https://msdnshared.blob.core.windows.net/media/2017/10/QnA_Bot_wEscalation_wCallouts.mp4"][/video]
Escalation Options with Live Assist
With the latest release of Live Assist for Dynamics 365, we have two options available to us in implementing Bot to Agent escalations:
- Create a bot and enable it as an agent in Live Assist, with the ability to transfer/escalate to other agents; this is enabled through the Live Assist Bot Agent Connector, and will enable end users to engage with your bot via the Live Assist end-user interface, just as if engaging via Live Assist chat with a Live Agent
- Create a bot and enable it on the Bot Framework channels of your choice, adding the ability for chats to be escalated to Live Assist agents via the Live Assist Escalation SDK; this option will enable end users to engage with your bot on the Bot Framework channels of your choice, though not through the Live Assist end-user chat experience
In this post, we will implement the first option: a bot that is enabled as a Live Assist agent, with the ability to transfer or escalate to other “real” agents in Live Assist.
We will create a bot that can:
- be accessed via the standard Live Assist end-user chat interface
- provide answers to customer questions via the Cognitive Services QnA Maker API
- detect the sentiment of all customer input via the Cognitive Services Text Analytics API
- initiate a transfer to other agents or skills when negative sentiment is detected
Note that we will be building our bot using the Bot Builder SDK for .NET. If you are working with Node.js, CafeX offers sample code for enabling a Bot Agent that can provide answers via QnA Maker here.
Prerequisites
The prerequisites for building and deploying our escalation bot include:
- An instance of Dynamics 365 for Customer Service (Online)
- You can request a trial of Dynamics 365 for Customer Service here
- A Live Assist for Dynamics 365 Trial that has been activated for your Dynamics 365 organization
- Optional: you may wish to provision and configure a Dynamics 365 Portal, and embed Live Assist chat in your portal
- A Microsoft Azure subscription for hosting our bot, and for enabling our Cognitive Services resources
- Visual Studio 2017
- Microsoft .NET Framework 4.6.1
- The Bot Builder SDK for .NET
- The Bot Application, Bot Controller, and Bot Dialog Visual Studio Templates
- Save the downloaded zip file to your Visual Studio 201X templates directory, which is typically found in %USERPROFILE%\Documents\Visual Studio 2017\Templates\ProjectTemplates\Visual C#
Setting Up our QnA Maker Service
Microsoft's Cognitive Services QnA Maker provides an easy-to-use tool for the ingestion of "Frequently Asked Questions" (questions and answers), making them available via a service that can be readily consumed within the Bot Framework. Bots can provide answers to end-user questions through the use of a Bot Framework dialog that we will leverage later in our post.
The QnA Maker documentation provides a brief video walkthrough of how to access the QnA Maker service on https://qnamaker.ai, and to create and publish a question and answer service. Rather than recreate the documentation, follow along with the steps seen in the video here.
While following along with the quick-start video, we obtain our credentials for accessing the knowledge base service we have created, including our:
- QnA Maker Subscription Key
- The Knowledge Base ID
- The Knowledge Endpoint URL
Save these credentials for use later in our setup process.
Optional: If you wish to populate your QnA Maker service with the articles from your Dynamics 365 knowledgebase, you can export your articles from Dynamics 365 to Excel, then format the articles in the tab-separated Question, Answer and Source format outlined in the QnA Maker documentation, for upload into your QnA Maker knowledge base.
Obtaining our Text Analytics Endpoint and Key
To enable our bot to escalate to an agent when the end user expresses negative sentiment, we will leverage the Cognitive Services Text Analytics API, which is able to be provisioned from the Azure Portal with an Azure subscription.
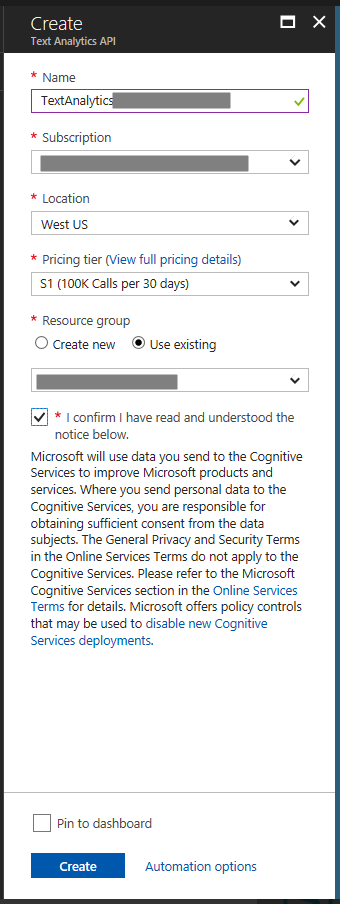
This deep link will take you to the Text Analytics API resource creation blade in the Azure Portal. Complete the required details, providing your desired resource name, subscription, location, pricing tier, and resource group (either a new or existing one). Accept the terms, and click the Create button:
You can then view details of the Text Analytics API resource that you have created, to obtain your endpoint based on the region you selected, and copy one of the two keys that were created for you:
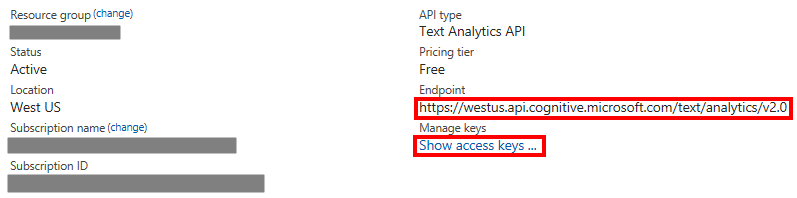
Save the endpoint and key for later use.
Important Note: When we insert the endpoint into our app configurations later on in the post, we will append '/sentiment' to the endpoint copied from the Azure portal. More details found below.
Building our Bot
We will now start putting together the code for our bot, using steps found in the Create a bot with the Bot Builder SDK for .NET quickstart.
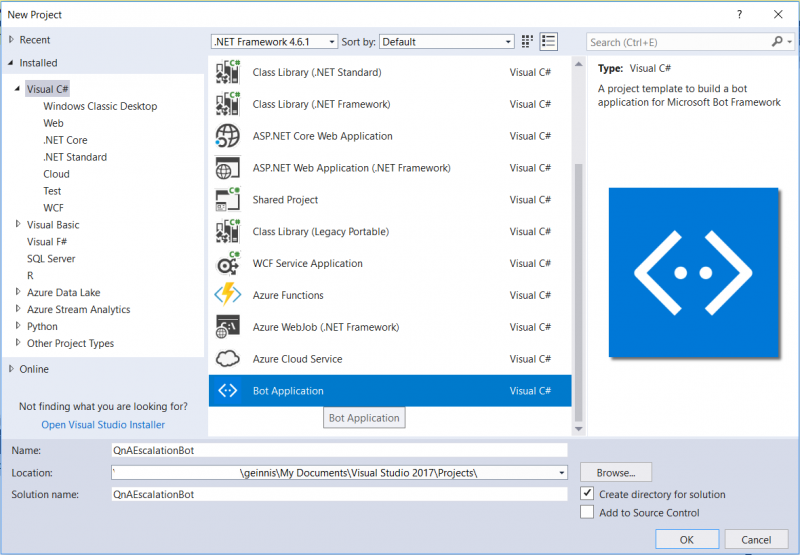
We Open Visual Studio, and create a new project using the Bot Application template that we downloaded as a part of our prerequisites:
In our Project Properties, on the Application tab, we specify .NET Framework 4.6.1 as the target framework.
Installing Packages and Adding References
We need install several packages that we will leverage as a part of our bot code, and ensure our project is referencing the latest version of the Bot Builder SDK. We can do this via NuGet:
- The latest version of the Microsoft.Bot.Builder package
- The Microsoft.Bot.Builder.CognitiveServices package, for QnA Maker functionality
Adding a Data Contract for the Text Analytics API
To facilitate interacting with the Cognitive Services Text Analytics API, we add a new item to our project: a Visual C# class which we will name TextAnalytics.JSON.cs. We will populate this file with the JSON data contracts for the REST Services outlined in the Text Analytics API documentation.
[snippet slug=usdsentiment_datacontract line_numbers=false lang=c-sharp]
Adding our QnA Maker Dialog
To our project, we will add a Bot Framework dialog to manage the interaction with our QnA Maker knowledge base. We right-click on our Dialogs folder in our project, and choose to Add New Item. We will add a C# Class that we name QnAMakerDialog.cs.
We will add code to our class using the Basic QnA Maker template found in the Bot Framework documentation here. The dialog will inherit from the QnAMakerDialog object, and calls the QnA Maker service with the following parameters:
- Subscription Key: this key was obtained earlier, when setting up our QnA Maker service; we will populate this from application configuration parameters in a subsequent step
- Knowledge Base ID: this ID was also obtained while setting up our service; we will populate this from application configuration parameters in a subsequent step
- Default Message: this optional parameter allows us to specify the message to return to the user when no answer has been found with a sufficient match
- Score Threshold: this optional value between 0 and 1 allows us to specify the threshold of the match that must be found from our knowledgebase in order to return an answer to the user
We add the following code to our new class, to allow the calling of the QnA Maker Service we created:
[snippet slug=qnaescalation_qna-maker-dialog line_numbers=false lang=c-sharp]
Adding our Escalation Dialog
We will also add a simple dialog that will handle escalation scenarios, by confirming that the user wishes to be transferred to an agent, and executing the transfer.
We right-click on our Dialogs folder in our project, and choose to Add New Item. We will add a C# Class that we name Escalation.cs.
Our Escalation dialog will initiate with the StartAsync method by requesting confirmation from the user on whether they would like to be transferred to a live agent. The response that the user provides is managed by the AfterEscalationConfirmation method. If the user wishes to be transferred (which we test by looking for a response that begins with a ‘y’), a transfer message is constructed and sent, using the transfer message format as outlined in the Live Assist Bot Agent Connector documentation. The key information about the transfer is included in the ChannelData property of the message, including the skill or agent that the chat should be transferred to. In our code, we are transferring the chat to a Skill that will be configured in Live Assist called BotEscalation. We could also adapt the code to transfer to an agent, by replacing our skill attribute with 'agent':'AgentNickname' in our JObject. Our Escalation.cs code is shown below:
[snippet slug=qnaescalation_escalationdialog line_numbers=false lang=c-sharp]
Adapting our Root Dialog
We will now adapt our RootDialog.cs class to examine incoming messages, and respond appropriately depending on the type of Live Assist message it is, and the sentiment expressed if it is a message from the user.
Our Root Dialog will:
- Respond with a greeting on initial connection to the user
- Check the sentiment of all user messages
- Route messages with a sentiment score of less than a nominal value of 0.2 to our escalation dialog
- Route messages that don’t have negative sentiment to the QnA Maker dialog
Our Root Dialog class also includes methods to call the Text Analytics API to determine the sentiment of user messages, as used in previous posts leveraging the API via .NET.
[snippet slug=qnaescalation_rootdialog line_numbers=false lang=c-sharp]
Adapting our Message Controller
We also make minor updates to our MessageController.cs class, which controls the flow of incoming user messages. We check to see if our incoming message is on the Direct Line channel (which Live Assist agent bots use), and if so, we direct it to our Root Dialog. Otherwise, we direct it straight to the QnA Maker dialog, so that other channels can still benefit from the QnA Maker knowledge base:
[snippet slug=qnaescalation_messagecontroller line_numbers=false lang=c-sharp]
Later on we will also update our Web.config file with necessary configurations and credentials, but first we need to deploy our bot to Azure, and register our bot.
Deploying our Bot to Azure from Visual Studio
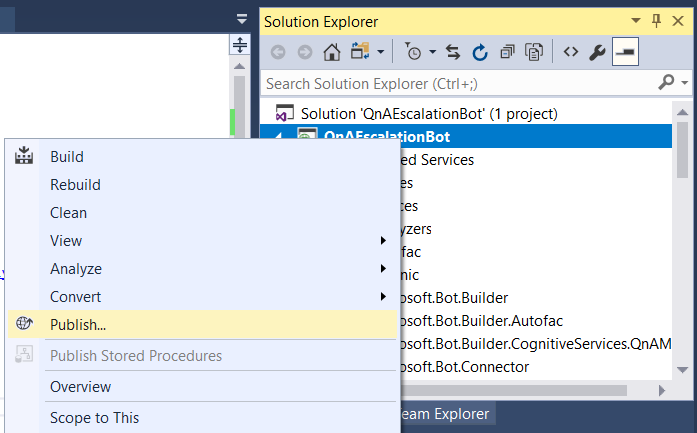
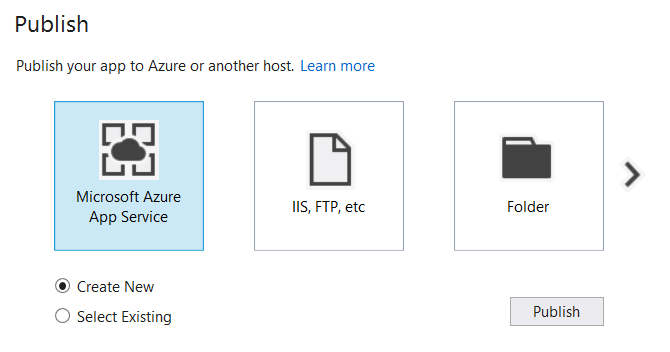
We will now deploy our bot to a Microsoft Azure App Service. We right-click on our project in the Visual Studio Solution Explorer, and select Publish:
We select Microsoft Azure App Service as the project type and click Publish:
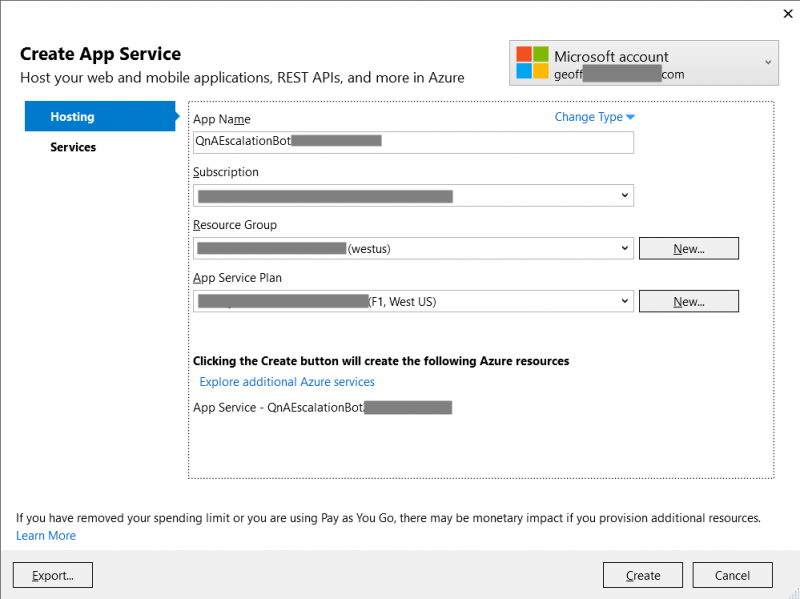
Next to App Name, we click Change Type and change the service's type to Web App. We enter our desired app name, Azure subscription, Resource Group (new or existing) and App Service Plan (new or existing), and click the Create button:
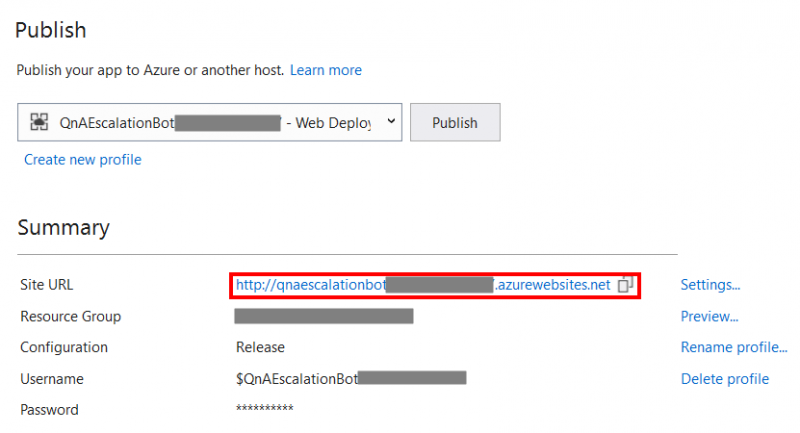
The creation of the needed resources, and the publishing of our bot to the App Service, should now be initiated. Upon completion, we can obtain the Site URL for our bot endpoint, which we can save for later use:
Registering our Bot with the Bot Service
We will now register our bot with the Bot Service, basing our process on the documentation found here. First, we authenticate to the Azure Portal, with our Azure credentials.
Once authenticated, we create a Bot Channels Registration, by clicking the Create a resource button found on the upper left-hand corner of the Azure portal, then select AI + Cognitive Services > Bot Channels Registration.
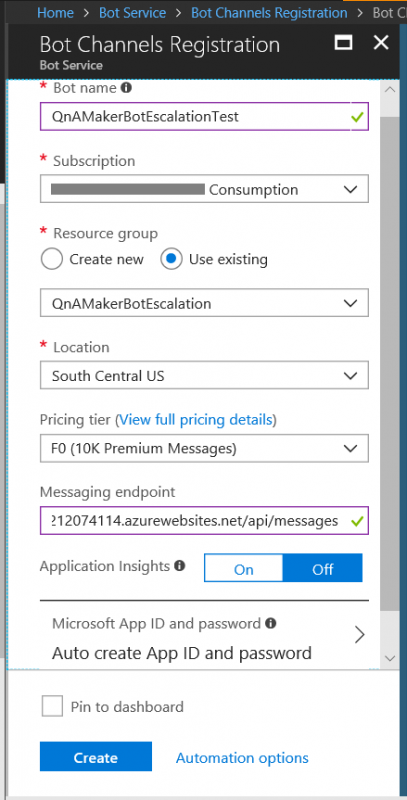
When creating our Bot Registration, we include:
- your bot's Name; this is the unique handle for your bot
- the Azure subscription, resource group, location, and pricing tier of our choosing
- our bot's Messaging endpoint, based on the Site URL we obtained during the publishing process; Note that we must replace http with https, and we must append /api/messages to our Site URL
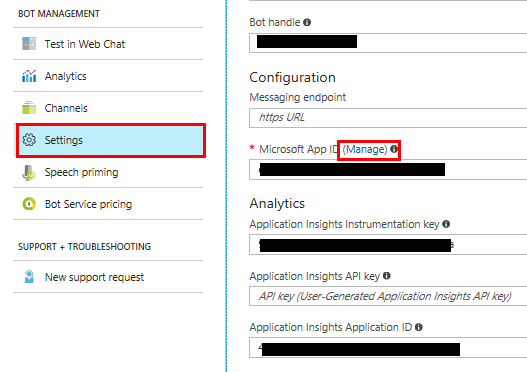
We can confirm that the registration has been created by checking the Notifications area in the Azure portal. Upon completion of the registration, we can open the newly created resource, and then click on Settings.
We can now provide Bot Profile details for our bot. Taken from the documentation, we can supply information including:
- an icon that will represent your bot in the conversation
- your bot's Display Name; When users search for this bot, this is the name that will appear in the search results
- a Description of your bot; This is the description that will appear in search results, so it should accurately describe what the bot does
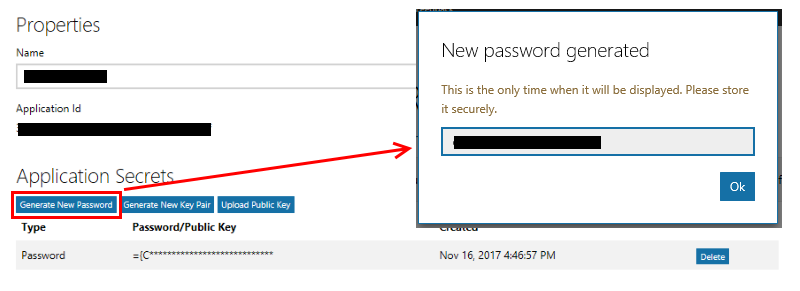
We also need to click the Manage link to obtain a Microsoft Application Password. This is the link appearing by the Microsoft App ID:
This link will open a window where you can generate a new application password. Click Generate New Password. This will generate a new password for your bot. Save both the App ID and Password for later use:
Updating our Web.config Configurations
We will now update our project's Web.config file with various authentication and configuration values that we have collected.
We add the following appSettings settings:
- BotId: our bot’s handle as created during Bot Registration
- MicrosoftAppId: our bot’s App ID as obtained during Bot Registration
- MicrosoftAppPassword: our bot’s App Password, as obtained during Bot Registration
- cogTextAnalyticsSubscriptionKey: our Text Analytics API key, as obtained during the provisioning of our resource in the Azure Portal
- cogTextAnalyticsEndpoint: the endpoint for the Text Analytics API, based on the region we selected during resource provisioning in the Azure Portal. Important Note: When we insert the endpoint value into our app configurations, we will append '/sentiment' to the endpoint copied from the Azure portal. For example, if you selected the West US region when provisioning your Text Analytics resource, the full value to insert in this appSetting would be https://westus.api.cognitive.microsoft.com/text/analytics/v2.0/sentiment
- QnASubscriptionKey: the QnA Maker subscription key that we obtained while Setting Up our QnA Maker Service
- QnAKnowledgebaseId: the QnA Maker knowledge base ID that we obtained while Setting Up our QnA Maker Service
[snippet slug=qnaescalation_webconfig line_numbers=false lang=c-sharp]
Once again, we publish our updated bot code to Azure, by right-clicking on our project, and selecting Publish, and then clicking on the Publish button with our same Azure publishing profile.
Setting up the Direct Line Connection
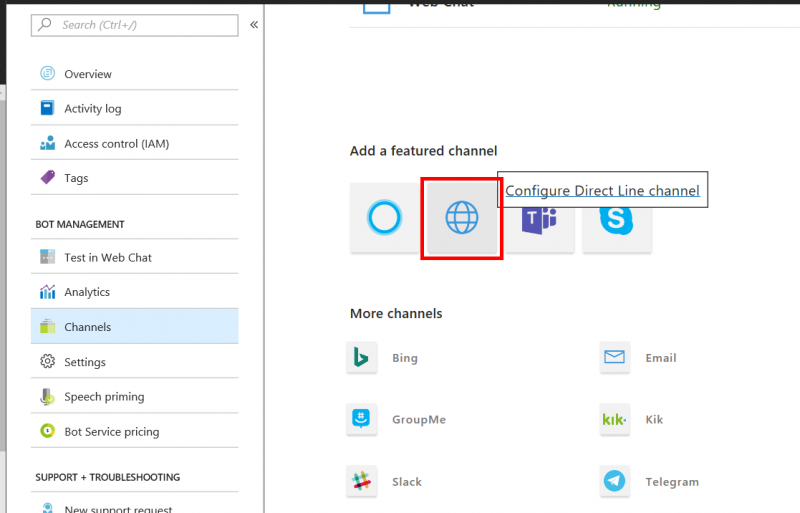
We will now enable the Direct Line channel for our bot, which is the channel that Live Assist leverages to enable the bot as a Live Assist agent. Still in the Bot Registration resource blade in the Azure Portal, we click on the Channels tab for our bot, and choose to add the Direct Line channel:
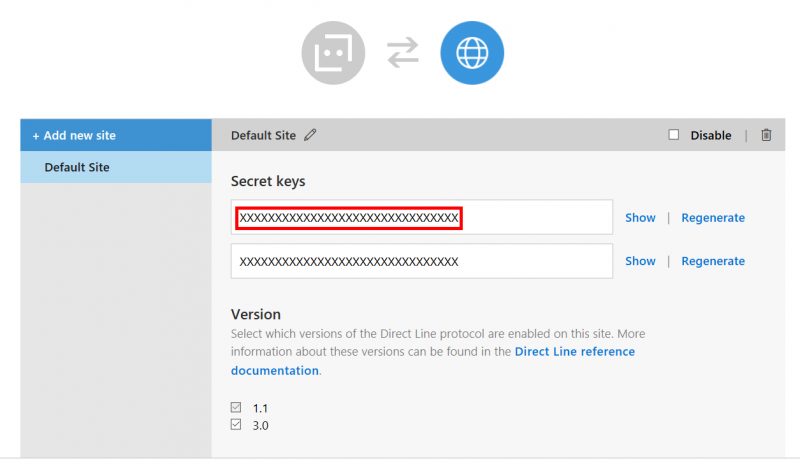
We then show, copy and save our first Secret key. Leaving all Version options selected, we then click the Done button:
Adding our Bot as an Agent in Live Assist
CafeX has provided instructional steps for adding a bot as an agent in a quick-start guide, and we will add our bot as an agent based on those steps.
First, we log into the Live Assist Administration Portal for the Live Assist-enabled Dynamics 365 organization that we are adding our agent to. The URL for the portal is different for each organization, but you can find your URL either in the “Welcome email” you received upon enabling Live Assist, or from within the Dynamics 365 web client, under Service > Live Assist Administration.
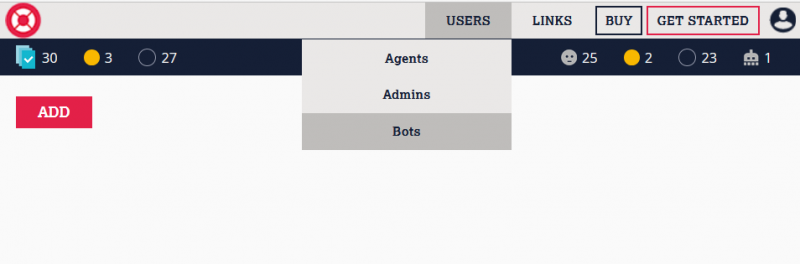
We navigate to USERS > Bots, and then click the ADD button:
In the resulting form, we enter:
- Nickname: our desired name for our bot, as displayed to end users
- Licenses: the number of Live Assist licenses to allocate to our bot; for every license, three concurrent chats can be handled by our bot
- Connection Type: we leave this as Ms
- Connection Key: we enter the Direct Line Secret key that we obtained earlier when configuring the Direct Line channel
We then click the SAVE button to save our bot.
Updating Live Assist Skills and Engagement
We will now assign appropriate skills to our bot agent and our live escalation agents, along with updating our chat engagement to direct chats to our bot.
We open up our Live Assist Engagement Administration URL, which can be found in the Dynamics 365 Web Client, under Service > Live Assist Supervisor.
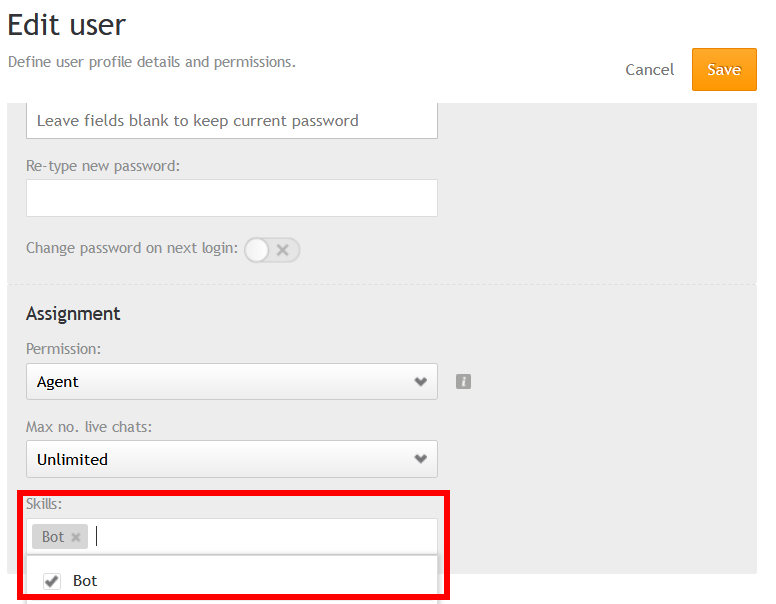
We navigate to USERS, and select our newly created bot:

We add a new Skill to our bot user, which we are calling Bot. We then click the Save button:
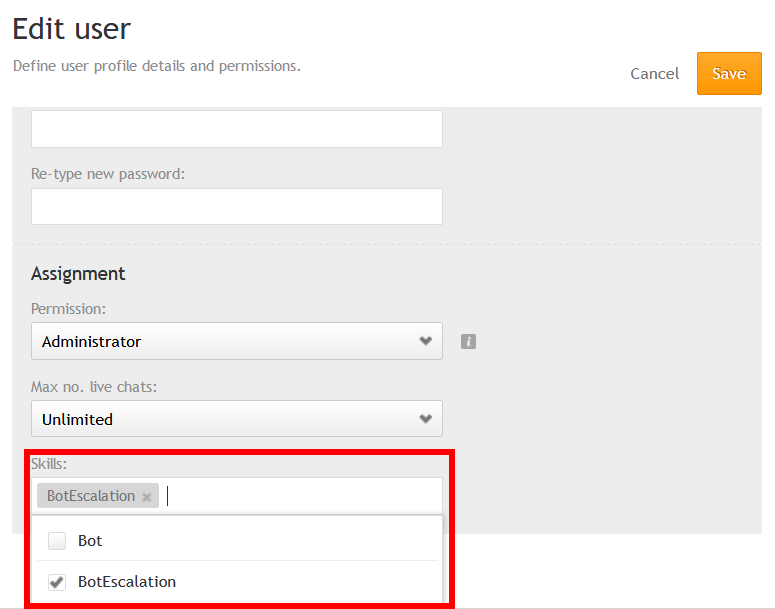
We now select a different “live” agent user who will receive escalations from the bot, and add a Skill which we call BotEscalation. We then Save the updates to our live agent user:
We now navigate to the CAMPAIGNS tab, and open up our default campaign (typically named Live Chat on your site).
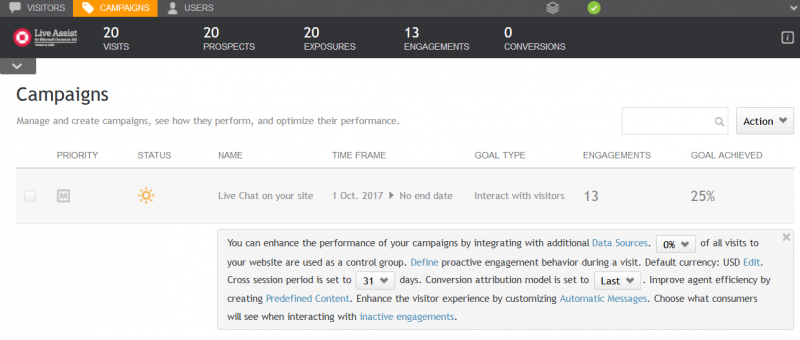
We click the Edit button next to our default engagement:
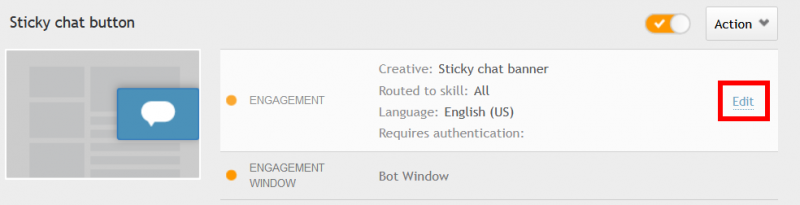
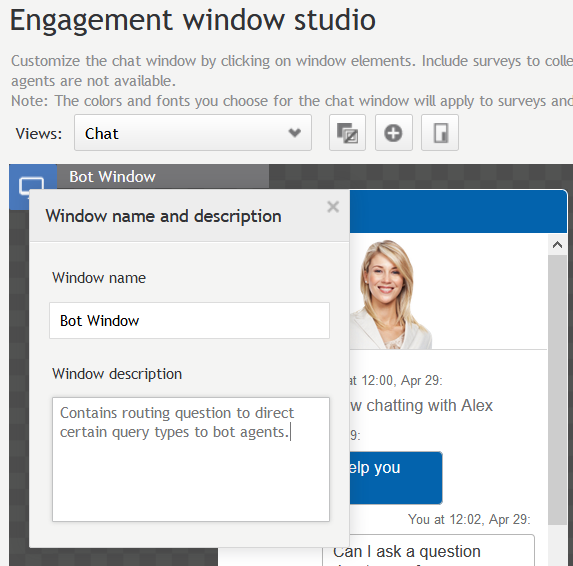
We are brought to the ENGAGEMENT step in the Engagement studio process. We click Next in the bottom-right to take us to the WINDOW step. While on the WINDOW step, we click the Add New button:

We provide our new window with a name and description:
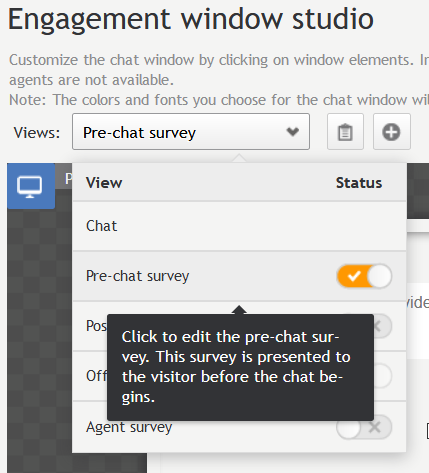
In our Views dropdown, we enable the Pre-chat survey by clicking the toggle, and then edit the pre-chat survey in the resulting window. We will use the pre-chat survey to determine what type of issue the user wishes to get help on, and direct specific types of issues to our bot agent:
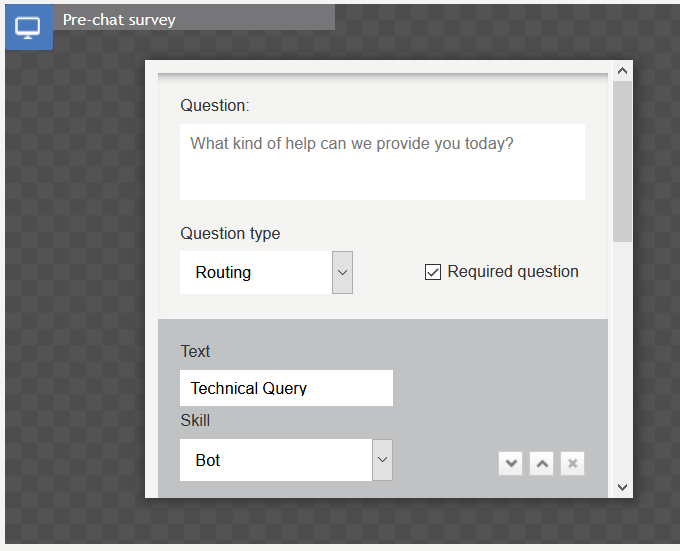
We use the Trash icon to delete any existing questions, then add a new question of type Routing. We add our desired question text, and add as many options as desired. For our first option, we add option text, and specify that the option will route to our Bot skill. We can add other options that will route to other skills, including directly to the BotEscalation skill, if desired:
We then click the Done button in the Pre-chat survey, and click the Save button in the bottom-right to save our window.
With our window now saved and selected, we click the Publish button in the bottom-right of the page, to publish our changes.
Testing our Bot
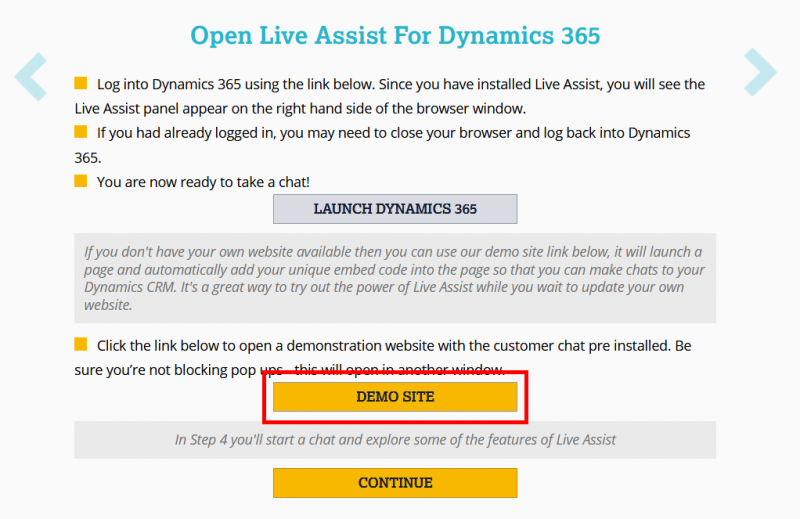
We should now be able to chat with our bot agent from any sites that we have enabled Live Assist chat on, or via the Demo Site that CafeX makes available for testing in the Live Assist Administration Portal (to open portal, go to Dynamics 365 Web Client under Service > Live Assist Administration).
We will test using the Demo Site. While in the Live Assist Administration Portal, navigate to GET STARTED, use the right chevron to navigate to the Open Live Assist for Dynamics 365 panel, then click the DEMO SITE button:
In the resulting sample website, you should see your chat engagement. If you elect to chat, and select the appropriate Routing Question option, you should be able to engage in a conversation with your bot that will be answered via QnA Maker. If sufficiently negative sentiment is expressed by you during the chat, you should be able to escalate to a live agent.
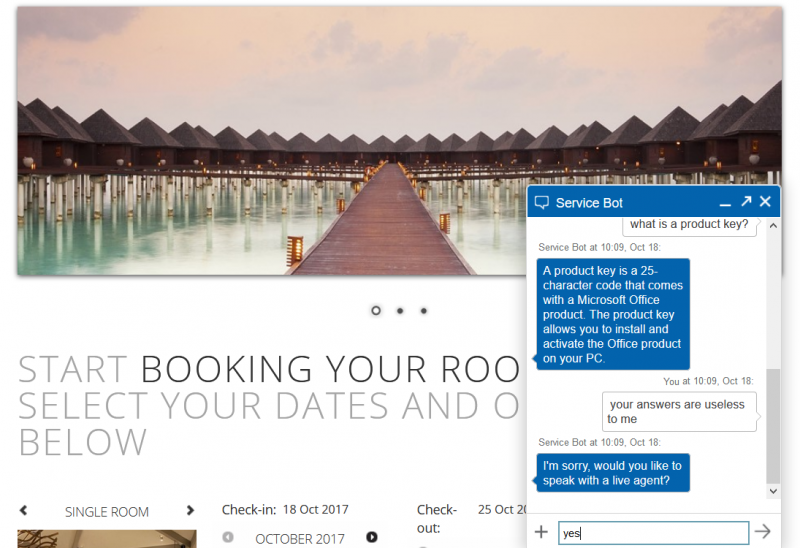
Notes: Make sure you are logged into Live Assist with a user that has the appropriate BotEscalation skill. In addition, if you are still authenticated in the Live Assist Engagement Administration portal, you may find that escalated chats will be directed there.
You can download the full Visual Studio solution code here.