Product and Part Identifier Bot using Custom Vision Service
In this post, we will build upon some of the capabilities that have been explored previously, including Microsoft’s Bot Framework, and the Cognitive Services Custom Vision Service. We will create a Bot that is capable of identifying a part or product from an organization’s Dynamics 365 product catalog, using an organization-specific image classifier that is powered by the Custom Vision Service.
By enabling part or product identification through an intuitive and mobile-accessible bot, we can facilitate such scenarios as:
- Enabling field technicians to quickly identify an unknown part or product while on-site, and providing them instant access to documentation and specifications
- Enabling customers to quickly identify a part or product to facilitate service requests or product-specific self-service
This 40 second video shows the functionality in action:
[video width="370" height="650" mp4="https://msdnshared.blob.core.windows.net/media/2017/06/CustomVisionBot3.mp4"][/video]
We will build on the sample code available in these two resources:
- The Receive Attachment code sample from the BotBuilder-Samples GitHub repository
- The Custom Vision Service quickstart guide in the Cognitive Services documentation
Pre-requisites
The pre-requisites for building and deploying our Product and Part Identifier Bot include:
- An instance of Dynamics 365 for Customer Service (Online)
- You can request a trial of Dynamics 365 for Customer Service here
- In our Dynamics 365 organization, we need to have configured:
- Products in our Products Catalog (ideally populated with product names, descriptions, product numbers, externally-accessible product image URLs, and links to product specifications)
- Administrator credentials to access the O365 Admin Portal for our tenant that our Dynamics 365 instance is connected to
- A Microsoft Azure subscription for application registration; A trial account will also work; See this previous post for a walkthrough of how to obtain Dynamics 365 Web API credentials
- The Dynamics 365 Software Development Kit (SDK)
- A Microsoft Account, for signing into the Custom Vision Service (https://customvision.ai)
- Visual Studio 2015 or higher
- Microsoft .NET Framework 4.6
- The Bot Builder SDK for .NET
- The Bot Framework Emulator (for Windows)
- The Bot Connector Visual Studio Project Template
- Save the downloaded zip file to your Visual Studio 201X templates directory, which is typically found in %USERPROFILE%\Documents\Visual Studio 201X\Templates\ProjectTemplates\Visual C#
Setting Up our Custom Vision Service Project
The first thing we will do is to set up our own Custom Vision Service project. The process of creating a Custom Vision Service project has been covered in a previous post, so to create our project, we can follow the steps outlined here (see Setting Up our Custom Vision Service Project).
After we have created, trained and tested our classifier, we can obtain the necessary credentials from the Custom Vision site to call the Prediction API by selecting the Performance tab, and clicking Prediction URL.
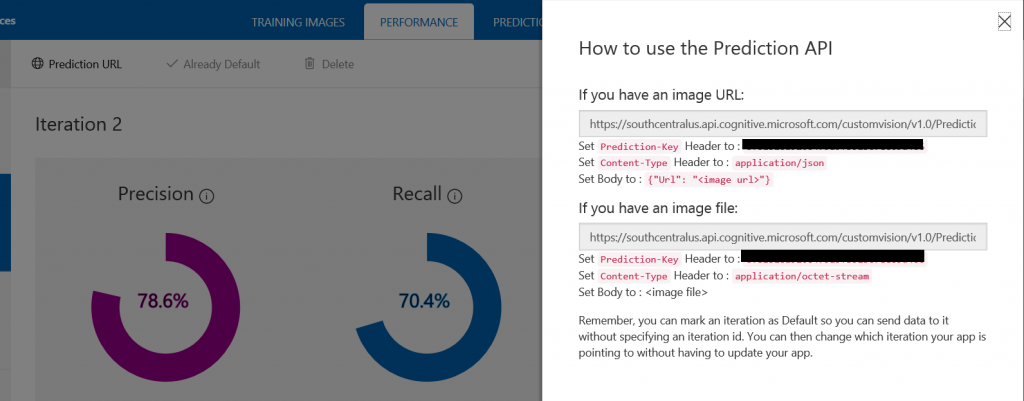
We can extract our Project GUID from the URL, and our Prediction Key from the Prediction-Key header value.
Obtaining our Dynamics 365 Web API Credentials
In order to query our Dynamics 365 Product Catalog, we will also need to have the required credentials to authenticate our requests via the Web API.
In addition to an O365 username and password with sufficient D365 privileges to read our Product Catalog, we require:
- Our Application Client ID
- Our OAuth 2.0 Authorization Endpoint
See this previous post for a walkthrough of how to obtain these credentials (starting at Obtaining our CRM Web API Credentials).
Building our Bot
We will now start putting together the code for our bot, using steps found in the Create a bot with the Bot Builder SDK for .NET quickstart.
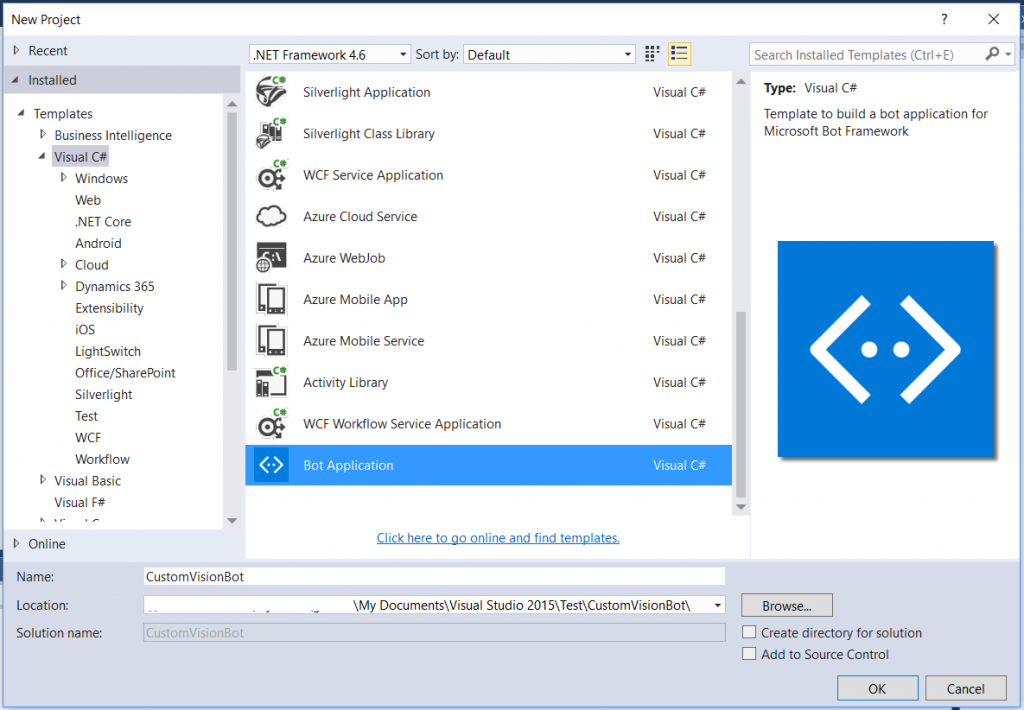
We Open Visual Studio, and create a new project using the Bot Application template that we downloaded as a part of our pre-requisites:
In our Project Properties, on the Application tab, we specify .NET Framework 4.6 as the target framework.
Installing Packages and Adding References
We need install several packages that we will leverage as a part of our bot code, and ensure our project is referencing the latest version of the Bot Builder SDK. We can do this via NuGet:
- The latest version of the Microsoft.Bot.Builder package
- Version 2.26 of the Microsoft.IdentityModel.Clients.ActiveDirectory package, to assist with Dynamics 365 Web API authentication
We also add references to the following assemblies, which we will use in our requests to the Custom Vision Service and Web API:
- System.Net
- System.Net.Http
- System.Runtime.Serialization
We will place the Custom Vision Service credentials and Dynamics 365 Web API Credentials into our Web.config settings. We open the file, and add our credentials as appSettings as shown below, to make them accessible throughout our project:
[snippet slug=customvisionbot_webconfig lang=xml]
Adding a Data Contract for the Custom Vision Service
To facilitate interacting with the Custom Vision Service, we add a new item to our project: a Visual C# class which we will name CustomVision.JSON.cs. We will populate this file with JSON data contracts for the data that comes back in the response from the sample code provided for the Prediction API.
[snippet slug=customvision_datacontract lang=c-sharp]
Querying Dynamics 365 via the Web API
We will also create a separate class to hold our utility CRMWebAPIRequest method, used to issue our Web API requests to Dynamics 365, as done in previous posts:
- The method accepts not only a request string, but also an HttpContent request payload, and request type indicator, to allow for not only querying, but creation of records in Dynamics 365
- Dynamics 365 Web API credentials are retrieved from the Web.config
- Depending on whether the request type, there is conditional logic to issue either a GET request when we are retrieving Dynamics data, or a POST request with content, if we are creating a Dynamics record
[snippet slug=customvisionbot_utilities lang=c-sharp]
Next, we will adapt our MessagesController.cs class to be able to initiate our main dialog with the user. We replace the default Echo Bot code with code that will initiate a new Dialog using a VisionDialog class that we will create next:
[snippet slug=customvisionbot_messagecontroller lang=c-sharp]
Next, we add a new class to our project, which we call VisionDialog.cs. This class will manage the interactions with the Custom Vision Service and Dynamics 365 to identify our product.
The code in the class will:
- Present the user with the option to upload an image for identification using the StartingOptionsMessage method (Note: Options to allow dynamic credential setting and viewing are included as placeholder options)
- If the user opts to upload an image, the AfterImageProvided method will
- Validate that an attachment has been included with the message
- Use HttpClient to retrieve the image as a byte array, using a JwtToken if necessary
- Issue a request to the Custom Vision Service, with the appropriate credentials
- Serialize the response using the CustomVision.JSON.cs data contract
- If a prediction is returned from the Custom Vision Service, a request will be made to the Dynamics 365 Web API to retrieve a matching product from the Catalog
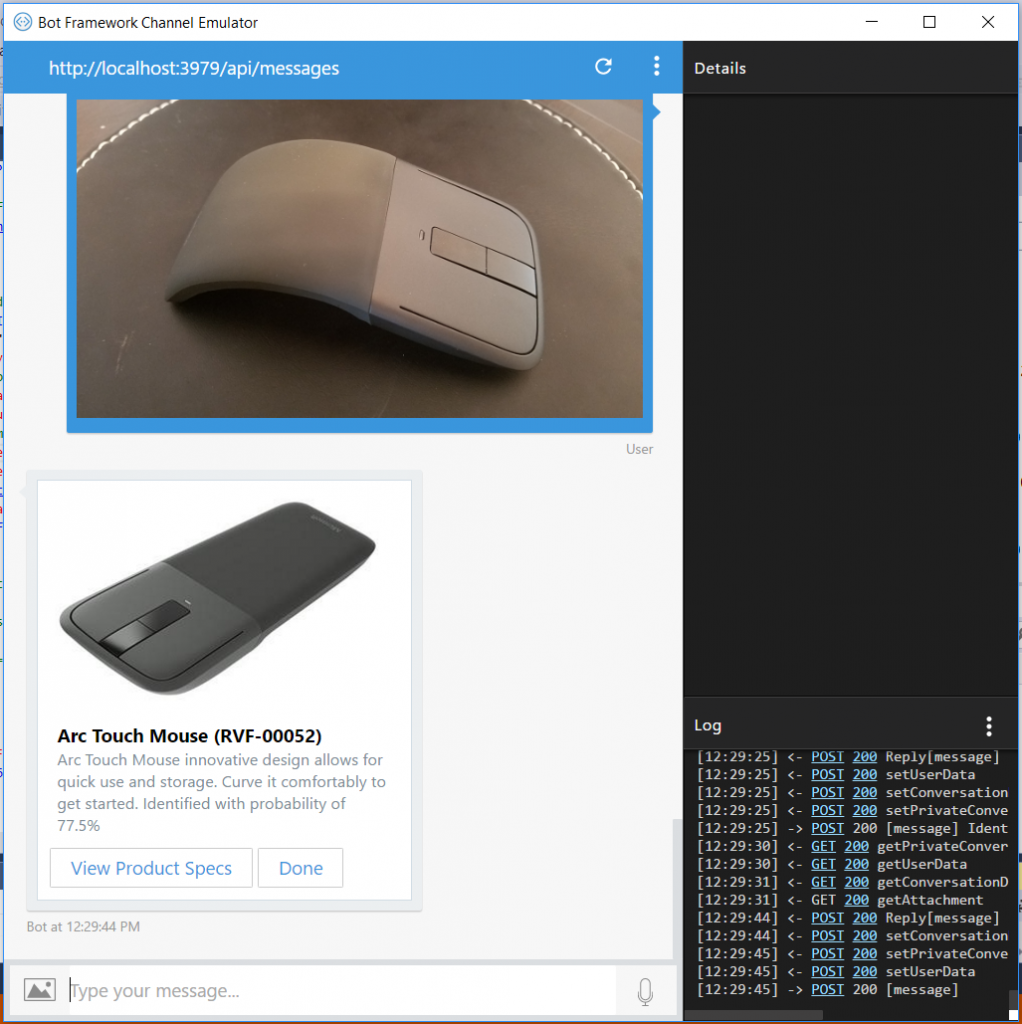
- If a matching product is found in the catalog, a message with a Hero Card will be returned to the user, including product details, and a link to product specifications, if available
[snippet slug=customvisionbot_visiondialog lang=c-sharp]
We are now ready to build and test our bot. As before, we press F5 in Visual Studio, which will Start Debugging. Once debugging has started, an Internet Explorer window should pop up, containing your bot endpoint information.
We also launch our Bot Framework Emulator which we downloaded earlier. We take the URL from the IE pop-up address bar, append /api/messages, and enter this in the URL field of the emulator. We can use the MicrosoftAppId and MicrosoftAppPassword from the application template Web.config file, and add them in the appropriate inputs in the emulator as well.
We can now test the identification of a product image through our bot emulator:
Our bot is ready to be published to Microsoft Azure, registered with the Bot Framework, and made available across channels. If you wish to walk through the deploying of your bot from Visual Studio, see here.