Bringing Bots into an Omni-channel Customer Service Strategy – Part 2: Creating Cases
This post is the second in a series in which we explore how we can take advantage of the benefits of scale and channel breadth with bots, making sure the experiences we create with them build upon the investments that we have made in our customer service strategy, and feed into the consolidated customer 360 view using Microsoft Service and Dynamics CRM as our underlying customer engagement platform.
We will build upon the bot we built in Part 1, which allows users to access self-service knowledge, tapping into the authoritative knowledge that has been curated and published using the robust knowledge management capabilities in the Dynamics CRM Interactive Service Hub.
We will upgrade our bot from v1 of the Bot Framework to v3. We will also enable our bot to collect the necessary information to create a case in Dynamics CRM, for subsequent follow-up.
We will use the concept of a FormFlow dialog within our bot to guide the user through a conversational experience to collect the information we require to submit our case to Dynamics CRM via the Web API. We will draw on the following resources:
- Documentation on upgrading bots from v1 to v3 of the Microsoft Bot Framework
- The AnnotatedSandwichBot sample bot application on GitHub
Note: It is recommended that you review the concepts in Part 1 of the series for an introduction and background.
Pre-requisites
The pre-requisites for building our service bot include:
- An instance of Dynamics CRM Online; you can request a trial of Dynamics CRM Online here
- Administrator credentials to access the O365 Admin Portal for our tenant that our CRM instance is connected to
- A Microsoft Azure subscription for application registration; A trial account will also work; See Part 1 for a walkthrough of how to obtain CRM Web API credentials
- Dynamics CRM credentials for a user with privileges to allow us to read Knowledge Articles and create Cases in CRM
- Visual Studio 2015
- Update all Visual Studio extensions using Tools->Extensions and Updates->Updates
- A Microsoft Account
- The Bot Builder SDK
- You can download the SDK on GitHub here
- The v3 Bot Framework Channel Emulator (for Windows)
- You can download the new Bot Framework Channel Emulator from here
- The v3 Bot Connector Visual Studio Project Template
- You can download the template from here
- Save the downloaded zip file to your Visual Studio 2015 templates directory, which is typically found in %USERPROFILE%\Documents\Visual Studio 2015\Templates\ProjectTemplates\Visual C#
Updating our Bot to the Bot Framework v3
In this walkthrough, we will create a new project using the updated v3 Bot Connector Visual Studio Project Template, then bring in and adapt our v1 bot code.
We Open Visual Studio, and create a new project using the new Bot Application template that we downloaded as a part of our pre-requisites.
As before, we need install several packages that we will leverage as a part of our bot code. We can do this via NuGet. The packages include:
The Microsoft.Bot.Builder package
-
- Note that we no longer need to install the Microsoft.Bot.Connector package, as it has been consolidated into the Microsoft.Bot.Builder package
The latest version of the Microsoft.WindowsAzure.ConfigurationManager package
Version 2.26 of the Microsoft.IdentityModel.Clients.ActiveDirectory package, to assist with CRM Web API authentication
The Microsoft.Bot.Builder.FormFlow.Json package, to assist us with our FormFlow dialog
We will place the CRM Web API Credentials (obtained in Part 1 of the series) into our Web.config settings. We open the file, and add our credentials as appSettings as shown below, to make them accessible throughout our project:
[snippet slug=botscasecreate_ lang=xml]
Next, we will adapt our MessagesController.cs class to be able to initiate our main dialog with the user, just as in Part 1. With the v3 bot framework, however, the Message object has been replaced with the Activity object. We replace the default Echo Bot code with code that will initiate a new Dialog using the ServiceDialog class from Part 1:
[snippet slug=botscasecreate_messagecontroller lang=c-sharp]
This time around, we will separate our ServiceDialog into a separate class file. To our project, we Add a new C# class called ServiceDialog.cs.
Into our class, we insert the code from Part 1, but we make some minor changes:
Any instances of Message objects are updated to Activity objects
We make use of the PostAsync method to send messages that are not prompting the user for information
We add two additional parameters to our call to the CRMWebAPIRequest method, to allow us to specify our HTTP Method, and pass a payload, to cater for our future requirements to create cases in our bot code
We set a value in our ConversationData with the Guid of one of our CRM Contacts
-
- As an extension of this example, we could add code to authenticate our user, and obtain their contact Guid, or alternately, create a new contact record based on data collected from the user
At this point, our updated ServiceDialog.cs class should appear as shown below:
[snippet slug=botscasecreate_startservicedialog lang=c-sharp]
We will also create a separate class to hold utility methods that may be accessed throughout our solution, such as the CRMWebAPIRequest method, used to issue our Web API requests to CRM. This method is taken from our Part 1 project, but adapted slightly, with these changes:
- The method accepts not only a request string, but also an HttpContent request payload, and request type indicator, to allow for not only querying, but creation of records in CRM
- CRM Web API credentials are retrieved from the Web.config app
- Depending on whether the request type, there is conditional logic to issue either a GET request when we are retrieving CRM data, or a POST request with content, if we are creating a CRM record
[snippet slug=botscasecreate_utilities lang=c-sharp]
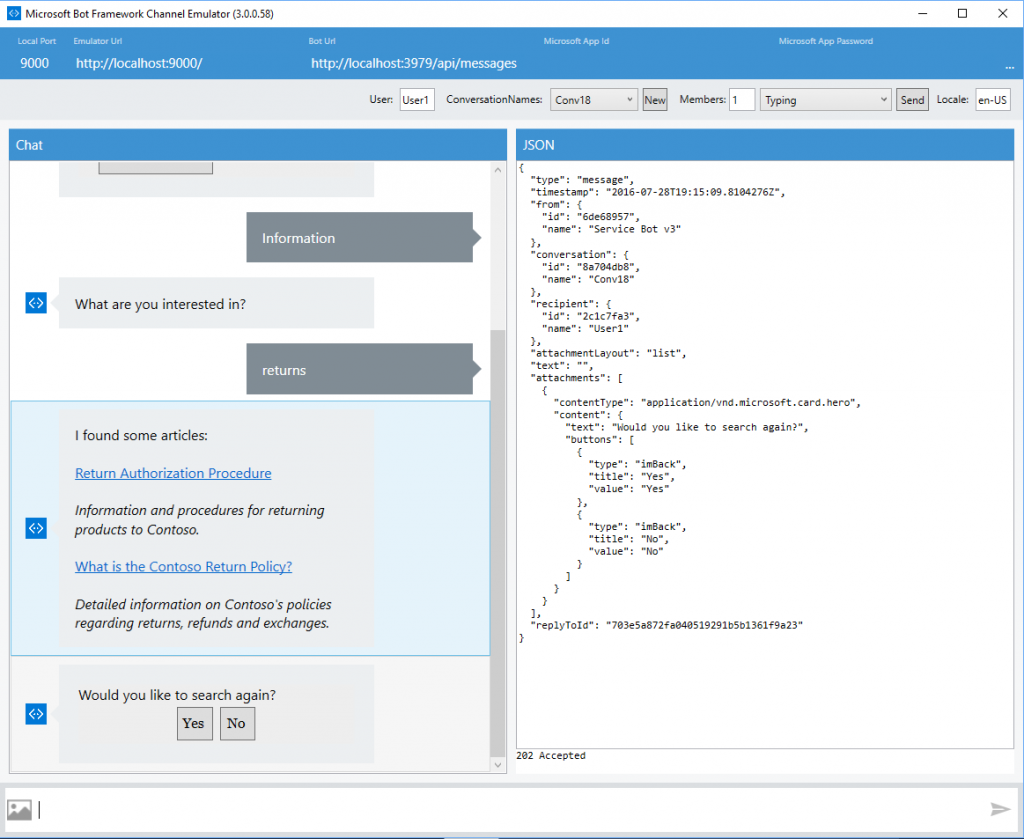
With these changes, our bot will now function as before, enabling access to self-service knowledge using the v3 Bot Framework:
Augmenting our Bot with Case Creation Capabilities
We will now enhance the functionality of our bot by enabling end-users to log issues via a conversational bot experience, resulting in cases in Dynamics CRM. As noted earlier, we will leverage a different type of dialog called FormFlow. FormFlow dialogs offer the ability to gather the information required to achieve a particular objective in a simplified way, based on a definition you (the developer) create in either a C# class or JSON object. The Bot Framework documentation provides a thorough discussion of the use of FormFlow, and serves as a great reference for in-depth information. The gathering of information required to submit a case is a process well-suited to the FormFlow model.
We will use the JSON Schema FormFlow in this walkthrough. One benefit of using this option is that, although in our basic example, we will be hard-coding certain attributes we will collect for our CRM Case within our JSON file, we could potentially adapt the entire set of data we need to capture at run-time, based on our CRM schema, through the dynamic creation of our JSON schema, allowing for extensibility.
First, we will add a new file to our project, by right-clicking on the project in the Visual Studio Solution Explorer, then selecting Add… > New Item. We then select a JSON Schema File template, under the Visual C# > Web options:
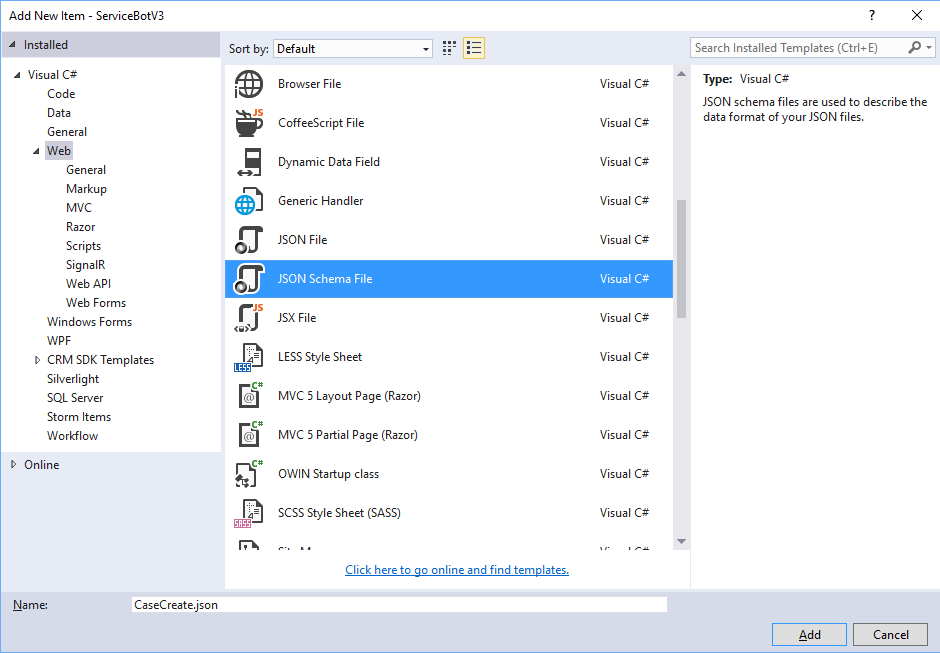
We also select our file in the Solution Explorer, and change the Build Action property to be Embedded Resource, to allow our file to be used to create our FormFlow dialog once built:

In our JSON Schema File, we define the pieces of data that we need to collect. For each attribute we wish to collect, we are able to specify a prompt, a data type, options, validation, and other aspects. We define the information we wish to collect as described below:
a Title for the case: a string will be typed by the user
a Product that the case relates to: the user will be prompted to select from three options
-
- Note that the option values correspond to the Guid values of three of our products in our instance of CRM; we are able to present the appropriate Display Names for the products using the DescribeAttribute in our schema
- As an extension of this example, in a real-world scenario, these options could potentially be populated based on products the customer is known to own
a Priority for the case: the user will be prompted to select from four options
-
- Note that the option values correspond to the values of the Option Set used for the prioritycode field in our CRM instance; we again provide appropriate Display Names for the options
a Description of the issue being experienced: a string will be typed by the user
[snippet slug=botcasecreate_json lang=js]
We now need to instantiate our Case Creation FormFlow dialog as a child dialog of our ServiceDialog at the appropriate juncture. To do this, we create a new method in our ServiceDialog.cs class, called BuildJsonForm, which will read the JSON schema we defined, and create and return a new JSON form builder:
[snippet slug=botcasecreate_buildjsonform lang=c-sharp]
Next, we will add a new CompletedCaseSubmission method to our ServiceDialog.cs class, which will process the JObject that is generated by the FormFlow dialog that gathers the case attributes. This method will receive the context and the case creation JObject as parameters, and will:
Retrieve the contacted Guid from conversation data; note that for our example, we are hardcoding a contactid in our Web.config appSettings, but in a real-world scenario, we would likely authenticate our user, or collect their contact information as a part of the dialog
Generate some JSON content for our request to the CRM Web API, to allow us to create an incident record in CRM, populating data we collected during our FormFlow dialog
-
- Important note: we include a custom caseorigincode in our example; If you wish to use the sample code with your instance of CRM, you will need to add a new caseorigincode Option Set Value of 100000001
Build a request Uri for our request to the CRM Web API (see CrmWebApiCSharp on GitHub for resources on interacting with the CRM Web API via C#)
Issue the request via our CRMWebAPIRequest method
Retrieve the resulting Guid for our new incident in CRM from the response
Use that new incident Guid to retrieve our newly-created customer-facing ticketnumber value via another “retrieve” request to the CRM Web API
Present the ticketnumber value back to our customer via a message back to the user
Finish the dialog using the IDialogStack.Done method
[snippet slug=botcasecreate_completedcasesubmission lang=c-sharp]
We now adapt our AfterServiceChoiceAsync method, to create a child dialog to capture case details and create the case when the user selects Submit an Issue from the initial options presented. This is the new augmented method:
[snippet slug=botcasecreate_afterservicechoiceasyncadapted lang=c-sharp]
We are now ready to build and test our bot. As before, we press F5 in Visual Studio, which will Start Debugging. Once debugging has started, an Internet Explorer window should pop up, containing your bot endpoint information.
We also launch our v3 Bot Framework Channel Emulator which we downloaded earlier. We take the URL from the IE pop-up address bar, append /api/messages, and enter this in the URL field of the emulator. We can use the default MicrosoftAppId (blank by default) and MicrosoftAppPassword (also blank by default) from the application template Web.config file, and add them in the appropriate inputs in the emulator as well. Note that these parameter names changed from v1 to v3.
We can now have a conversation with our bot, via the emulator, and test out the submission of our case to CRM via the bot:
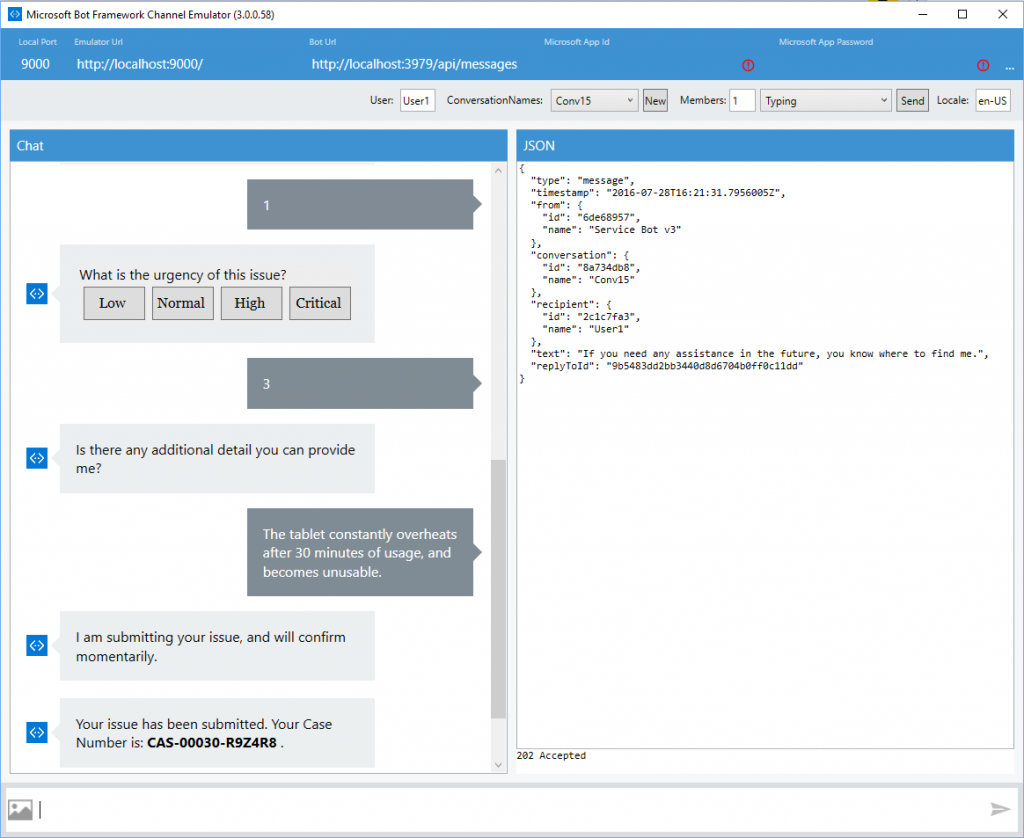
The case has now been created and appears in CRM, and we can see that it originated from the bot:
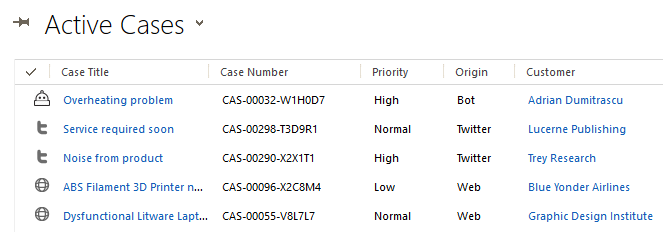
Note that if you wish to use a custom icon for cases originating from the bot, as shown above, see here for instructions.
Our bot is again ready to be published to Microsoft Azure, registered with the Bot Framework, and made available across channels. If you wish to walk through the publishing of your bot and configuring of channels, you can find details here.
Here is a brief video showing our bot’s behavior when published and deployed to the Skype channel:
[video width="384" height="720" mp4="https://msdnshared.blob.core.windows.net/media/2016/07/ServiceBotV3_CaseSubmit.mp4"][/video]
You can download the full source code for the solution here. Prior to building the sample, ensure you:
- Populate your CRM Web API Credentials in the Web.config file
- Populate a contactid Guid from your CRM instance in the MessageReceivedAsync method in ServiceDialog.cs
- Populate three product Guids and product names in CreateCase.json
- Add a new caseorigincode Option Set value of 100000001 via the Dynamics CRM Settings > Customization > Customize the System administration