Zune 2 and Recorded HDTV from Windows Media Center
The recent release of Zune 2 has been sort of a good news / bad news situation for those of us who use Windows Media Center to record TV and/or movies. The original Zune desktop software did not support the dvr-ms format used by Windows Media Player Center (thanks for the correction, David) at all, so the good news is that the new Zune desktop software will handle automatic conversion of dvr-ms files to sync to the Zune. This is a big step forward for most folks.
Unfortunately, the bad news is that the automatic conversion does not include content recorded in high-def, due to the AC3 audio encoding used for these programs.
One solution that has worked well for me is to use Expression Encoder, along with a third-party AC3 decoder, to encode the HD dvr-ms files for the Zune. Here's how:
Download and Install Expression Encoder (you can get a trial version here)
Download and Install an AC3 decoder (this is necessary to allow Expression Encoder to read the audio track from the dvr-ms file). One option I've tried that works is the NVIDIA PureVideo decoder...a 30-day trial can be found here
Note that the activation information for the trial is in the page linked to above.
OPTIONAL: Download and unzip the dSHARPiE WMV Metadata Editor. dSHARPiE allows you to restore the WMV metadata that identifies a given video as a movie, TV show, or Music Video, so that the Zune device will put in into the proper category.
Start Expression Encoder
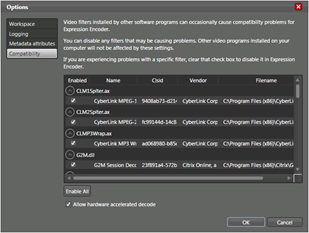 If you have any issues with Expression Encoder crashing after installing a new codec, go to Tools | Options, and in the Compatibility section, disable any codecs you're not using with Encoder. I disabled all non-Microsoft codecs, with the exception of the NVIDIA audio codec, and that solved my compatibility issues.
Import the video you want to convert (File | Import...)
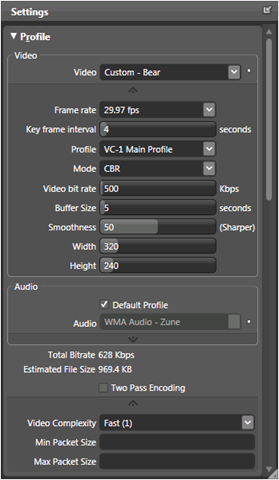
In the Settings tab, set the Profile settings as follows:
 - Video: Hardware Device - Zune
- Frame rate (click the \./ symbol to unhide this and other settings): 29.97fps
- Mode: CBR
- Two Pass Encoding - your choice...enabling this option may reduce file size, but will take longer to encode
- Video Complexity (another hidden setting, right below Two Pass Encoding): Set to 1 or 2 to speed encoding, at the expense of a slight drop in quality, probably unnoticeable on the Zune screenIn the Settings tab, you can optionally use the Crop settings to make a 4:3 recording that is letterboxed better fit the Zune screen
In the Output tab, you can choose the location where your encoded output should be saved. Note that for video conversion, you do NOT want to select a Template
In the Media Content pane, click the Encode button. How long the encoding takes will depend on a variety of factors, including the speed of your machine, the settings you chose, etc.
OPTIONAL: Once the video encoding has finished, you can run dSHARPiE to update the metadata for the encoded file. Refer to the dSHARPie page for more info. Note in particular that if you edit the metadata for a video you have already synced to the Zune, you will need to remove the video from both the Zune and from the collection on the desktop, before adding the video back into the collection and re-syncing (I dropped the modified files into a new subfolder under one of the monitored folders), or the updated metadata will not be read
If the output folder used by Expression Encoder is not a folder monitored by the Zune desktop software, you will need to move the encoded video to a folder that is monitored
Open the Zune desktop software, go to the Collection > Videos section, and drag the new video to your Zune to sync
Credits to my Microsoft colleagues David Bono, Bjarne Dollerup, and Tokuro Yamashiro, as well as the rest of the Zunistas who commented on the above process, for helping suss out this process.
| Share this post : |  |
 |
 |
 |
 |