Creating a custom navigation for SharePoint 2010
This blog is about creating a highly configurable custom navigation for SharePoint 2010 using minimum code.
The navigation can be global navigation, current navigation or any navigation. It will all depend on how it is configured.
I will follow the approach creating a custom menu that would be placed on Master page using delegate control.
Creating Delegate control:
1. Create a user control under SharePoint mapped folder "CONTROLTEMPLATES". Let’s name it “GlobalNavigationControl.ascx” that is going to be used as delegate control in the master page.
2. Open the .ascx file and add 2 user controls <SharePoint:AspMeu> and <asp:SiteMapDataSource> as shown in below code snippet. Also note that DataSourceID property of AspMenu should be the id of SiteMapDataSource.
 <SharePoint:AspMenu ID="MyGlobalNavigation"
 runat="server"
 EnableViewState="false"
 DataSourceID="MyTopSiteMap"
 AccessKey="<%$Resources:wss,navigation_accesskey%>"
 UseSimpleRendering="true"
 UseSeparateCss="false"
 Orientation="Horizontal"
 SkipLinkText=""
 CssClass="my-own-style"/>

 <asp:SiteMapDataSource id="MyTopSiteMap" runat="server"/>
To handle the styling of menu, use the CssClass property to set your own custom CSS class.
CSS class for v4.master is "s4-tn"
3. The behaviour of the menu will depend on the properties of these 2 controls. Since we have created our own control “GlobalNavigationControl.ascx”, we need to expose the properties of the 2 controls so that it can be configurable.
4. Go to code-behind and create public properties as shown below:
 #region Menu control Properties

 /// <summary>
 /// Gets or sets number of levels to be displayed as static
 /// </summary>
 public int StaticDisplayLevels
 {
 get;
 set;
 }

 /// <summary>
 /// Gets or sets maximum number of levels to be shown in flyout sub menus
 /// </summary>
 public int MaximumDynamicDisplayLevels
 {
 get;
 set;
 }

 #endregion

 #region DataSource Properties

 /// <summary>
 /// Gets or sets provider for the site map data source
 /// </summary>
 public string SiteMapProvider
 {
 get;
 set;
 }

 /// <summary>
 /// Gets or sets StartingNodeOffset for the site map data source
 /// </summary>
 public int StartingNodeOffset
 {
 get;
 set;
 }

 /// <summary>
 /// Gets or sets a value indicating whether to start from current node or not
 /// </summary>
 public bool StartFromCurrentNode
 {
 get;
 set;
 }

 /// <summary>
 /// Gets or sets a value indicating whether to show starting node or not
 /// </summary>
 public bool ShowStartingNode
 {
 get;
 set;
 }

 #endregion
5. In page load event, assign the user control’s property values to the properties of AspMenu and SiteMapDataSource:
 protected void Page_Load(object sender, EventArgs e)
 {
 this.MyGlobalNavigation.MaximumDynamicDisplayLevels = this.MaximumDynamicDisplayLevels;
 this.MyGlobalNavigation.StaticDisplayLevels = this.StaticDisplayLevels;

 this.MyTopSiteMap.SiteMapProvider = this.SiteMapProvider;
 this.MyTopSiteMap.ShowStartingNode = this.ShowStartingNode;
 …
 …
 }
6. Add Site map provider in web.config. Open web.config file of your site, go to node “system.web/siteMap/providers”.
Add below entry. Configure its properties like name, IncludePages, IncludeSubsites , ShowSiblings, etc. properly as per your requirements.
 <add name="MyGlobalNavSiteMapProvider" description="Provider for Global Navigation"
 type="Microsoft.SharePoint.Publishing.Navigation.PortalSiteMapProvider, Microsoft.SharePoint.Publishing, Version=14.0.0.0, Culture=neutral, PublicKeyToken=71e9bce111e9429c"
 NavigationType="Combined" EncodeOutput="false" IncludePages="Never"
 IncludeSubsites="Always" IncludeHeadings="True" IncludeAuthoredLinks="True" ShowSiblings="False" Version="14" />
7. Now add an “Empty Element” for delegate control entry.
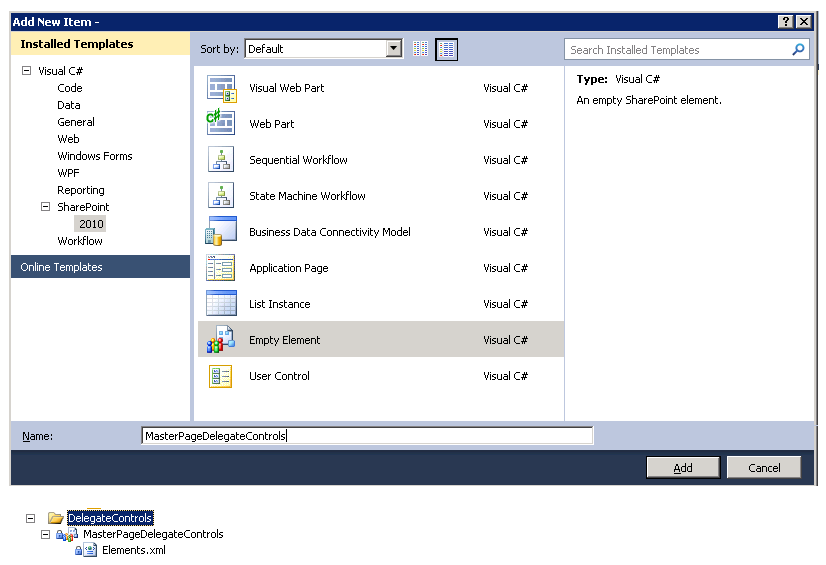
8. Open Elements.xml of the delegate control and add below entry. This is setting the properties of the custom control that we just created above. Also note the property SiteMapProvider.This is actually the “name” of site map provider from web.config.
 <?xml version="1.0" encoding="utf-8"?>
 <Elements xmlns="https://schemas.microsoft.com/sharepoint/">
 <Control Id="MyGlobalNavIDForMasterPage"
 Sequence="10"
 ControlSrc="~/_ControlTemplates/GlobalNavigationControl.ascx">
 <Property Name="MaximumDynamicDisplayLevels">0</Property>
 <Property Name="StaticDisplayLevels">1</Property>
 <Property Name="ShowStartingNode">false</Property>
 <Property Name="SiteMapProvider">MyGlobalNavSiteMapProvider</Property>
 </Control>
 </Elements>
Add delegate control to master page:
- Open master page and go to the area/div where you want to add the navigation control.
- Add the delegate control tag and make sure the property ControlId is set to the same ID that was set in the Elements.xml file of the delegate control.
<SharePoint:DelegateControl runat="server" ControlId=" MyGlobalNavIDForMasterPage "/>
Add delegate control to the feature:
Make sure the delegate control is added to one of the feature of in the project. As soon as the feature is activated at a site or site collection, the menu will start appearing on the master page.
Configuring the navigation to Up and Running site once the development is complete and you do not want to touch the code
This particular navigation is configurable through 3 places.
- Form the delegate control Elements.xml. This will be available under your feature folder in 14 hive. Here you can change the control's properties if required.
- From the web.config site map provider. Properties like, show subsites, show pages can be set in web.config file. This is recommended only while development and not when the site is in production or available for end users. 3rd option is recommended in that case.
- Open the site and go to site settings>Look and Feel>Navigation. Here you will find all the properties like show subsites, show pages, etc that we pre-configured in web.config file.