Construct 2 Game Creation: Part II Space Chain
And here we are again visiting the numerous advantages of Scirra’s Construct 2. A good example of the possible results is Mortar Melon , a game created with Construct 2 that has reached the half million of downloads!. You can also check Jesse Freeman's review of the game in his blog.
In this post I will concentrate on Space Chain the fist starter kit I created and that you can download here, after you obtain the project you can modify it and use it to create you own games.You can also get it and play it from the Windows Store.
And you can play it here too:
This game was created with Construct 2
Overview
In Space Chain the player should destroy the falling enemies before they touch Earth. The control input relies heavily on Construct's capabilities and allows the player destroy the enemies using their mouse or the touch screen when available.
To obtain more points the player could destroy enemies of the same type and create chains. That is also the origin of the game's title.
The purpose of this Starter Kit was to provide a base showcasing the basic controls for sprites in Construct 2 and elements commonly used in games like a score, a pause button, game over conditions and global variables.
This starter kit was also a good example on how to take a Construct 2 game and publish it in the Windows Store.
In future posts we will study more complex examples and how to port these games to Windows Phone.
First Steps
I recommend you to check the first post of this series (Construct 2 Game Creation: Part I) to cover all the basic elements you will need for this tutorial and familiarize yourself with the basic interface of Construct.
But here is a quick reminder:
- Download Construct 2.
- Install Construct 2.
- Download Space Chain.
- Double click the .capx file that contains Space Chain's project.
- Read this post and learn about the game.
- Create your own awesome games.
And you are ready to go!
Now let's see the basic elements of Space Chain. You can start by running the starter kit and getting used to the provided game.
Monsters, Monsters everywhere
In this game you find 4 kinds of monsters represented by 4 different sprites.
![]()
In the paid version we could use Families to simplify even more our events regarding the enemies, but I am assuming you will start your development with the free version and a good amount of events are redundant to be able to deal with the 4 kinds of monsters.
To create a new sprite for the enemies, or any other game element, you just have to double click in the layer and then select sprite from the presented list:
![]()
After that you just have to select the image you want for the enemy and then pick a location in the layout for it. I had to repeat these steps to add 4 monsters of different colors to add variety to the game.
To add the needed behaviors for the enemies you have to pick an enemy and then use the right mouse button or the side bar to add behaviors.
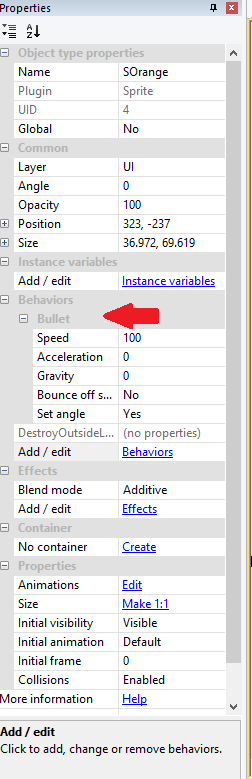
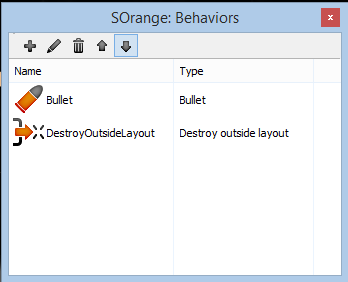
The 2 behaviors that we need for our monsters are: Bullet and DestroyOutsideLayout.
The bullet behavior is needed to provide movement to the monsters. You can determine the speed of the movement and other attributes in the side bar.
The DestroyOutsideLayout behavior is added to eliminate the monsters when they are out of the screen and to keep the number of monsters the game is tracking under control.
Now, if you create a new project and follow the general steps until this point you will notice that you have just 4 enemies and they will come down the screen to disappear into oblivion, but four monsters are not enough, we need to create new monsters every now and then. To do that we need to add a new event to create monsters every X seconds. The event should look like this:

In Space Chain I created a global variable named SpawnSpeed to control the amount of seconds in between the creation of new enemies. The other thing you may observe in this event is that I am just setting a random value to the global variable TypeMonster, this is to have the chance to create different monsters every time.
To actually create the monsters I included these 4 events:
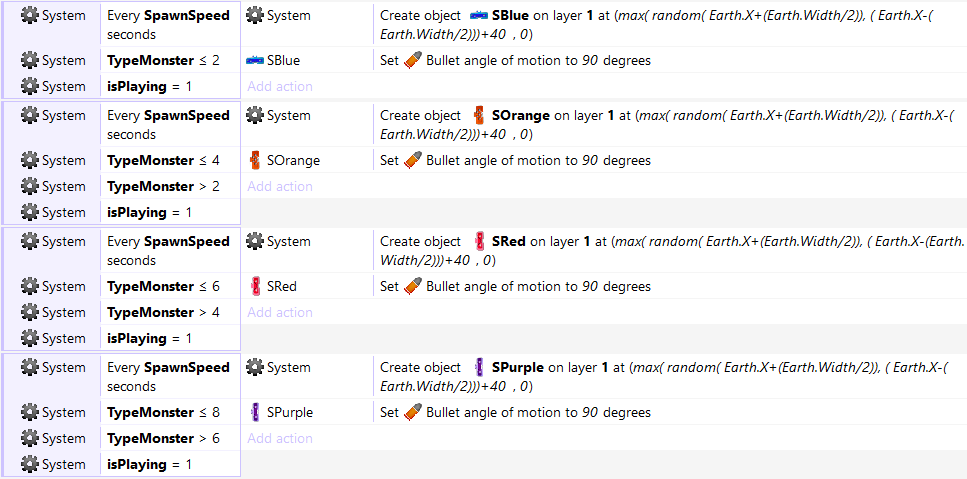
These 4 events are quite similar, each one takes care of creating a monster of a different kind and places it in a random position just at the upper border of the screen.
You may also notice that each event has an additional condition that is asking if the isPlaying global variable is 1. This is used to only create monsters when we are not paused or in the game over state. But don't worry we will have an entire post about that.
Armageddon is night
Finally let's talk about the destroy Earth Events. The 4 different kinds of monsters have the same falling movement and are directed towards Earth. What happens when the reach our planet?
First we should add the sprite for Earth. Following the same steps to add a monster we should be able to include an image that represents Earth:
![]()
The dotted line represents the lower edge of the visible screen, I left the rest of the Earth image there to accommodate for different screen sizes and a paranoid "just in case".
After adding the Earth sprite I wanted to include an explosion, so I went ahead an added another sprite for that.
Then I added the 4 following events:
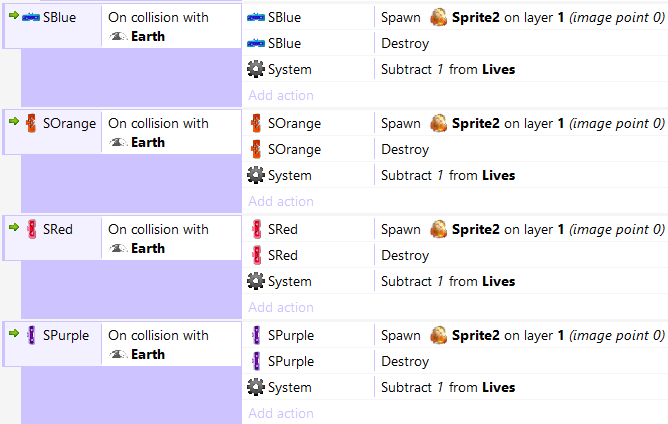
These events detect the collision between the 4 kinds of monsters and Earth, and take care of 3 basic actions:
- Destroy the monster that collided with Earth.
- Create an explosion where the monster was located.
- Subtract 1 from the Lives global variable.
To make it work correctly you should add the Fading behavior to the explosion sprite, that way it will be on screen just for 1 second.
Next Steps
And there you go, at this point you should have a basic idea of many of aspects of Space Chain, and if you started the project from zero, you should have constants waves of monsters that crash against Earth.
In following posts I will get in detail about the input handling to allow the player destroy the monsters and the game logic to create chains of destroyed monsters.
Please let me know if you want me to add more detail to these posts or what ideas you get with this Starter Kit.