Putting it all together – CORS tutorial
Hosting the two sites on IIS and understanding the request flow and needed configuration to allow the entire application work correctly is what we will focus on in this article. This far, in this tutorial we have gone through creating the front-end website using Razor Pages and the back-end HTTP web-service using WebAPI, as well as preparing the two solutions for publishing on IIS as explained in: /en-us/aspnet/core/publishing/iis?tabs=aspnetcore2x . Since the application is expected to run using Windows Integrated authentication there will be a couple of more steps that we will need to take in both solutions to make sure that the ASP.net Core interacts correctly with IIS and is forwarded the authentication tokens from the IIS worker process (w3wp.exe).
The first thing to accomplish, is to setup the applications to work with IIS. This is achieved in the Startup.cs class of each of the two projects. We will be adding IIS as a service, in the ConfigureServices method, using the options pattern. The only option we are interested in is having the applications configured for Windows Authentication. This is done by setting the AutomaticAuthentication option and setting to true. The code is shown below:
public void ConfigureServices(IServiceCollection services)
{
services.AddMvc();
//needed to enable IIS integration with Windows Auth
services.Configure<IISOptions>(options =>
{
options.AutomaticAuthentication = true;
});
}
The highlighted code is what needs to be added to the ConfigureServices method in both projects, after which they should be recompiled and published.
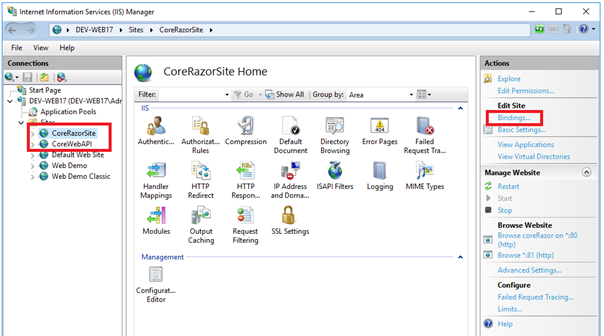
Inside the IIS Manager Console, I recommend setting two websites (they can be on different servers on the same server) and setting up HTTP bindings with host header entries, for corerazor and corewebapi, by selecting the 'Bindings' action for each website:
Host bindings for CoreRazor – front end website

Host bindings for CoreWebAPI – backend http webservice application

SIDE NOTE: If you plan to host both websites on the same Windows server, and if you have no DNS so that you can setup CNAME aliases for the hostnames coreRazor and coreWebApi , you can modify the hosts file of the computer you will be accessing the website from to map the two entries to your server's IP address. To do this, you may wish to follow the article below: https://www.petri.com/easily-edit-hosts-file-windows-10 .
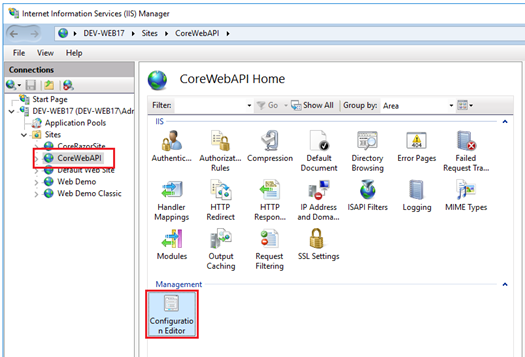
The second step in configuring the two applications to use Windows Integrated authentication, is to configure the ASP.net Core Platforms Handler to forward the Windows integrated authentication token to the dotnet.exe process that is hosting the application. The easiest way to achieve this is using the Configuration Editor in the IIS Mangeger console. Just select each of your sites, and then double click the 'Configuration Editor' icon in the middle pane:
Once inside this feature, you will be able to access any configuration relating to the website, that is coming either from ApplicationHost.config file or the website's web.config file. Using the dropdown control from the top of the Configuration Editor window, select the System.WebServer/AspNetCore tag from the list of availabe tags as shown:
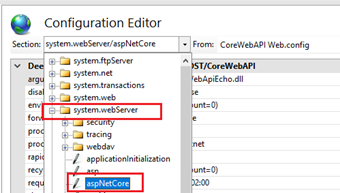
Within this section, you will find all of the possible configuration for the ASP.net Core Platforms Handler. Among the settings is one called forwardWindowsAuthToken whish should be set to 'true', in order for the module to forward the authentication token to the dotnet.exe process.
Next, we need to understand the request flow, which may be then most important part of this tutorial. Nothing gets the point across better than a visual diagram:
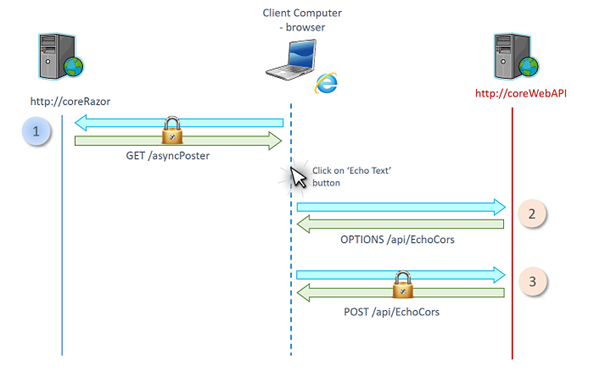
In the above diagram, the client browser will:
1. Make a request to https://coreRazor/asyncPoster . The request will be of type GET and will result in the Razor Page executing on the server and sending back some HTML markup to the browser to render.
Once the page is displayed, the user will proceed and enter some text in the text area control and press the 'Echo Text' button. At this point the interesting stuff starts to happen.
2. The JavaScript engine will send a CORS preflight request to the https://coreWebAPI/api/EchoCors url. The purpose of this request is to make sure that the website allows requests coming from another site (notably https://coreRazor) to be sent and processed. The request materializes as an OPTIONS request on the wire, and the following HTTP headers are sent out:
OPTIONS /api/EchoCors HTTP/1.1
Host: corewebapi
Connection: keep-alive
Access-Control-Request-Method: POST
Origin: https://corerazor
User-Agent: Mozilla/5.0 (Windows NT 10.0; Win64; x64) AppleWebKit/537.36 (KHTML, like Gecko) Chrome/62.0.3202.94 Safari/537.36
Access-Control-Request-Headers: content-type Accept: */*
Accept-Encoding: gzip, deflate
I have underlined the important information in red – the Origin header indicates where the Javascript that is perfoming the CORS request originated from: https://corerazor. The Access-Control-Request-Method indicates what kind of request the script woud like to make (a POST request in this case). According to: https://fetch.spec.whatwg.org/\#cors-preflight-fetch , the CORS preflight request has to go out without any authentication. And this is the main problem in our case.
If you have followed along with the tutorial up to this point, you will know that Windows Integrated Authentication will reject any requests that are sent without credentials, and the response from the IIS server will be a 401 status code, requesting authentication. This will not allow the JavaScript engine to know if requests from the origin site are allowed to the target backend site, and will result in failure.
In order to remedy this, we need to modify the IIS settings, for the backend https://coreWebAPI site to allow anonymous requests in certina cases. This is where a good understanding of the HTTP pipeline in IIS comes in handly, and I would suggest a detour to video number 2 in the IIS Architecture and Components videos I have posted online a while ago: https://linqto.me/n/IISArchitecture . The HTTP processing pipeline is based on events being raised and pieces of code called 'http modules' subscribing to the notificatins sent out on these events to perform changes to the request or the response.
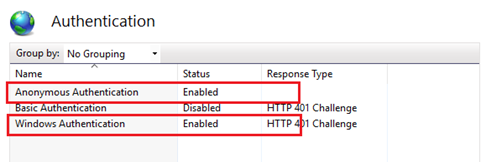
Two pipeline stages are important here: 1) Authentication and 2) Authorization. In the authentication stage, we are trying to understant who is the user behind the request. So we may chose to say the user is the 'anonymous user', and that annonymous authentication should also be turned on. Below are the authentication settings on IIS for the https://coreWebAPI site – note that both Windows Integrated Authentication and Anonymous Authentication are enabled:
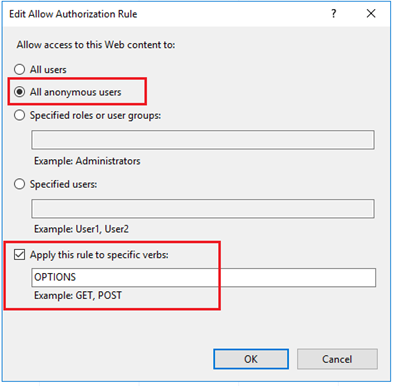
In the next stage of request processing, the Authorization stage (or Authorization event), we need to make sure we only allow the anonymous requests from CORS preflight and require all other incoming requests have authentication credentials supplied. We can achieve this through Authorization Rules. A default authorization rule granting all users access to the site is already in place and supplied by default by IIS. We will start by modifying this rule to only allow anonymous users, if they send requests that are using the OPTIONS http verb. Below is the target configuration in IIS for this authorization rule:
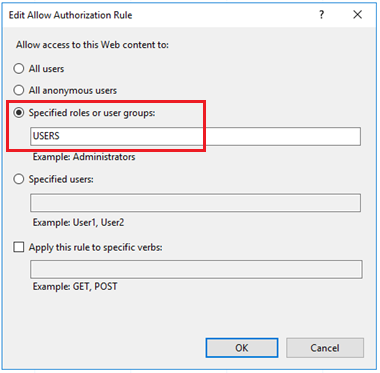
However, this authorization rule is not enough as it will block all other requests. We need a second 'Allow' Authorization rule that needs to be introduced. This rule will perimit access to the application to a desired group of users – for the demonstration, I have chosen the 'Users' group, which should include most authenticated user accounts from the server where the backend application is hosted. In a real world scenario, we would configure an Active Directory group, such as 'Domain Users' if a really large scope was targetted, or some more restrained, like a specific user group.
Here is what the web.config file for the backend website will contain following the modifications to the authorization rules:
<system.webServer>
<handlers>
<add name="aspNetCore" path="*" verb="*" modules="AspNetCoreModule" resourceType="Unspecified" />
</handlers>
<aspNetCore processPath="dotnet" arguments=".\WebApiEcho.dll" stdoutLogEnabled="false" stdoutLogFile=".\logs\stdout" />
<security>
<authentication>
<anonymousAuthentication enabled="true" />
<windowsAuthentication enabled="true" />
</authentication>
<authorization>
<remove users="*" roles="" verbs="" />
<add accessType="Allow" users="?" verbs="OPTIONS" />
<add accessType="Allow" users="" roles="USERS" />
</authorization>
</security>
</system.webServer>
These two rules will ensure that: CORS preflight OPTION request rules will be honored without requiring authenticatin, will all other incoming requests will need to present valid credentials to be allowed through to our ASP.net Core WebAPI application.
If we review the response headers for the CORS preflight request shown earlier, we can see that the server does authorize the receipt of CORS request from the https://coreRazor website:
HTTP/1.1 200 OK
Vary: Origin
Server: Kestrel
Access-Control-Allow-Credentials: true
Access-Control-Allow-Headers: content-type
Access-Control-Allow-Origin: https://corerazor
X-Powered-By: ASP.NET
Content-Length: 0
In the highlighted headers, we can see that the server is indicating that CORS requests to this server from the website are allowed if they supply credentials, and if the requests orginates from the https://coreRazor site. With this information, the JavaScript engine can now proceed to perform the POST request with JSON content to send to the WebAPI controller for processing.
By Paul Cociuba https://linqto.me/about/pcociuba