Activating Dynamic Compression on the IIS 6 web-server
Although it has been almost 10 years since the Windows 2003 and the IIS 6 web-server came out, there are still a big number of websites, especially executing ASP.net that are still present and running on the web. However, since the IIS 7 webserver came out, most of the documentation about IIS has been focusing on this version of the web server, and the search engines are very good at indexing new content, and forgetting older articles.
This is why I wanted to have a quick blog post about how one would activate dynamic compression on the IIS 6 webserver, since this is not something obvious from the start. It is important to understand that ASP.net and IIS had a much looser integration back in 2003, and the server was not as geared towards running the ASP.net stack as it is today.
So what is compression: compression is the fact that we can shrink HTTP responses that are sent from the server to the client to save bandwidth. This is done (or rather was) by two different algorithms, called gzip and deflate – deflate was dropped in IIS 7 and onwards. Dynamic compression is the web-server's ability to compress the responses created by a web-application such as an ASP.net web-app on the fly, before they are sent to the requesting browser.
On a side note, compression is always a delicate balancing act, since to compress the responses, CPU resources are used, so you might waste more time doing compression than sending a big response uncompressed.
To activate Dynamic Compression for the IIS 6 server for an ASP.net application you have to follow the following steps:
Activate Dynamic Compression: this is done on the server level, if you are going through the IIS management console. You have to click on the Web Sites node in the tree panel on the left side of the console, and bring up the properties menu. Inside the properties window, you will find a tab called Service. Clicking this will display an interface like in the screenshot below:
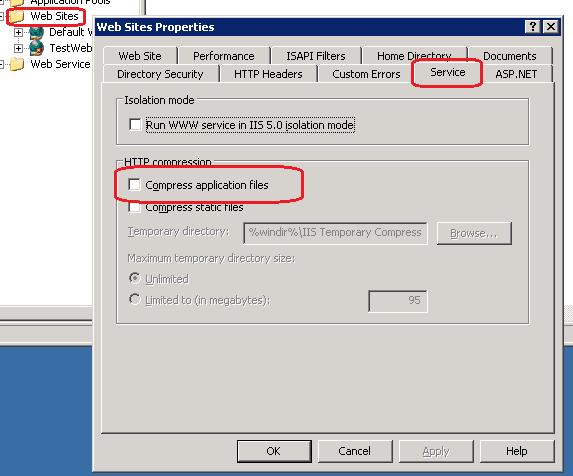
Checking the Compress application files checkbox will enable dynamic compression on the server level.
Alternately, you can accomplish this via command line. Open a command line prompt, and navigate to the C:\inetpub\adminscripts folder then type the following command:
cscript adsutil.vbs set w3svc/filters/compression/parameters/HcDoDynamicCompression true
To check if compression is activated or not, you can use the following command:
cscript adsutil.vbs get w3svc/filters/compression/parameters/HcDoDynamicCompression
Add the appropriate extensions for ASP.net. By default, only responses generated for requests aimed at .exe, .dll, and .asp extensions will be compressed. These extensions have nothing to do with ASP.net content, and hence we have to append the ASP.net specific extensions to the IIS configuration. This can only be done via command line, and not via the IIS Manager Interface. Use the following command to add the aspx, asmx, ashx, axd extensions to the IIS configuration for deflate and for gzip:
cscript adsutil.vbs set W3SVC/Filters/Compression/deflate/HcScriptFileExtensions "asp" "exe" "dll" "aspx" "asmx" "ashx" "axd"
cscript adsutil.vbs set W3SVC/Filters/Compression/gzip/HcScriptFileExtensions "asp" "exe" "dll" "aspx" "asmx" "ashx" "axd"
Please note that each time you wish to add extensions to the current configuration, you have to list all the extensions that will be used by IIS, including those that were present in the configuration already. Think of it as re-writing the value of a variable each time you execute the command as opposed to appending to the value – which is exactly how this is done in the IIS metabase.
Setup the compression level for dynamic compression: by default the compression level (which is on a scale of 0 to 9) is set to 0 meaning that no compression is done. In order to complete the activation of the dynamic compression on the IIS 6 web-server, you have to increase the compression level to a value greater than zero. Use the following commands to set the compression level for deflate and gzip:
cscript adsutil.vbs Set W3SVC/Filters/Compression/deflate/HcDynamicCompressionLevel 9
cscript adsutil.vbs Set W3SVC/Filters/Compression/gzip/HcDynamicCompressionLevel 9
and the following two commands to check the values of the compression levels used:
cscript adsutil.vbs get W3SVC/Filters/Compression/deflate/HcDynamicCompressionLevel
cscript adsutil.vbs get W3SVC/Filters/Compression/gzip/HcDynamicCompressionLevel
On a side note, the article explains how to setup Dynamic Compression for the IIS 6 server at the server level. But you can also setup compression on the site level. In order to do this at the site level, you can execute the following command:
cscript.exe adsutil.vbs SET W3SVC/1/DoDynamicCompression TRUE
In the above command, the site ID is used to setup Dynamic Compression at the website level. Hence a Site ID of 1 is usually the Default Web Site.
You can also setup dynamic compression at virtual directory level, by using the following command:
cscript.exe adsutil.vbs SET W3SVC/1/root/MyDirectory/DoDynamicCompression TRUE
In the above command, the name of the virtual directory for which Dynamic Compression will be enabled is MyDirectory, and it is underneath the website with the Site ID 1 – which is normally the Default Web Site.
By Paul Cociuba – ASP.net Engineer
Follow what I read via LinqTo.me 