Perf testing with multiple users
This post is #2 in a series of posts about performance testing, please make sure you have read this post first.
In the previous post, you created a NAV Virtual Machine, installed Visual Studio, install Git, Cloned the NAV 2017-Sample repository from the NAVPERF organization, configured the settings and ran the test scenarios.
Now, we need to add users.
Users and Tenants
When testing your solution it is important to run your tests in an environment as close to real-life as possible. If you want to know how the user experience will be when 100 heads down data entry users are using your single tenant setup, then you need to test for that.
If you want to know how the system will handle an average of 3 occasional users per tenant and having 100 tenants loaded on your setup, then you need to test for that.
We will handle the user type (occasional, normal, heavy) in a later post.
Run the test with 10 users
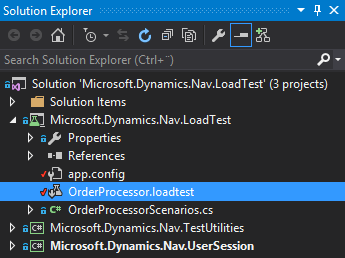
In the Solution Explorer, locate the OrderProcessor.loadtest item and open that:
This will open up the settings window:
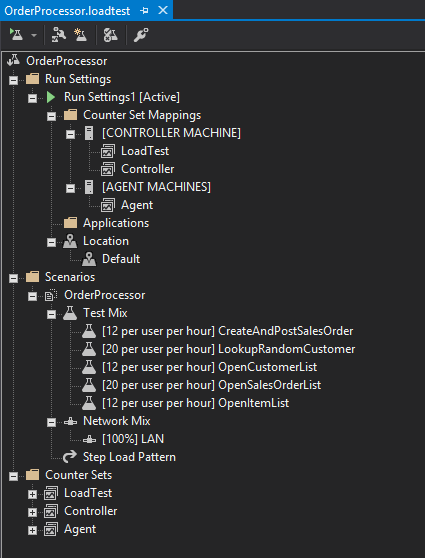
In Run Settings, you define the duration of your test and how you want to simulate your users. You don't want your one VM on Azure to simulate 1000s of users, that wouldn't give you the right picture. For now, we will leave this as is.
In the Run Settings1 [Active] properties window you will find a section called Timing. Here you will find Warm-up Duration, Cool-down duration and Run Duration. Run Duration is set to 10 minutes by default.
In Scenarios you define the Test Mix (the scenarios and the average frequency of those) and the Step Load Pattern (how many users and how to spin them up).
In the Step Load Pattern properties window, you will see that it is defined as starting out with one user and adding one user every 10 seconds until reaching a max. of 10 users, all doing an average of 12 Sales Orders, 20 Random Customer Lookups and opening various lists a number of times every hour.
So all in all, if we don't change anything, the test should run for 10 minutes, and after 1 minute and 30 seconds we should be at 10 users using the system.
Lets try, press the Run Load Test button:

As your tests are running you will see in the overview that all tests are failing and navigating into the error details you will find this:
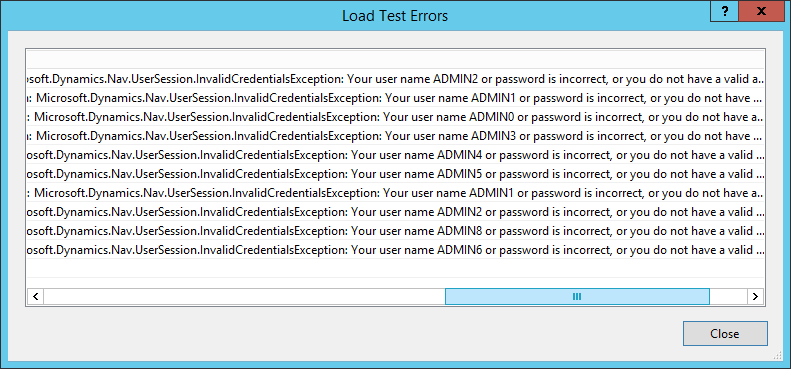
Running the tests just once worked just fine (app.config specifies your ADMIN user and password) and in single runs, Visual Studio will use this user. To be honest, it isn't Visual Studio, it is of course our own code. Locate the GetUserName method in the NAVUserContextManager.cs file in the TestUtilities project.
 protected override string GetUserName(TestContext testContext)
{
    LoadTestUserContext loadTestUserContext = testContext.GetLoadTestUserContext();
    if (loadTestUserContext != null)
    {
        // add the load test user id as a suffix to the default user name
        return String.Format("{0}{1}", DefaultNAVUserName, loadTestUserContext.UserId);
    }
    // empty user name will use the default user name, this is the case when running as unit tests
    return DefaultNAVUserName;
}
Try to out-comment all lines except for the return DefaultNAVUserName and re-run the Load Test.
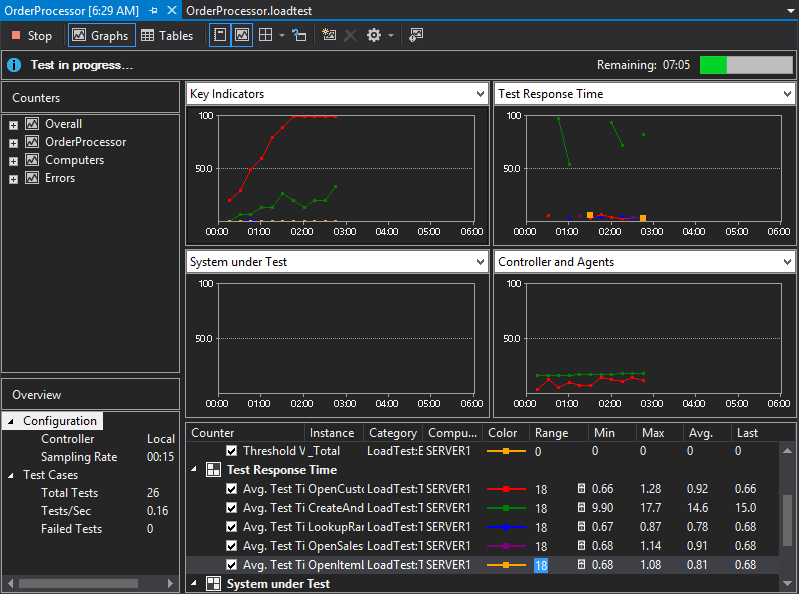
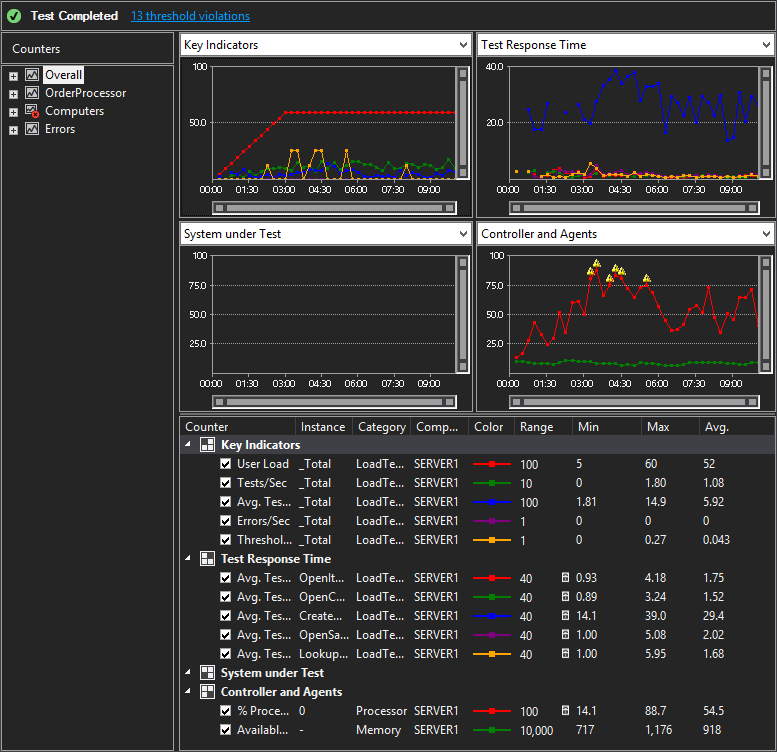
You will now see tests are passing and please use some time to digest all the info you get:
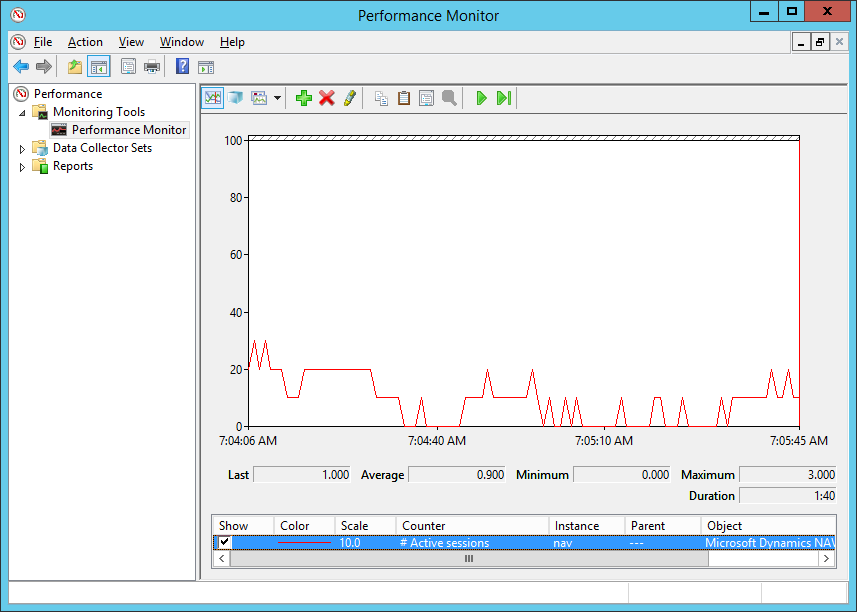
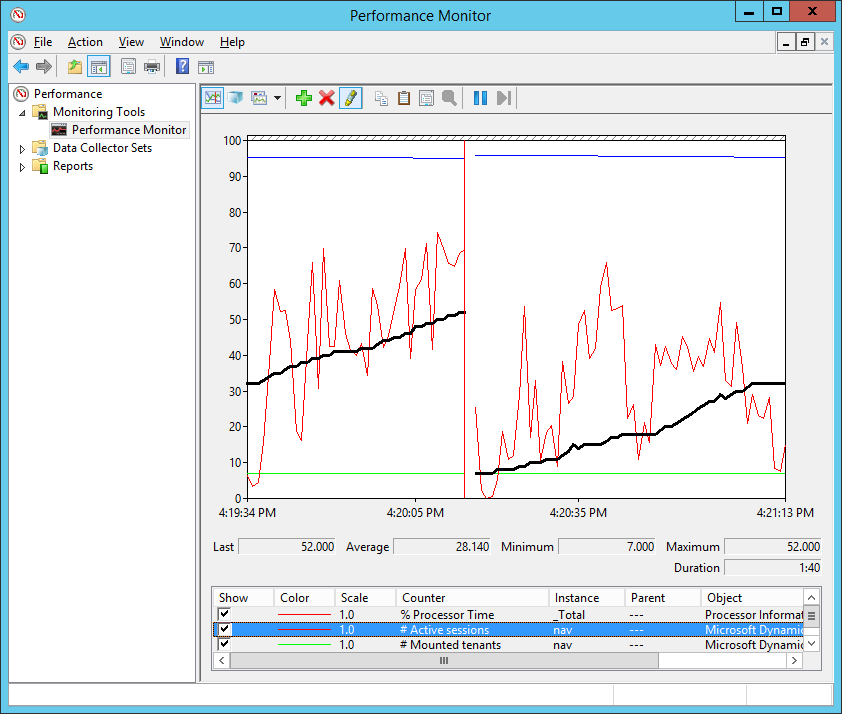
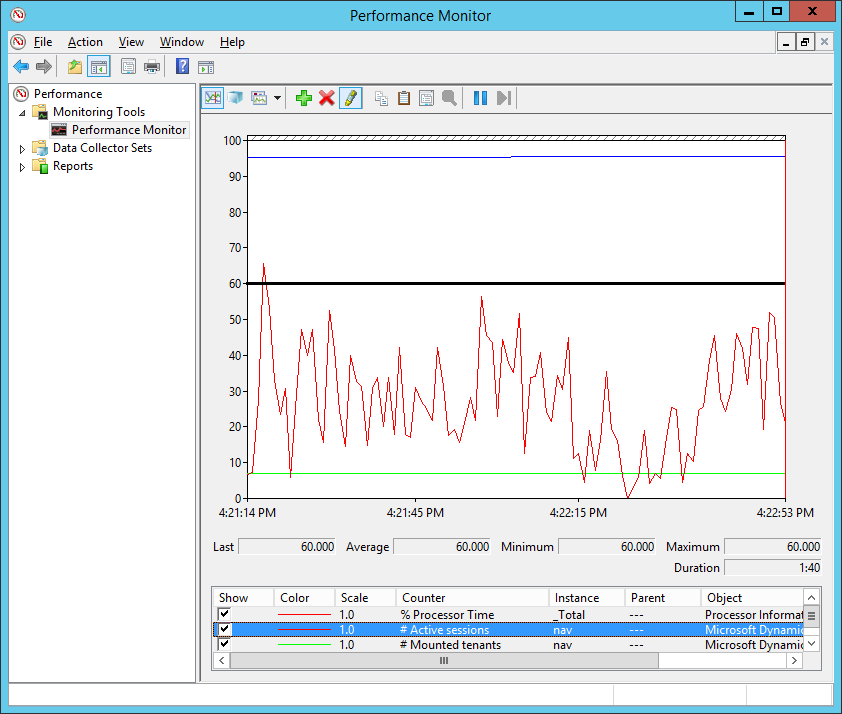
You can also open the Performance Monitor and add some performance counters from the NAV Server. Here I have added the active sessions:
You might wonder why the number of users aren't increasing every 10 seconds like we specified. The reason for this is, that our test mix says that the average user is doing something 76 times an hour. This means that the user will be kicking off a task (on average) every 47 or so second and VS will NOT start by kicking off a task immediately after adding a user.
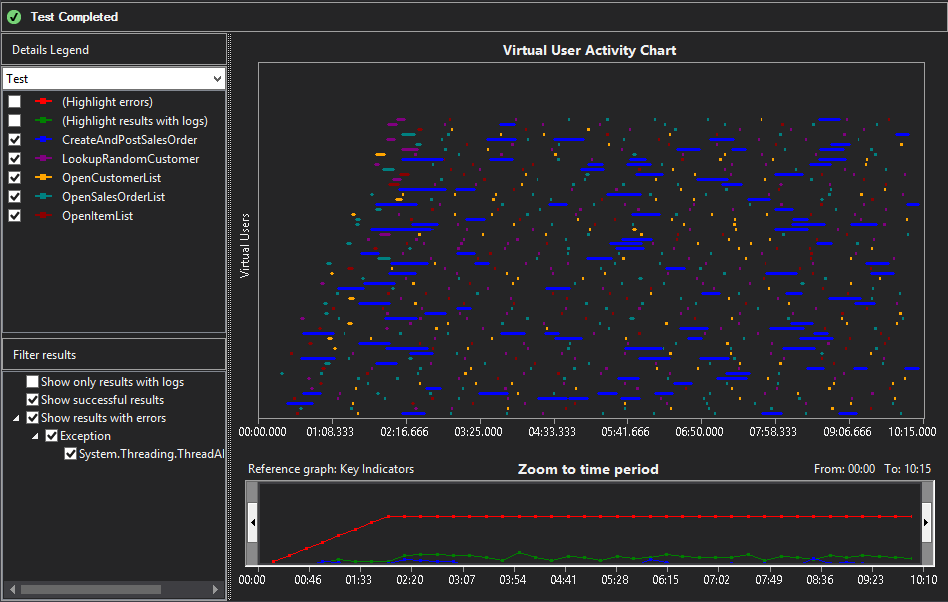
When your test is done, have a look at the virtual user activity chart on the details page:

Every line (from below) is a virtual user and all the black is idle time and the various colors are different scenarios.
Physical vs. Virtual Users
In my first post, I talked about the difference between performance testing and load testing. You might have seen, that Visual Studio uses Load test all over and actually, in the UserContextManager class you will find, that we map visual studios virtual users to physical users in NAV, by creating (and keeping) a UserContext per UserId in the TestContext (methods GetUserContext and ReturnUserContext).
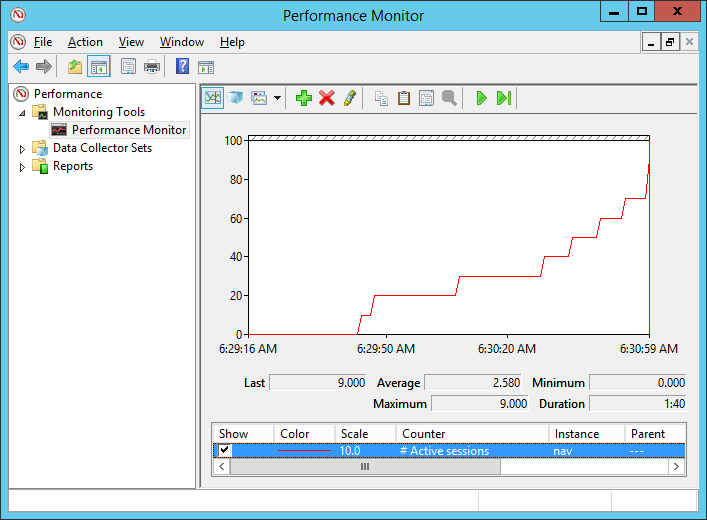
By doing this we will have 10 active sessions in NAV, but looking at the virtual user chart you only seldomly have more than one or two users being active at the same time. By removing the Virtual to Physical user mapping and re-running the test, our virtual user chart will (of course) look the same, but the performance monitor in NAV will have a different picture:
The chart has a scale of 10, meaning that you only twice in this ~2 minute timeframe have 3 active users and you actually very frequently have absolutely no users.
This simulates that users are closing the client (closing the browser or the Windows Client) and starting again when they do the next task. By starting again, I mean opening a session, opening the Role Center etc.
You need to consider which "mode" is the right for your solution. The perf. test sample will keep sessions open.
Let's add 10 users to NAV
Adding users to NAV is easily done in PowerShell
 . ("c:\program files\Microsoft Dynamics NAV\100\Service\NavAdminTool.ps1") | Out-Null
0..9 | % {
    New-NAVServerUser -ServerInstance $serverInstance -UserName "$navAdminUser$_" -Password (ConvertTo-SecureString -String $NavAdminPassword -AsPlainText -Force) -LicenseType Full
    New-NAVServerUserPermissionSet -ServerInstance $serverInstance -UserName "$navAdminUser$_" -PermissionSetId SUPER
}
Having done this, you can remove the comments in the GetUserName method and run your tests using all users.
Setup Multitenancy
When using NAV based on the Gallery Image on Azure, it is fairly easy to change the system to multi-tenancy.
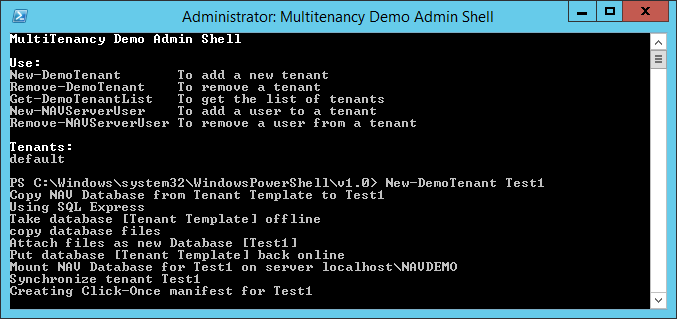
Running this will automagically switch your setup to multi-tenancy and create a Multitenancy Demo Admin Shell on the desktop. The script will display what it is doing:
 Welcome to the Multitenancy Installation script.

This script will help you turn your NAV DEMO Environment into a multi-tenant server.
Note:
- You cannot install multitenancy after you install the new developer experience.
- You cannot install multitenancy after taking a single tenant database to Azure SQL.
- You cannot install multitenancy after setting up load balancing.

The landing page will automatically be updated with a list of all tenants and their URLs.

Read Settings
NAV Version: 100
Database Name: [Demo Database NAV (10-0)]
Import Modules
Server Instance: NAV
Switch to Multi-tenancy
Stop NAV Service Tier
Copy Database [Demo Database NAV (10-0)] to [Tenant Template]
Copy NAV Database from Demo Database NAV (10-0) to Tenant Template
Using SQL Express
Take database [Demo Database NAV (10-0)] offline
copy database files
Attach files as new Database [Tenant Template]
Put database [Demo Database NAV (10-0)] back online
Remove Database [Demo Database NAV (10-0)]
Remove Database [Demo Database NAV (10-0)]
Export NAV Application from [Tenant Template] to [Demo Database NAV (10-0)]
Start NAV Service Tier with DatabaseName empty
Mount NAV Application Database
Remove Application part in [Tenant Template]
Import MTDemoAdminShell module
Create default tenant
Copy NAV Database from Tenant Template to default
Using SQL Express
Take database [Tenant Template] offline
copy database files
Attach files as new Database [default]
Put database [Tenant Template] back online
Mount NAV Database for default on server localhost\NAVDEMO
Synchronize tenant default
Creating Click-Once manifest for default
...
Add Tenant ID to Change global ClientUserSettings
Add Tenant ID to Change ClientUserSettings for vmadmin
Remove old Desktop Shortcuts
Setup Desktop Shortcuts with Tenant specification
Multitenancy successfully installted.
Please open Multitenancy Demo Admin Shell on the desktop to add or remove tenants
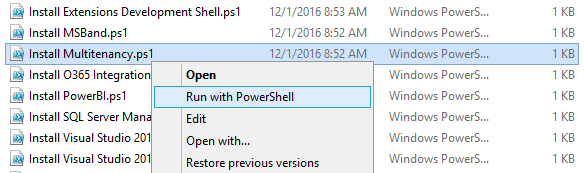
After this, you can open the Multitenancy Demo Admin Shell and add 3 tenants (Test1, Test2 and Test3):
Visual Studio Load Test doesn't know anything about NAV Tenants (as it didn't know anything about NAV Sessions).
There are different ways to handle tests of multi-tenant setups. If the load is significantly different on the individual tenants, you might want to spin up a performance test session per tenant and specify the tenant in the CreateUserContextManager.
If the load is evenly distributed, we will have to distribute the users over the tenants and we will have to do a few modifications to the sample project in order to make this work:
First, we will change the GetUserName to return the username in a specific tenant based on the Load test id. We do this by adding a % 10 (modulo 10) so that we always use ADMIN0 to ADMIN9.
 protected override string GetUserName(TestContext testContext)
{
    LoadTestUserContext loadTestUserContext = testContext.GetLoadTestUserContext();
    if (loadTestUserContext != null)
    {
        // add the load test user id as a suffix to the default user name
        return String.Format("{0}{1}", DefaultNAVUserName, loadTestUserContext.UserId  % 10);
    }
    // empty user name will use the default user name, this is the case when running as unit tests
    return DefaultNAVUserName;
}
Beside this, we also need to select the right tenant. Create a new method underneath the GetUserName method in NAVUserContextManager:
 protected string GetTenantName(TestContext testContext)
{
    LoadTestUserContext loadTestUserContext = testContext.GetLoadTestUserContext();
    if (loadTestUserContext != null)
    {
        return "TEST" + (loadTestUserContext.UserId  % 3 + 1).ToString();
    }
    return "default";
}
Note the % 3 for having 3 tenants. This works because we have TEST1, TEST2 and TEST3 as tenants. If your tenants are named differently, you can create an array of tenant names, have them in a database or whatever - and... - you would of course never hardcode the number of users in each tenant and the number of tenants like this, but this only serves as an example on how to get the tenant name.
Last but not least you need to modify the CreateUserContext method right above the GetUserName method.
 protected override UserContext CreateUserContext(TestContext testContext)
{
    var userName = GetUserName(testContext);
    var tenantName = GetTenantName(testContext);
    var userContext = new UserContext(tenantName, Company, AuthenticationScheme.UserNamePassword, userName, DefaultNAVPassword);
    return userContext;
}
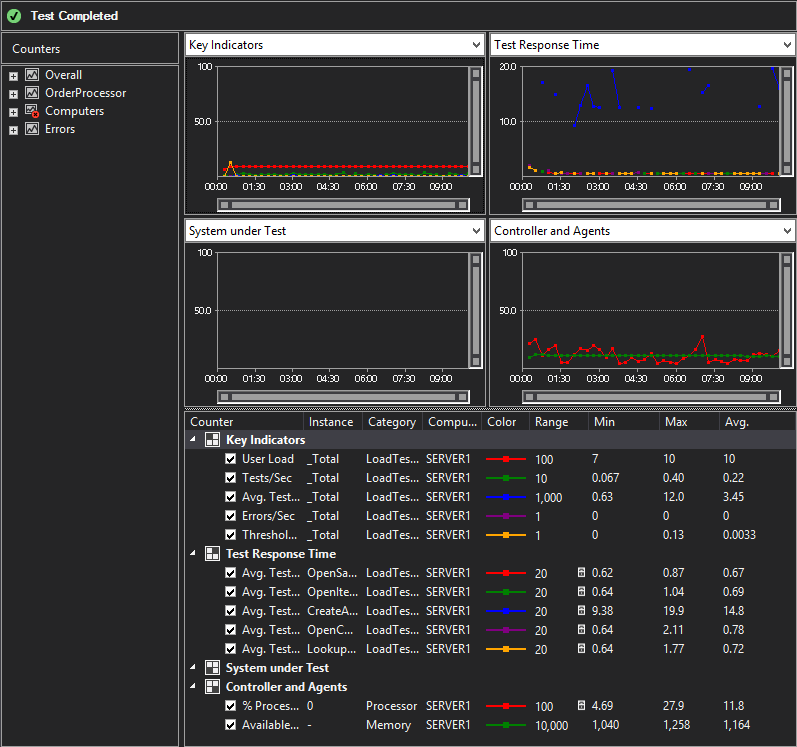
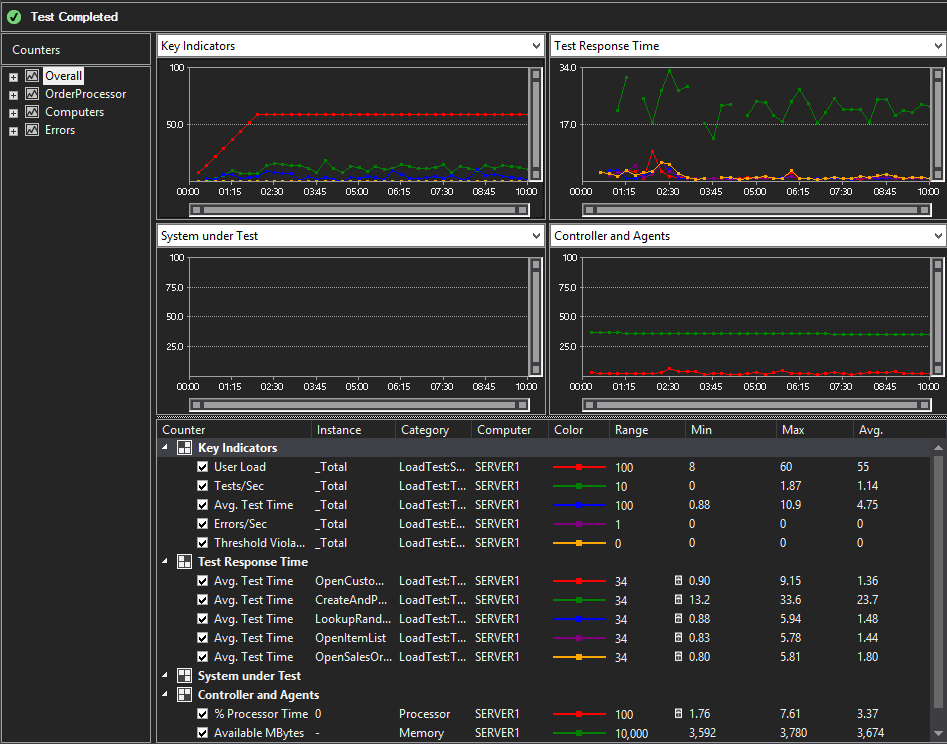
Now change the Step Load Pattern to a maximum of 30 users (3 tenants * 10 users) and Run the Test.
The Result will now look a little different than before, in general you will see that all tests are running a little slower, you might see threshold violations because the C: drive idle time percentage is too low and the average % Processor utilization climbs from ~10% to ~25%.
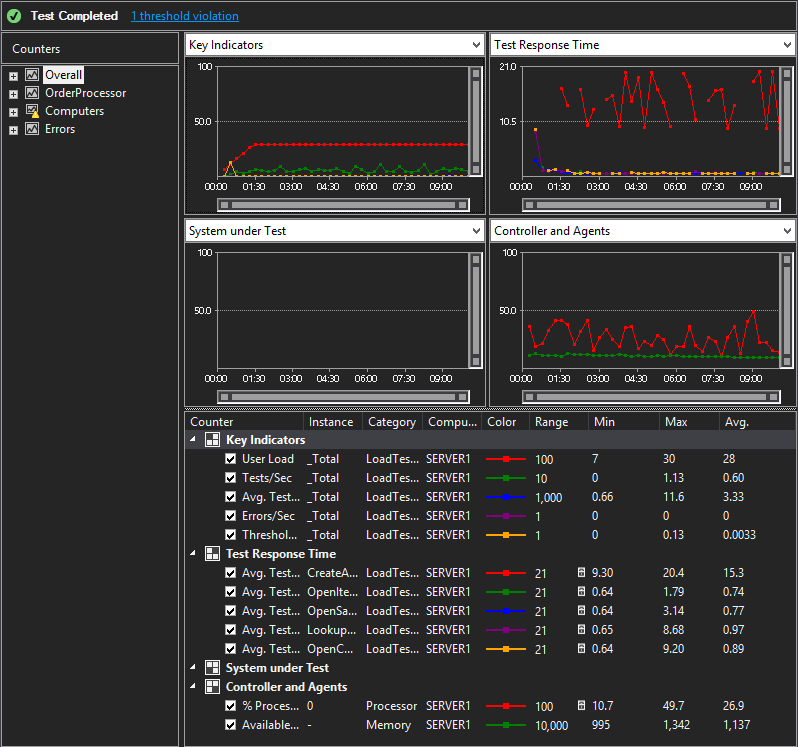
Added 3 more tenants, increased the max. user number to 60 and now the average processor utilization is over 50% giving threshold violations on CPU exceeding 75%.
Examine the three test runs below:
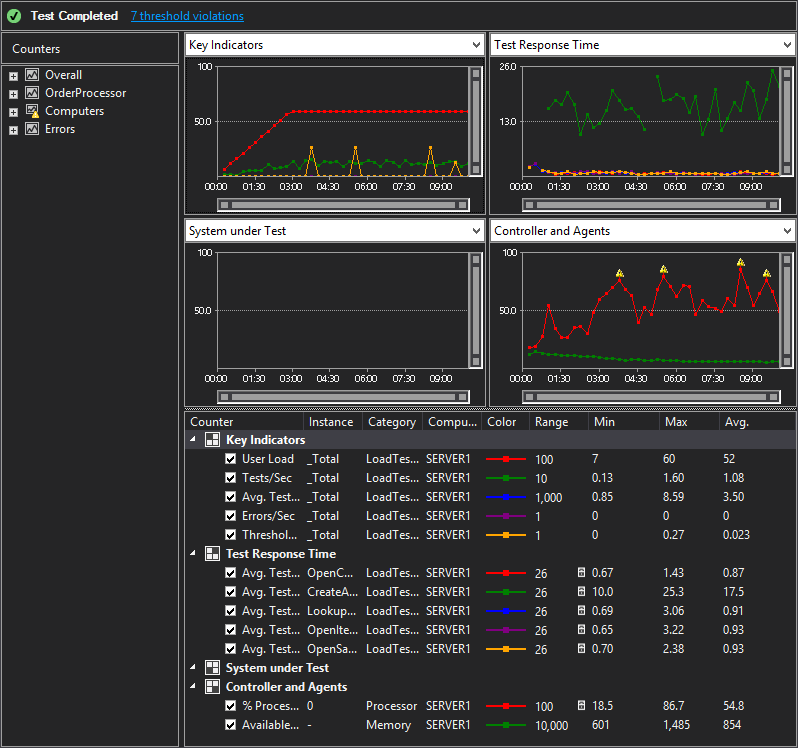
Note: This does NOT imply that you safely can run 30 or 40 users on the default size of the Azure Gallery Image - it merely states that with the load we have defined in the sample will allow you to run this amount of users. If users are doing more tasks, the number of users is very different.
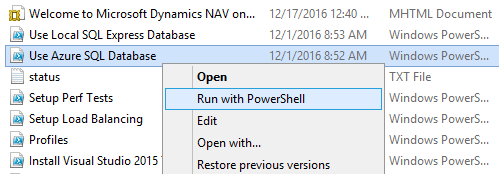
Use Azure SQL Database
What we have been testing up until this point is everything on one box (SQL Server, NAV Service Tier, IIS and Client (in this case Visual Studio).
Lets try to move the database to Azure SQL and see if this changes the picture?
In the C:\DEMO folder launch the Use Azure SQL Database.ps1 script.
Say No to the question on whether you want to connect to an existing Azure SQL Database, login to your Azure Subscription and answer the remaining questions in order for the script to move your app database and all tenant databases to Azure SQL.
This will take a while, but everything should run smoothly (tested today:-)) and you will see a lot of output, telling you what the script is doing right now.
At the end, the script will configure NAV to use the Azure SQL databases and restart the Service Tier and you can re-run your perf tests.
Looking and comparing the results, it seems that it takes more time to establish connection to all these Azure SQL databases, but after some minutes, it seems like ther server is getting into a better rythm.
For this, under the Run Settings, you can se a warm-up duration, which will ensure that the service and the database connections are warmed up before running the actual tests.
Moving the Performance Test project to a different machine
Next thing we want to do is, to either use Visual Studio Online or to move Visual Studio and the test project to a different machine.
What we do is of course to spin up another NAV machine and run the scripts from this post on that one. After that, we modify the app.config to point to this file and of course make the changes to the project that is describes above and then the perf test with 60 users again.
Now we can monitor the test machine:
and some selected performance counters from the NAV Server:
You can also get performance counters from the NAV Servers included in the test run on the test machines.
It is very clear to see, that the NAV Server is doing much better. At 60 users, the CPU utilization is averaging 30% and also the perf test machine isn't really exhausted.
Now, I could continue into more details about settings and figuring out why and how, but I think this blog post is already very long, so I will stop here, where we are running tests from one Server on Azure against a NAV Service Tier on Azure with 6 tenants (10 users on each) all running Azure SQL.
Note: This still doesn't imply that you safely can run 60 users on a D2V2 Azure box with the database on Azure SQL, it all depends on the scenarios, so... - next post is around how to write new scenarios for performance testing.
Enjoy
Freddy Kristiansen
Technical Evangelist