So you want to get started on perf testing, huh???
On November 10th, I tweeted that the NAV 2017 version of the Load Test Sample Project was available - expect some blog posts:-)
Hopefully you haven't been pressing F5 on my blog for the last 35 days... - but wait no more.
I will of course use the Azure Image as foundation for running performance tests. There are a lot of reasons for this, the primary being, that it is a known foundation, we know whats there, where it is and how to use it.
But first...
What is performance testing?
I distinguish between performance testing and load testing. Where the tools, the scenarios and the mechanisms are the same, the goal is very very different. You do load testing to test whether your server can withstand heavy load. What happens if I put maximum load on the server? You do performance testing to validate the performance of your setup at the expected load. How does my setup react to the number of users I expect doing the tasks i expect?
In Performance testing, it is important that the scenarios are executed at the pace users would be performing the scenarios - the closer to real life, the better results you will get. Increasing the load to in-humanlike speed will only test the stability of the server. It is safe to assume that Microsoft runs load testing of the NAV Service Tier when qualifying the builds. We also do run performance tests, but we cannot run your performance tests without having the right scenarios and the right appliccation.
Create the machine
Use https://aka.ms/navdemodeploy and type in Resource group name, Machine name and password - and press deploy.
This will deploy an initialized VM on Azure. I will use this as my service tier, dev machine and all. This is of course not how you will run the actual performance tests, but just to get started.
Download Visual Studio 2015 Enterprise Edition
In order to run Performance tests, you need Visual Studio Enterprise Edition. Use the script in C:\DEMO to install VS 2015: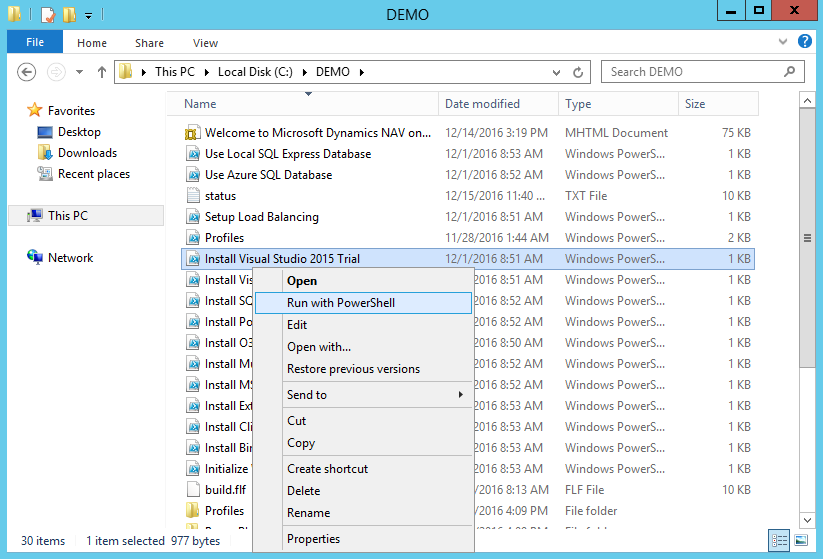
You will need to reboot your VM after installing Visual Studio 2015.
Installing git
You can download and install the latest version of git here: https://git-scm.com/download/win
or you can run this small piece of PowerShell script:
 function Install-Git
{
    $gitexe = "C:\Program Files\Git\bin\git.exe"
    if (!(Test-Path -Path $gitexe -PathType Leaf)) {
        $url = "https://github.com/git-for-windows/git/releases/download/v2.11.0.windows.1/Git-2.11.0-64-bit.exe"
        $downloadFolder = "C:\DOWNLOAD"
        New-Item -Path $downloadFolder -ItemType Directory -ErrorAction Ignore | Out-Null
        $filename = ("$downloadFolder\"+$url.Substring($url.LastIndexOf("/")+1))
        $WebClient = New-Object System.Net.WebClient
        $status = $WebClient.DownloadFile($url, $Filename)
        Start-Process -FilePath $Filename -WorkingDirectory $downloadFolder -ArgumentList @("/verysilent") -Wait -Passthru | Out-Null
    }
    $gitexe
}
$gitexe = Install-Git
It might seem cumbersome to use PowerShell for this, but in the end, this will become another installation script on the VM in CU2 - so it kind of needs to be there.
Cloning the NAV 2017-Sample repository
Having installed git, we can now start git and clone the project containing sample code for NAV 2017. We can also just run this small piece of PowerShell script:
 $documentsFolder = [environment]::getfolderpath(“mydocuments”)
$perfFolder = "$documentsFolder\NAVPERF"
New-Item $perfFolder -ItemType Directory -ErrorAction Ignore | Out-Null
$nav2017sampleUrl = "https://github.com/NAVPERF/NAV2017-Sample"
Start-Process $gitexe -WorkingDirectory $perfFolder -ArgumentList @("clone", $nav2017sampleUrl) -Wait -PassThru | Out-Null
and you will now have the sample project in the NAVPERF folder under My Documents.
Changing app.config
The default app.config will be configured to use localhost as the service tier and Windows Authentication as authentication protocol. This will work if the VM has NOT been initialized. Since we already did initialize the VM, and since performance typically will not run Windows Auth, we modify app.config. We need to specify the Url to the server, the username and the password for connecting.
Of course, we do that in PowerShell as well.
Note: This code will not work unless you are running on an Azure Gallery Image.
 # Find NAV Version
$DVDfolder = (Get-ChildItem -Path "C:\NAVDVD" -Directory | where-object { Test-Path -Path (Join-Path $_.FullName "WindowsPowerShellScripts") -PathType Container } | Select-Object -First 1).FullName
$NavVersion = (Get-ChildItem -Path "c:\program files\Microsoft Dynamics NAV" -Directory | Select-Object -Last 1).Name
# Find Public WebBase Url for Username/Password endpoint
$CustomSettingsConfigFile = "c:\program files\Microsoft Dynamics NAV\$NavVersion\Service\CustomSettings.config"
$config = [xml](Get-Content $CustomSettingsConfigFile)
$PublicWebBaseUrl = $config.SelectSingleNode("//appSettings/add[@key='PublicWebBaseUrl']").value.Replace('/AAD/','/NAV/')
if ($PublicWebBaseUrl -ne "") {
    . "c:\demo\multitenancy\hardcodeinput.ps1"
    # Modify app.config
    $appConfigFile = "$perfFolder\NAV2017-Sample\Microsoft.Dynamics.Nav.LoadTest\app.config"
    $appConfig = [xml](Get-Content $appConfigFile)
    $appConfig.SelectSingleNode("//configuration/applicationSettings/Microsoft.Dynamics.Nav.LoadTest.Properties.Settings/setting[@name='NAVClientService']").value = ($PublicWebBaseUrl.Replace('/AAD/','/NAV/')+'cs')
    $appConfig.SelectSingleNode("//configuration/applicationSettings/Microsoft.Dynamics.Nav.LoadTest.Properties.Settings/setting[@name='NAVUserName']").value = $NavAdminUser
    $appConfig.SelectSingleNode("//configuration/applicationSettings/Microsoft.Dynamics.Nav.LoadTest.Properties.Settings/setting[@name='NAVUserPassword']").value = $NavAdminPassword
    $appConfig.SelectSingleNode("//configuration/applicationSettings/Microsoft.Dynamics.Nav.LoadTest.Properties.Settings/setting[@name='UseWindowsAuthentication']").value = "False"
    $appConfig.Save($appConfigFile)
}
Now all should be ready, we just need to start VS.
Start Visual Studio
Starting Visual Studio can be done by launching the .sln file.
& "$perfFolder\NAV2017-Sample\Microsoft.Dynamics.Nav.LoadTest.sln"
You will need to sign in to Visual Studio (or say not now) and specify your color scheme, but after that you should be good to go.
You can copy all powershell snippets and create one long powershell script, to do it all.
Running your first test
In Visual Studio, build the solution in Visual Studio (Shift+Ctrl+F5)
Open the Test Explorer (Test -> Windows -> Test Explorer).
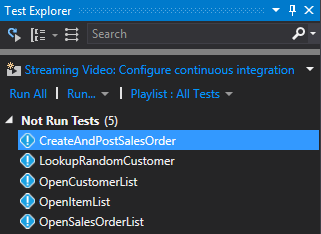
Select any test method, right-click and say Run Selected Test.
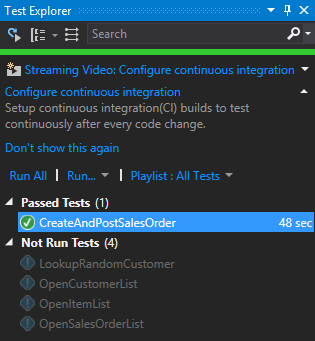
Now mark the remaining 4 tests and say Run Selected Tests - they should all pass.
Running the tests one-by-one is of course not performance testing. For it to be performance testing we need to setup test settings, test mix and a lot of other things. More on that in the next post.
Enjoy
Freddy Kristiansen
Technical Evangelist