How to render SQL Server acyclic blocking graphs using Visual Studio Code, TypeScript, NodeJS and TreantJS - Part 1
Introduction
SQL Server uses blocking - among other technologies - to ensure ACID transactions. There are a lot of lock types in SQL Server, ranging from Shared and Exclusive, Page and Range or even table level. You can find more about these here: [TechNet] - Lock Modes. Whenever SQL server tries to acquire a lock on a resource and that resource is already owned by another, incompatible lock, blocking occurs. Depending on how long - and how often - these blocks persist the execution slowdown becomes noticeable. We will use this premise in order to show how to create a simple SQL Server-backed web site using Visual Studio Code, NodeJS and TypeScript. Since the post is very long I'll split it into two separate ones. In the first part we'll setup Visual Studio code for TypeScript + NodeJs debugging. We will also create a skeleton web service using express and mssql packages. In the second part we will create a TrantJs page rendering the data provided by the REST API just created. You can find the following post here: https://bit.ly/bcts2.
How to inspect blocking
There are many ways to find out the SPIDs (process IDs) involved in blocking. For the purpose of this article, we will focus on the sp_who stored procedure. This little helper will give back the current list of processes active in SQL Server along with the blocking process, if any. You can find more details here: https://msdn.microsoft.com/en-us/library/ms174313.aspx.
In the following example we have some blocked processes:
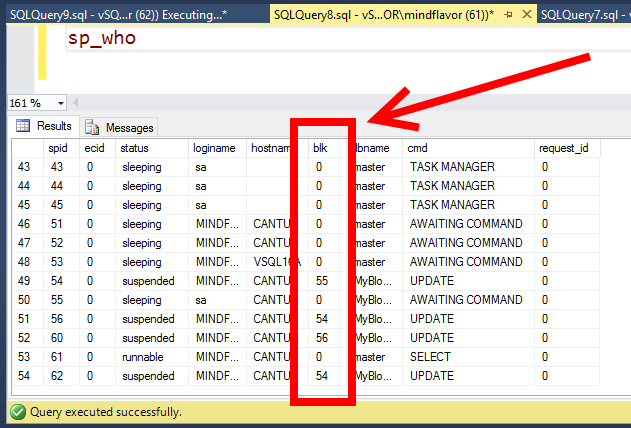
The column blk is either zero - no blocking - or the SPID blocking the session. In the example we see the SPID 54 blocked by 55. The SPID 54 blocks SPID 56 and SPID 62 in turn. The SPID 56 blocks SPID 60. These blocked processes are a directed acyclic graph (if it were a cyclic graph we would have had a deadlock instead).
The blocked graph could be better visualized like this:
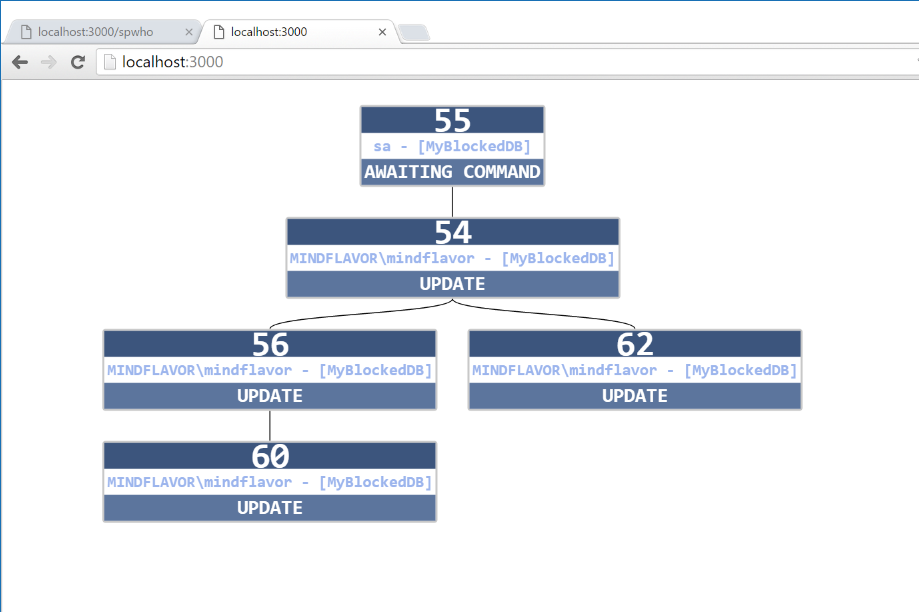
Suppose now you are a DBA tasked on killing the offending SPID. But you cannot kill SPIDs at random: for example, killing SPID 56 is not guaranteed to resolve the problem because the SPID 60 might end up blocked by SPID 55. So, in general, you want to kill the root SPID - that is, the one blocking one or more SPIDs without being blocked by someone else. In our example the root SPID is SPID 55. It's easy to find the root in our graph but it's hard to do with the sp_who output because we will have to re-create the graph in our heads first (and when there are hundreds of blocked processes the task becomes daunting).
So what about a tool to visualize the blocking graph on demand?
Architecture
For our tool we will use many open source technologies. We will use NodeJs with Express for the backend and TreantJs for the graph.
Something like this:

Setup
npm and TypeScript
Generally speaking setting up a TypeScript project is cumbersome - especially if you are spoiled like me by Visual Studio. You need to have Node and npm installed (if you don't, go here). First create a working folder, go in it and initialize the project:
Now install TypeScript and Typings:
Now initialize the TypeScript compiler options and Typings:
Once done your folder should be like this:

Transpilation and debugging
Let's edit tsconfig.json a bit to allow debugging via source maps. We want to add these compilerOptions:
| Option | Use | |
|
Directory where to store the transpiled JavaScript files | |
|
true since we want to be able to debug our code in the TypeScript source files directly. |
The sourceMap field takes care of that. emitDecoratorMetadata and experimentalDecorators are not strictly needed in our project but are useful and required if you plan to use metadata-heavy frameworks (such as Angular 2).
We also tell the TypeScript compiler (tsc) to avoid transpiling the node_modules and the typings module files. Now let's add a dummy app.ts file with this code:
Task runner for building the solution
Now let's ask Visual Studio Code to build our solution. Since we don't have the appropriate configuration (again) we will be asked to create one. Luckily Visual Studio Code does that for us:
Debugging
Last step is to debug our code. Press F5 in Visual Studio Code and - again - we will be asked to create a configuration file. We pick Node.Js as runtime. Remember we must change the configuration because we have created a typescript file and we use source maps.
| Option | Use |
|
Main ts file to start |
|
true since we want to be able to debug our code in the TypeScript source files directly. |
|
Where our transpiled files are stored (in our case, the dist folder). |
We should also check if the breakpoints are working correctly. Just add a breakpoint in our ts file and Start Debugging:
You will be able to inspect the running process regardless of the transpilation and see the variables as usual.
Install required packages
For out project we will use three open source packages using npm. Let's add them:
Also install the typings in order to exploit TypeScript's strong type checking:
.gitignore
The --save flag tells npm to store the package information in our package.json file. The same applies with typings and the typings.json file. This is useful because in order to get all the dependencies again all we have to do is issue npm install (or typings install). In general you don't want to ship the external packages with your code. The user will install the dependencies upon download/clone. To avoid checking in the downloaded packages, we will add the node_modules folder to our .gitignore file. My final .gitignore is like this:
I've also excluded the output folder of the transpilation (dist), the typings folder and the .vscode specific folder.
Create a dummy program
Let's create a dummy program to test that everything is in place. We will create a web server that responds to the URL /sp_who sending back the result of the stored procedure as JSON:
The result will be browsable from https://localhost:3000/spwho:

Hide noisy folders from Visual Studio Code
Our solution is cluttered with many noisy folders. We have the node_modules , the typings folders which are automatically handled by npm and typings, respectively. We do not need to concern with them so we want to hide them from the Visual Studio Code folder view. All we have to do is to add the "files.exclude" property to the workspace settings:
This will leave less clutter in the Visual Studio Code folder tree allowing you to focus on your code.
Moving on
Right now we have:
- A functional, unauthenticated web server serving static pages.
- A functional, unauthenticated web server serving REST verbs in JSON.
- A way to interact with SQL Server.
- We are able to debug step by step in our TypeScript source code, directly in Visual Studio Code.
All we have to do is to render the data graphically. We need to serve some static JavaScript that will interact with our REST API service. We will use AJAX for that. However, this is the topic of the following blog post (https://bit.ly/bcts2).
Happy coding Francesco Cogno