A Graphical Guide To VTT 6.10 Light Latin Autohinting
VTT 6.10 now includes an Autohinter for Latin fonts. The Autohinter uses a Lightweight hinting strategy that focuses on grid-fitting common heights, such as x-height, Cap Height, Ascender, Descender using CVT (Control Value Table) heights as reference, and linking across common stems, such as H crossbar, E, F, Horizontals, O, Q, C, G, Rounds, lowercase ‘e’ rounds and horizontal bar, and lowercase ‘n’, ‘o’ rounds etc. This strategy, takes advantage of *DirectWrite rendering, allowing the inside of glyph contours to round to fractional pixels. The key heights are anchored to the a full pixel Grid, thereby maintaining consistency onscreen, in gridfitted heights of common characters, both within a font and across a font family.
Note, the Autohinter Light will automatically generate a compiled and completed Control Program, Pre Program and Font Program.
The following are the reduced set of Y-Direction hinting commands added automatically by the VTT 6.10 Light Latin Autohinter.
- YAnchor & ResYAnchor
- YIPAnchor (YInterpolate followed by Yanchor)
- YInterpolate
- ResYDist
- YShift
For the examples below, I ran the Autohinter Light on the VTTDemo.ttf font, that ships with VTT 6.10. The following animations, of some of the control characters, for the Cap and Lowercase, shows the order of how the VTT Autohinter Light adds the basic set of Y-Direction hints. As you will see, the smaller set of hinting commands can be used to hint all of the characters in a font. Once you are familiar with this smaller set of hints, it is then easy, to edit the Autohinter output, or to add you own hinting.
The hinting approach used in the Autohinter Light, is suitable for Webfonts that will be rendered in DirectWrite. *Note. The Autohinter sets the GASP table to always use ydirection antialiasing, for DirectWrite rendering, which allows for fractional rounding of horizontal stems.
This approach does the following
- Gridfits Heights such as Cap, and x-height a full pixel grid, helping to maintain high contrast, onscreen, and height consistency across glyphs, and font family weights and styles.
- Allows horizontal stems to round to *fractional pixels.
- Maintains the correct weight of stems, and correct proportions in the hinted glyphs.
- Suppresses subtle features such as overshoots, and undershoots, at lower screen sizes, and allows these features to show again, when enough pixels are available.
*When Hinting for other types of Rendering, such as ClearType GDI, or black and white, that do not support fractional pixel rounding, a stricter method of hinting using inheritance is required.
The following animations show the graphical representation of the High Level Hinting code, (VTT Talk) added by the Autohinter. Refer to the details below each animation describing more about the hints in each glyph. This will give a good overview of the basic stem control hints, needed for a standard Latin font. Hinting can be added using the VTT 6.10 Graphical User Interface or by running the Autohinter Light, and editing the hints using the GUI, post autohinting. More detailed notes are added for the CAP H and Cap O, to explain the hinting concepts. The remainder of the glyphs follow a similar pattern. I will add additional notes when there is a new concept introduced.
Let ’ s start with the Cap H.
High-level Hinting code for Cap H (VTT Talk, ctrl + 5 in VTT)
/* VTTTalk glyph 37, char 0x48 (H) */
/* GUI generated Mon Apr 11 03:23:49 2016 */
ResYAnchor(0,2), Moves point 0 to the Grid, using Control Value Table number 2 as reference. (Cap Height outline measurement = 1434. cvt 2 =1434)
YShift(0,5) Shifts point 5, to a new position on the grid, relative to point 0’s new position on the grid, ensuring point 5 will also be gridfitted to Cap Height.
Note: We do not need to touch all points when hinting. If two points are at the same position and make an unbroken straight line, we can use either point for hinting and the other point will travel with the hinted point, because when the hints are compiled, an instruction called ‘Interpolate Untouched Points’, keeps these two points moving together. In the example above, point 1, will travel with the hinted Point 0, and point 4 will travel with the hinted point 5, similar for the commands at the base of the Cap H.
ResYAnchor(11,8) Moves point 11 to the baseline Grid, using Control Value Table number 8 as reference. (Baseline outline measurement = 0. cvt 8 =0)
YShift(11,7) Shifts point 7, to a new position on the grid, relative to point 11, ensuring point 7 will also be gridfitted to Baseline.
YIPAnchor(0,9,11) Moves point 9, to full pixel grid, relative to point 0 & point 11, which now have new gridfitted positions. This helps to keep high contrast on the bottom of the horizontal crossbar on the Cap H. The Autohinter chooses point 9 on the bottom of the horizontal bar, to interpolate, between the top and bottom of the Cap H. If point 2 was chosen, the bar would have a tendency to round down and may cause the bar to be low. It is better visually for the bar to be high as opposed to low. The bottom point is used, and if the bar cannot be centered it will be pushed up. This same strategy is used in a consistent way, for E, F, etc.
ResYDist(9,2) Links across Cap H horizontal crossbar from point 9 to point 2. This command positions point 2, relative to point 9’s new position on the grid, and allow point 2 to round to a fractional pixel. This maintains the correct weight of the horizontal bar, allowing also for a more subtle transition at break points. In rendering that does not support fractional pixels, hairlines and crossbars must break in full pixel jumps, so from 1 to 2, 2 to 3 etc. This can cause the rendering to either look too light or too heavy at the point where it breaks. Fractional rounding, can happen in DirectWrite where we have additional anti-aliasing in the y-direction, allowing for a much smoother transition at these breakpoints.
A note on the Res command.
TrueType fonts need to be hinted to render optimally onscreen. Some of these, Hints, are specific to particular rendering environments such as black-and-white or grey-scaling (anti-aliased), or ClearType/ClearType with vertical anti-aliasing rendering. The general structure of the Hints are the same for the all of the rendering environments. For example, a letterform such as an uppercase “H” has two vertical strokes and one horizontal bar, whether it is rendered in ClearType or in black-and-white.
In black-and-white rendering, the strokes of the fonts’ letterforms typically have a width that is a multiple of a full pixel, because in black-and-white rendering a pixel is either fully on or fully off. In grey-scaling and ClearType rendering, a pixel can have an intermediate shade of grey or color. In black-and-white rendering for instance, Hints will often constrain parts of the letterforms’ outlines to a full pixel boundary, while in grey-scaling and ClearType rendering the same parts of the outlines will be constrained to a fractional pixel value.
The Res addition to the command ResYDist, for example, stands for Rendering Environment Specific, and ensures that the appropriate rounding happens, for the various rendering environments. This saves adding additional Hinting commands if Hinting is required to work in a variety of rendering environments. I will cover this in more detail in a later post.
A note on the Control Value Table ( ‘ cvt’)
TrueType allows control over the regularity of features through the use of values stored in the ‘cvt’ table. Control values are measurements of features, such as lowercase stems widths, and key heights such as Cap Heights and x-Height. These stems, and Heights, although similar to one another, may have slightly different outline measurements. With cvt’s the distances can be controlled so they are the same pixel width at a low resolution, and heights, can be made to be equal also at lower resolutions. At a higher resolution the control value won’t be used and the natural distance will display in the stems and heights. see below for more on Overshoots and Undershoots in the Cap O example. 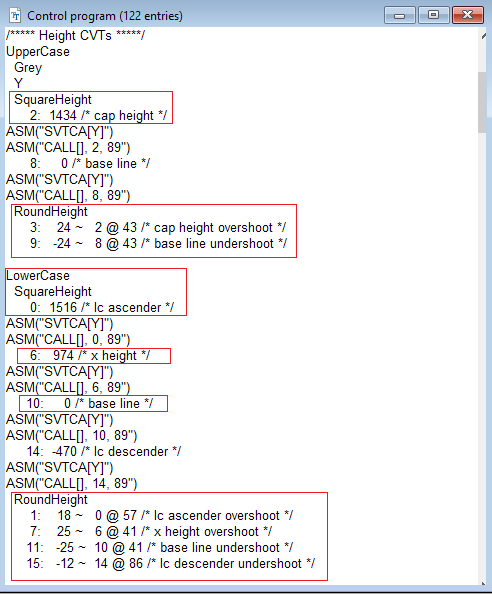
An example of a section of the CVT Table from the VTTDemo.ttf font.
To view the CVT Table, in VTT, View Menu, > Control Program, or ctrl + 4
Cap O
High-level Hinting code for Cap O
/* VTTTalk glyph 64, char 0x4f (O) */
/* GUI generated Mon Apr 11 09:02:53 2016 */
/* Y direction */
ResYAnchor(7,3) Moves point 7 to the Grid, using Control Value Table number 3 as reference. CVT 3 = 24. (24 is the measured difference between the Square Cap Height and the Round Cap Height. At small sizes, the round cap height is made equal to the square Cap Height, and rounds to a full pixel. This is done ensure undershoots and overshoots, do not round to above the Cap Height or below the Baseline, where there are not enough pixels onscreen to show this difference. At larger sizes, when there are enough pixels, to show the difference, the undershoots and overshoots are allowed to round using the measured outline. These values are calculated automatically by the Autohinter. The size at which Overshoots and Undershoots kick in, can be manually edited. I will cover this in greater detail in a later post.
Fitting the overshoots and undershoots to a full pixel grid, helps to, minimize blur at small screen sizes, and keeps heights consistent onscreen between square and round characters, within a font.
ResYDist(7,23) Links across Cap O Top Y-Round, from point 7 to point 23. This command positions point 23, relative to point 7’s new position on the grid, and allow point 23 to round to a fractional pixel.
ResYAnchor(15,9) Moves point 15 to the Grid, using Control Value Table number 9 as reference. (undershoots are controlled in the same way as the overshoot above. In this case, CVT 9 = -24. (-24 is the measured difference between the Baseline of 0(zero), and the Round undershoot measurement of the Cap O, which is measured at -24 below the baseline.
ResYDist(15,31) Links across Cap O Bottom Y-Round, from point 15 to point 31. This command positions point 31, relative to point 15’s new position on the grid, and allow point 31 to round to a fractional pixel.
Smooth()
Cap A
High-level Hinting code for Cap A
/* VTTTalk Unicode 0x41 (A) */
/* ACT generated Fri Apr 8 06:14:52 2016 */
/* Min and Max */
ResYAnchor(3,8)
ResYAnchor(4,2)
YInterpolate(4,1,3)
YAnchor(1)
ResYDist(1,17)
YShift(3,7)
Smooth()
Cap E
High-level Hinting code for Cap E
/* VTTTalk glyph 23, char 0x45 (E) */
/* GUI generated Fri Apr 8 06:17:44 2016 */
/* Y direction */
(1) ResYAnchor(0,2) Moves point 0 to the Grid, using Control Value Table number 2 as reference. (Cap Height outline measurement = 1434. cvt 2 =1434)
(2) ResYDist(0,3) Links across Cap E top horizontal bar, from point 0 to point 3. This command positions point 3, relative to point 2’s new position on the grid.
(3) ResYAnchor(11,8) Moves point 11 to the baseline Grid, using Control Value Table number 8 as reference. (Baseline outline measurement = 0. cvt 8 =0)
(4) ResYDist(11,8) Links across Cap E lower horizontal bar from point 11 to point 8. This command positions point 8, relative to point 11’s new position on the grid.
(5) YIPAnchor(0,7,11) Repositions point 7, on the Cap E Mid-Bar, relative to point 0 & point 11, which now have new gridfitted positions. This command also moves point 7 to the nearest grid.
(6) ResYDist(7,4) Links across Cap E mid-bar from point 7 to point 4. This command positions point 4, relative to point 7’s new position on the grid.
Smooth()
Cap M
/* VTTTalk glyph 57, char 0x4d (M) */
/* GUI generated Tue Apr 12 03:43:20 2016 */
/* Y direction */
ResYAnchor(0,2)
YShift(0,11)
ResYAnchor(30,8)
YShift(30,13)
YShift(30,22)
Smooth()
Lowercase x
/* VTTTalk glyph 223, char 0x78 (x) */
/* GUI generated Tue Apr 12 04:22:20 2016 */
/* Y direction */
ResYAnchor(1,6) Moves point 1 to the Grid, using Control Value Table number 6 as reference. (x-height outline measurement = 974. cvt 6 =974)
YShift(1,6) Shifts point 6, to a new position on the grid, relative to point 1, ensuring point 6 will also be gridfitted to x-height.
ResYAnchor(13,10) Moves point 13 to the baseline Grid, using Control Value Table number 10 as reference. (Baseline outline measurement = 0. cvt 10 =0)
YShift(13,9) Shifts point 9, to a new position on the grid, relative to point 13, ensuring point 9 will also be gridfitted to baseline.
Smooth()
Lowercase o
/* VTTTalk Unicode 0x6f (o) */
/* ACT generated Fri Apr 8 06:14:52 2016 */
ResYAnchor(15,11) Moves point 15 to the Grid, using Control Value Table number 11 as reference. CVT 11 = -25. (25 is the measured difference between the lowercase baseline of 0 (zero) and the lowercase round undershoot) Overshoots and Undershoots are handled in the same way as the Cap examples above.
ResYAnchor(7,7) Moves point 7 to the Grid, using Control Value Table number 7 as reference. CVT 7 = 25. (25 is the measured difference between the lowercase square x-height of 974, stored in CVT 6, and the lowercase round overshoot)
ResYDist(7,23) Links across lowercase o top Y-Round, from point 7 to point 23. This command positions point 23, relative to point 7’s new position on the grid, and allows point 23 to round to a fractional pixel.
ResYDist(15,31) Links across lowercase o bottom Y-Round, from point 15 to point 31. This command positions point 31, relative to point 15’s new position on the grid, and allows point 31 to round to a fractional pixel.
Smooth()
Lowercase n
/* VTTTalk glyph 174, char 0x6e (n) */
/* GUI generated Tue Apr 12 07:39:10 2016 */
/* Y direction */
ResYAnchor(14,10)
YShift(14,5)
ResYAnchor(15,6)
ResYAnchor(19,7)
ResYDist(19,9)
Smooth()
Hopefully this gave a good overview of the smaller set of Hinting commands needed for making Webfonts. If there is more interest, I can add additional animations for other glyphs, with explanations.
In the next post I will look at how to edit the Hinting generated by the Autohinter, to fine tune the rendering for onscreen display.
cheers
Mike