Hosting Git on the Cloud with Windows Azure Virtual Machines (Part 4)
In part 2 and part 3, we have created a Virtual Machine running Linux though Windows Azure Virtual Machines, and we have setup a Git repository on the VM. We are now going to see how to clone the repository, and push back the changes. In this blog post, we will use TortoiseGit on Windows as a client, but you can use any Git client tool, or the command line, and from any operating system.
Make sure you have the private key (the PPK file) we generated in part 2 using Puttygen.
What we will do first is create an empty repository on the server. We will need to log in onto the server to do that.
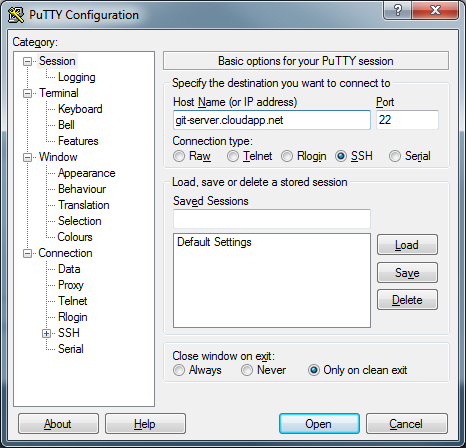
Start putty and enter your hostname (xxxx.cloudapp.net).
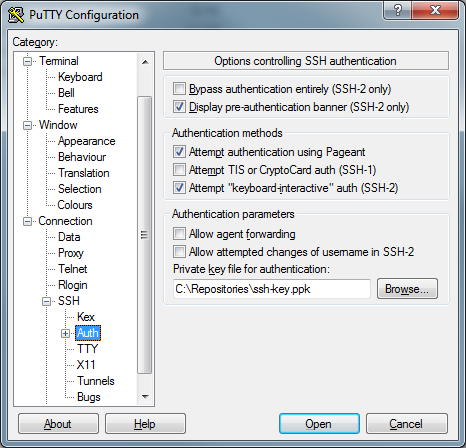
On the left, click on “Auth”, under “SSH”, under “Connections”. Click Browse where it says “Private key file for authentication”, and find your private key file. Click Open.
When you are prompted for your username, type “git” (the git user). Putty should then authenticate you using your private key. It will ask you for the passphrase you chose when you generated the key pair.
You should now be logged in. Create a new repository by doing:
 cd /git
git init --bare myrepo.git
You can now log out from the server. The repository has been created on the VM. Let’s now clone it on your machine.
First make sure you have installed msysgit on your client machine. You can download it from here. Then you can install TortoiseGit, it you haven’t done so already. You can download it at this location.
You should now be all prepared to use Git from your client machine.
Right click on the folder where you want to clone the repository, and select “Git Clone…”. A popup will appear.
In the URL, type a URL such as: ssh://<your-clouapp-host-name>/git/<your-repository-name>
In our example, <your-repository-name> would be myrepo.git.
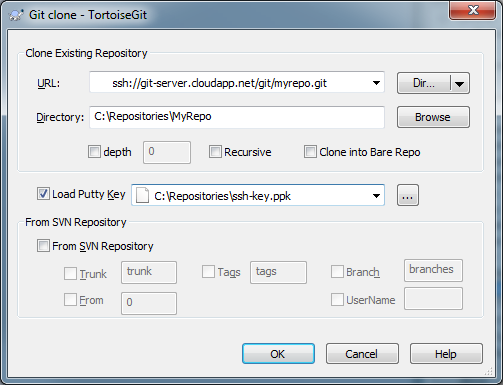
Check “Load Putty Key”, and browse for your private key. Click OK.
You will be prompted for the user, type “git”, you may also have to type the passphrase of your private key.
This is it, the repository is cloned. The repository will be empty of course, but you can now make some changes (add a file), commit the changes.
After pushing back your commits to origin (the virtual machine), your changes will be safely and durably stored on Windows Azure, and you will benefit from the Geo-replication. Any contributor who owns a private key (as configured in part 3) can create new repositories, push and pull code. You can create as many repositories as you want by following the first 4 steps of this article. You should have about 25 GB free on the disk for storing your repositories, if you chose the default Ubuntu image provided by Windows Azure. In case you need more space, you can attach an additional virtual disk. The current price for Geo-Replicated storage is $0.125 per GB per month. This solution is more complex than setting up a repository on GitHub, especially for a small one, but if you have many repositories and/or large ones, this will be a very economical solution.