WPF: spinning circles
Animation is an extremely exciting topic of investigation and the main pillar for gaming. The term "animation" simply means that something is changing over time (movement). WPF offers different methods to make animation and many examples are available in internet. Nevertheless to have a fan we discuss on how to spin multiple circles inside a canvas (if you don’t like ellipse you can replace with shape you wish). In WPF a circle can be drawn through System.Windows.Shapes.Ellipse class. In general animation requires some manner of custom code to be executed in a loop, in real time. In our post are discussed two different ways to implement animation:
- timer-based animation: this approach is based on set a timer and a function that is periodically called back based on timer frequency
- frame-based animation: this method is created by attaching an event handler to the static Rendering event on System.Windows.Media.CompositionTarget class.
Let start our discussion with a Mathematic approach; to spin circles we use the following parametric equation which governs the motion of circles center in time span:
Xk(t)= X0+R*cos qk(t)+r * cos ak(t)
Yk(t)= Y0+R*sin qk(t)+r * sin ak(t)
qk(tj)= qk(tj-1)+v
ak(tj)= ak(tj-1)+v2
v=( p/180)*(N/10)
v2= (p/180)*(0.3*k) k=0,1,2,…N-1
where
t is interval of time from start of animation (t=0)
k is the index of circle which identify a specific circle in a range [0,N-1]
N is the total number of circles
R is the main radius
r is the secondary radius
X0 is the x-coordinate of the center of main radius R
Y0 is the y-coordinate of the center of main radius R
Xk(t) is the x-coordinate of the center of the circle k at time t
Yk(t) is the y-coordinate of the center of the circle k at time t
qk(tj) is the angular velocity of main radius R of the circle k at time t
ak(tj) is the angular velocity of secondary radius r of the circle k at time t
v is the variation of angular velocity of main radius R
v2 is the variation of angular velocity of secondary radius r
The parametric equation can be written in term of vectors:

One aspect to figure out is that parametric equation defines the coordinates of center of circle that we want to draw and therefore all parameters in the equation are not related with radius of circle. In the equation main radius R and secondary radius r are the modules (magnitude) of two vectors which sum defines the coordinates of center of our circle.
The effect of parametric equation is to overlap two simultaneous circular motions:
- one motion spins the circle around the center (X0,Y0),
- a secondary motion spins the circle around the head of vector R(t)
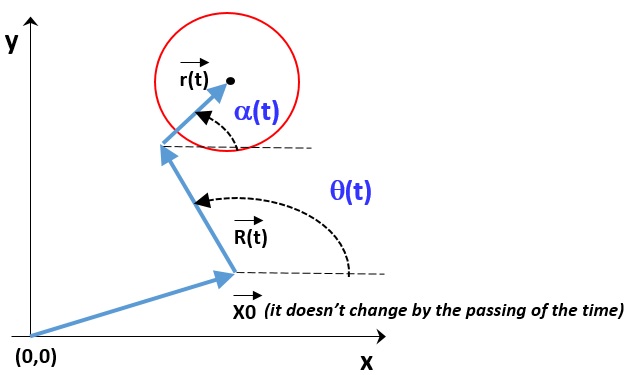
Figure 1: parametric equation in vector notation
To correct position all the circles at initial time (t=0) we use the following initial condition:
qk(t=0)=(p/180)*(360*k/N) k=0,1,2,….N-1
ak(t=0)= (p/180)*(360*k/N) k=0,1,2,….N-1
In cavans the origin of x-coordinate and y-coordinates is taken respect to top-left corner of canvas control: to translates the origin of main radius R in the center of canvas control we set X0 and Y0 as:
X0 = (Windows1.canv.Width / 2);
Y0 = (Windows1.canv.Height /2);
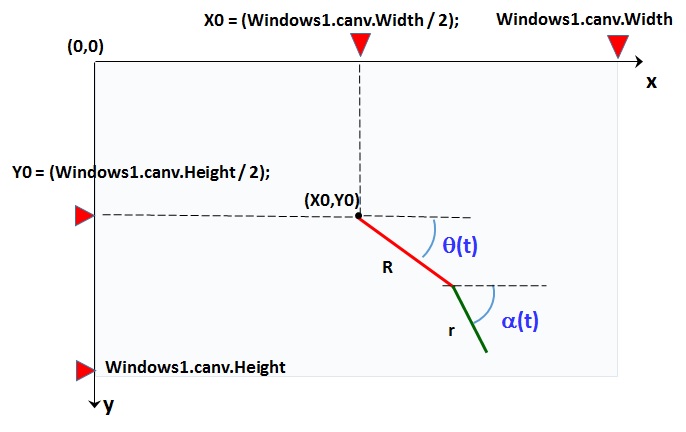
Figure 2: simultaneous motions of the main radius R and secondary radius r
As shown in Figure2, q(t) is the angle subtending the main radius R and the horizontal axis, and a(t) is the angle subtending the secondary radius r and the horizontal axis.
In System.Windows.Shapes doesn’t exit the class Circle but we can use Ellipse with Width = Height to shape ellipse in circle. As described in “How to: Draw an Ellipse or a Circle” https://msdn.microsoft.com/en-us/library/ms751563.aspx to draw a circle in a canvas we write:
public MainWindow()
{
InitializeComponent();
this.myGrid.Children.Add(canv);
this.myGrid.Width = Windows1.Width ;
this.myGrid.Height = Windows1.Height;
double desiredCenterX = 200;
double desiredCenterY = 250;
Ellipse myEllipse = new Ellipse();
myEllipse.Width = 100;
myEllipse.Height = 100;
myEllipse.Fill = Brushes.Blue;
Canvas.SetLeft(myEllipse, desiredCenterX -(myEllipse.Width / 2));
Canvas.SetTop(myEllipse, desiredCenterY -(myEllipse.Height/ 2));
canv.Children.Add(myEllipse);
}
The (desiredCenterX, desiredCenterY)are the coordinates of the ellipse's center. One option to control position of child element in canvas is through Canvas.SetLeft and Canvas.SetTop methods; coordinates of child element is taken respect to left edge and top edge of canvas. The Figure 3 and Figure 4 show the coordinates of the center of the circle respect to the canvas control.
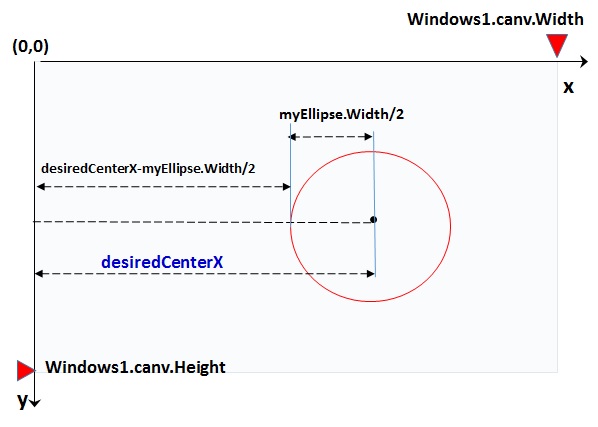
Figure 3: x-coordinate to set properly the circle in the canvas
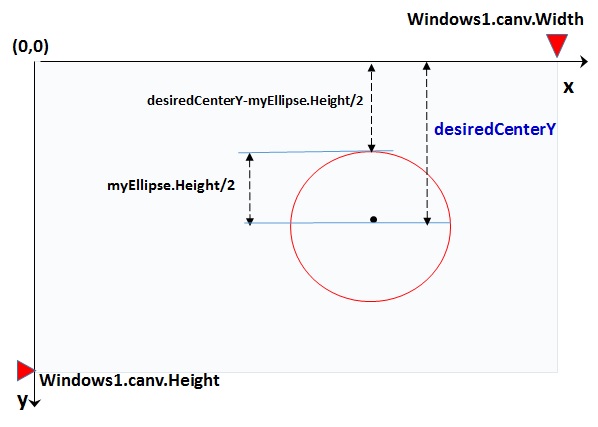
Figure 4: y-coordinate to set properly the circle in the canvas
At this stage is clear how to draw a single circle in the canvas; our final goal is to draw a large number of circles and an easy implementation can be done through multiple arrays associated each with one ellipse property:
// maximum size of array of Ellipse objects
public static int TotNumCircles = 200;
// array of "System.Windows.Shapes.Ellipse" objects
public static Ellipse[] ellip = new Ellipse[TotNumCircles];
// array of x-coordinate the centers of the ellipses
public double[] x = new double[TotNumCircles];
// array of y-coordinate the centers of the ellipses
public double[] y = new double[TotNumCircles];
// angle of main radius R
public double[] theta = new double[TotNumCircles];
// angle of secondary radius r
public double[] alfa = new double[TotNumCircles];
// angular velocity of main radius R
public double[] v = new double[TotNumCircles];
// angular velocity of secondary radius r
public double[] v2 = new double[TotNumCircles];
Every ellipse is unique identified by index k=0,1,2,3…, TotNumCircles-1 of related array.
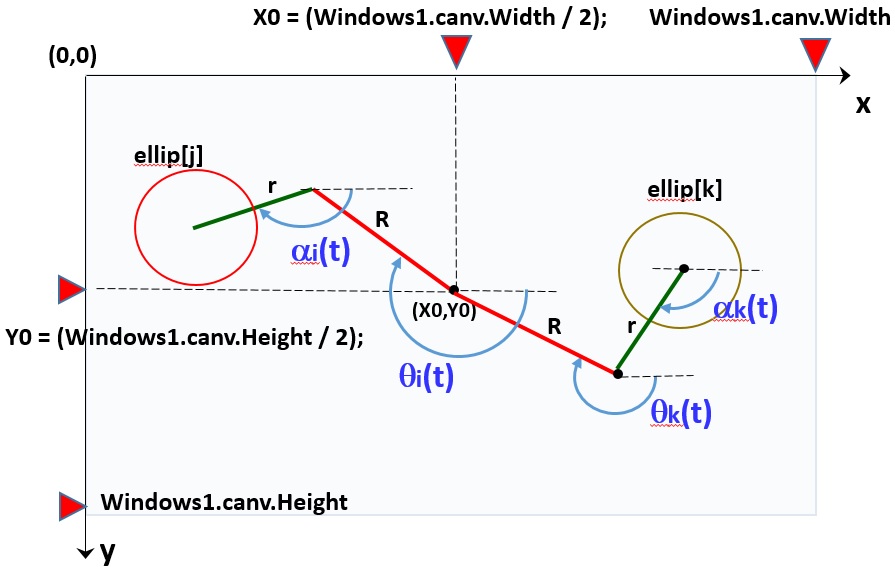
Figure 5: example of two circles in canvas with different angular velocity
In XAML file of our Visual Studio project, we have four controls type:
- a ScrollViewer control provides a convenient way to enable scrolling of content in our WPF applications. The HorizontalScrollBarVisibility property is enabled that indicates a horizontal ScrollBar is displayed.
- A canvas is added as child of ScrollViewer control. Canvas defines an area within which we can explicitly position child elements by using coordinates that are relative to the Canvas area.
- We have five System.Windows.Controls.Slider controls to change parameters in the equation:
Slider Name |
parameter changed in the equation |
Slider Name="sliderMainRadius" |
main radius R |
Slider Name="sliderSecondaryRadius" |
secondary radius r |
Slider Name="sliderCirclesSize" |
diameter of circles |
Slider Name="sliderAngularVelocity” |
angular velocity of circles |
Slider Name="sliderTotalCirclesNumber" |
total number of circle in canvas |
To show value of slider in a Textbox, we use in XAML file the slider as binding source object of Textbox control:
<Slider Name="myslider" ValueChanged="mySlider_ValueChanged" Value="0" Minimum="0" Maximum="100"/>
<TextBox Name="myTextBox" Text="{Binding ElementName=mySlider, Path=Value}" />
where mySlider_ValueChanged the is the function invoked on changing of value of the slider bar in the canvas.
The Name property represents the name of the control, which is a unique identifier inside the element tree. The Minimum and Maximum properties represent the minimum and maximum values of the slider range. On the ValueChanged event of slider controls, we simply write the code to update variables of parametric equation.
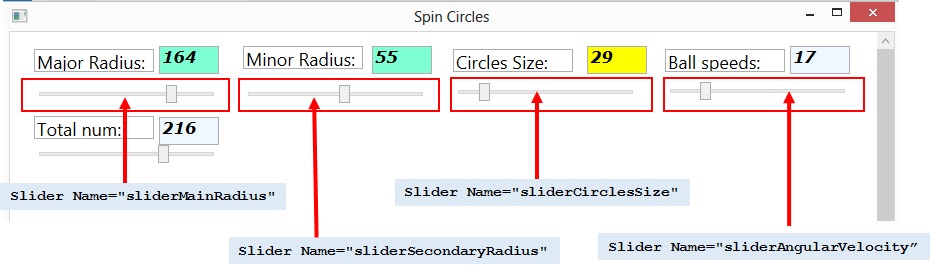
Figure 6: slider controls to change parameters equation
timer-based animation
So far, we have built all elements to draw circles in a canvas; what is missing is our animation. WPF is designed to save developers from the difficulties of threading. Typically, WPF applications start with two threads: one for handling rendering and another for managing the UI. The rendering thread effectively runs hidden in the background while the UI thread receives input, handles events, paints the screen, and runs application code. Most applications use a single UI thread.
The UI thread queues work items inside an object called a Dispatcher . The System.Windows.Threading.Dispatcher class provides services for managing the queue of work items for a thread. The Dispatcher orders the elements in its queue by priority. There are ten levels that may be specified when adding an element to the Dispatcher queue. These priorities are maintained in the DispatcherPriority enumeration. The Dispatcher selects work items on a priority basis and runs each one to completion. Every UI thread must have at least one Dispatcher, and each Dispatcher can execute work items in exactly one thread.
Time-based animation can be implemented in WPF through System.Windows.Threading.DispatcherTimer class, a timer that is integrated into the Dispatcher queue which is processed at a specified interval of time and at a specified priority. Initializes a new instance of the DispatcherTimer class which processes timer events at a priority specified with the DispatcherPriority can be done through the statement:
DispatcherTimer timer = ``new System.Windows.Threading.DispatcherTimer(DispatcherPriority);
As next step we need to add a DispatcherTimer to our project. In WPF all elements have got lifetime events; the Loaded event (lifetime event) says that the visual tree is not only built and initialized, but layout has run on it, data has been bound, it's connected to a rendering surface (window) and you're on the verge of being rendered. When we reach that point, we canvas the tree by broadcasting the Loaded event, starting at the root. Therefore, Loaded event occurs when the element is laid out, rendered, and ready for interaction.
In our project we can add to the Loaded event a RoutedEventHandler that allows to call the Window1_Loaded() function containing a new instance of DispatcherTimer.
Loaded += new System.Windows.RoutedEventHandler(Window1_Loaded);
The DispatcherTimer class supports specifying an interval between ticks as well as the code to run when the timer's event fires; in our project DispatcherTimer is created with following code:
void Window1_Loaded(object sender, RoutedEventArgs e)
{
// Create a Timer with a highest priority
DispatcherTimer timer = new DispatcherTimer(DispatcherPriority.Send);
// Set the Interval to 2 seconds
timer.Interval = TimeSpan.FromMilliseconds(5);
// Set the callback to invoke every tick time
timer.Tick += new EventHandler(timer1_Tick);
// Start the timer
timer.Start();
}
private void timer1_Tick(object sender, EventArgs e)
{
for (int j = 0; j < TotNumCircles; j++)
{
theta[j] = theta[j] + v[j];
alfa[j] = alfa[j] + v2[j];
x[j] = X0 + circleSize / 2 + (R * Math.Cos(theta[j]))
+ (r * Math.Cos(alfa[j]));
y[j] = Y0 + circleSize / 2 + (R * Math.Sin(theta[j]))
+ (r * Math.Sin(alfa[j]));
Canvas.SetLeft(ellip[j], x[j]);
Canvas.SetTop(ellip[j], y[j]);
}
}
By default the DispatcherTimer tied to Dispatcher uses the Normal priority but in our case we set the DispatcherPriority to the highest value (DispatcherPriority.Send).
frame-based animation
Structure of our project remains roughly the same of timer-based project, but we need to replace the DispatcherTimer with frame-based mechanism. WPF provides a way to create frame-based animation by attaching an event handler to the static Rendering event on System.Windows.Media.CompositionTarget class .
The System.Windows.Media.CompositionTarget is a static class which represents the display surface on which your application is being drawn. In other words every time a scene is drawn to screen, the CompositionTarget class raises the Rendering event to notify any event handlers that a frame has been rendered. The static CompositionTarget.Rendering event is raised post-layout and pre-render once per frame. The Rendering event occurs just before the objects in the composition tree are rendered. To terminate the animation is enough detach of the event handler. Using the frame-based Rendering event is the preferred approach because provides the best performance. One aspect to consider with CompositionTarget is that the frames-per-second (fps) rate may differ from machine to machine: factors such as hardware and system workload will affect how many times per second the rendering event will be fired. Animation of circles is created adding the statement:
CompositionTarget.Rendering += new EventHandler(RenderFrame);
or in alternative way
CompositionTarget.Rendering += RenderFrame;
The Rendering event calls the Rendering event handler that we have named RenderFrame which increase at every frame the angular speed of every circle of an amount equal to the variation of angular velocity, v[j] for main radius R and v2[j] for the secondary radius r of parametric equation:
public void RenderFrame(object sender, System.EventArgs e) { for (int j = 0; j < TotNumCircles; j++) { theta[j] = theta[j] + v[j]; alfa[j] = alfa[j] + v2[j]; x[j] = X0 + circleSize / 2 + (R * Math.Cos(theta[j])) + (r * Math.Cos(alfa[j])); y[j] = Y0 + circleSize / 2 + (R * Math.Sin(theta[j])) + (r * Math.Sin(alfa[j])); Canvas.SetLeft(ellip[j], x[j]); Canvas.SetTop(ellip[j], y[j]); } }
[View:https://www.youtube.com/watch?v=nGAhX3d1A44]
You can download the Visual Studio 2012 projects (inclusive of porting in Windows Store apps) here:
 AnimationSpinningCircles_TimerBased.zip
Timer-base project.
AnimationSpinningCircles_FrameBased.zip
Frame-base project.
SpinningCircles_FrameBasedWin8.zip
Project Windows Store Frame-base.
Reference
- Threading Model in WPF: https://msdn.microsoft.com/en-us/library/ms741870.aspx
- Build More Responsive Apps with the Dispatcher: https://msdn.microsoft.com/en-us/magazine/cc163328.aspx
- Comparing the Timer Classes in the .NET Framework Class Library: https://msdn.microsoft.com/en-us/magazine/cc164015.aspx
- Fun With Animation Part 1-CompositionTarget Rendering: https://blogs.msdn.com/b/brandf/archive/2007/10/09/fun-with-animation-part-1-compositiontarget-rendering.aspx
- WPF CompositionTarget.Rendering/Animation Responsiveness: https://blogs.msdn.com/b/sean_mcdirmid/archive/2008/09/13/wpf-compositiontarget-rendering-animation-responsiveness.aspx?Redirected=true