Live IIS Smooth Streaming in Expression Encoder 4
September 2010
Authors: Jamie Lang and Sam Wookey
INTRODUCTION
Expression Encoder 2 was the first version of Encoder to support encoding content into the IIS Smooth Streaming format. In Expression Encoder 4 Pro, we have taken this support one step further with the introduction of Live Smooth Streaming. Now, you can stream audio and video from your webcam or capture card directly to an Internet Information Services (IIS) server with the latest IIS Media Services installed. Live Smooth Streaming content is delivered over existing HTTP networks thus reducing the custom infrastructure needed to broadcast a live event. CDNs and content providers no longer have to worry about how much capacity they can dedicate on their much more resource constrained streaming networks. They can take advantage of all the resources of their HTTP network and do not have to worry about maxing out network capacity and shutting out users from live events. For a user viewing a Live Smooth Streaming broadcast, they no longer need to worry about watching a video feed tailored to the lowest common denominator of consumer hardware. A Live Smooth Streaming broadcast contains different video quality levels all the way up to true HD quality (720p+), allowing users on cells phones and the fastest PC’s to consume video from the same stream at a quality level appropriate for their platform.
Live IIS Smooth Streaming is only available in the Pro version of Expression Encoder. You can purchase it individually or as part of Expression Studio 4 Ultimate.
In the rest of this article, we are going to walk through the steps needed to get up and broadcasting your first Live Smooth Streaming event. At the end, we have included a few links where you can find more information about Live Smooth Streaming and ways that you can take advantage of it for you particular application.
SETTING UP IIS MEDIA SERVICES
The first step in using Live Smooth Streaming in Expression Encoder 4 Pro is to download and install IIS Media Services for Internet Information Server. IIS Media Services provides the server side component which distributes Live Smooth Streaming content to clients (or other edge servers). IIS Media Services can be installed using the Web Platform Installer (WPI) or from the IIS download site. The following prerequisites must be fulfilled prior to installing IIS Media Services:
- You must use IIS 7 running on one of the following operating systems:
- Windows Server 2008
- Windows Server 2008 R2
- Windows Vista with SP1
- Windows 7
- To manage IIS Live Smooth Streaming using the IIS Manager user interface, the IIS Management Console for IIS must be installed.
The IIS site contains an excellent tutorial on installing and configuring the IIS Media Services. This page will take you step by step on installing Live Smooth Streaming support on the server, creating your first publishing point, and testing your installation using sample content.
Live Smooth Streaming in Expression Encoder 4 only supports Push mode on a publishing point. This means that Encoder will push content to the IIS server (as opposed to Pull mode, where the IIS server will pull video from a support encoder). It is important to make sure that all publishing points you create that you wish to use with Expression Encoder 4 have the Push option selected under the Live source type combo box, as in the picture on the below.

If you are running IIS Media Services 4.0 Beta, you can also set up the publish point to transmux the stream into a format compatible with Apple mobile devices along with a .m3u8 format manifest. This will require that the Expression Encoder is streaming using H.264 Baseline (iPhone) or H.264 Main (iPad) profiles. When setting up the publish point, there will be a new tab called Mobile Devices. Checking the Enable output to Apple mobile digital devices will enable this feature. Then you can set up a webpage using a HTML 5 video tag to point to the new .m3u8 manifest:
<video width="640"
height="480"
src= "smoothApple.isml/manifest(format=m3u8-aapl)"
poster="MyPosterFrame.png"
autoplay="true"
controls="true" >Live</video>
For more information, see the Apple HTTP Live Streaming article on the IIS site.
CONFIGURING EXPRESSION ENCODER
Now that you have installed the required server side components, we can begin using Expression Encoder 4 to start broadcasting some content. The first step after installing Expression Encoder 4 is to create a new Live Broadcasting Project from the New Project window.
Next, we need to choose the sources that we are going to use to broadcast. Expression Encoder 4 can broadcast from a range of different sources, from video and audio capture cards, still pictures or audio and video files. All of the live encoding functionality that was supported in past versions of Encoder, such as switching between different sources, looping file sources, jumping from one file source to the next, and configuring all of your source properties, are supported for Live Smooth Streaming broadcasting. Also, make sure you remember to Cue the source you want to begin broadcasting with. The Start button stays disabled until you Cue one source to start with.
After you have added all of the sources that you wish to broadcast from, it is time to configure your encoding settings to use Live Smooth Streaming. To make this easier, we have created many built-in presets to get you started. Expression Encoder 4 supports creating Live Smooth Streaming content using either the VC1 or h264 video codecs, giving you the flexibility to distribute your content on a whole range of different clients and devices. Silverlight clients support the playback of both types of content, but if you wish to broadcast to clients such as an iPhone, you will need to use one of the h264 presets.

Figure 2: Encoder live preset panel |
The built-in presets will get you started with some basic settings to get you broadcasting quickly. If you wish to configure these settings further, you can find all of the options you want under the Video and Audio tabs. Each stream supports different settings for bit rate and size, and using the various tabs, you can add and remove streams, as well as configure the settings for each stream. See the Tuning Your Broadcast section below for suggestions on optimal settings for your encoding machine.
You can also change the Advanced Video Encoding Settings for the overall broadcast by expanding the chevron under the Video settings expander. However, unless you know what each setting does, it’s best to leave these as the defaults from one of the presets for Live Smooth Streaming, as some of these settings can have a very detrimental effect on your broadcast. Some settings, such as Closed GOP, cannot be changed, as they will create an invalid Live Smooth Streaming broadcast.
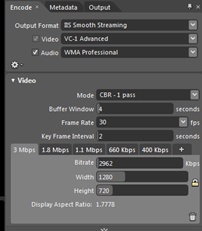
Figure 3: Configuring individual streams |
Now that you have established that you are creating a Live Smooth Streaming broadcast, you can set the location to push the broadcast. On the Output tab, click on the Streaming checkbox to enable pushing a broadcast to an IIS Live Smooth Streaming enabled server. By default, the Publishing Point radio button is enabled. Broadcast mode is disabled when a Live Smooth Streaming output format is selected.
Type the location of your Live Smooth Streaming publishing point into the Location combo box (Figure 4). The publishing point URL looks like https://<server name>/<virtual directory>/<name>.isml. The <name> for the publishing point comes from the file name you chose when creating the publishing point on the server.
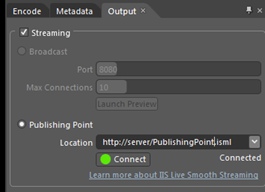
Figure 4: Selecting a publishing point |
Live Smooth Streaming publishing points behave differently than Windows Media Services publishing points, so if you are familiar with WMS publishing, there are a couple caveats to keep in mind. Live Smooth Streaming publishing points aren’t created automatically like WMS ones, and they don’t start automatically either when you start streaming to them. They must be created manually on the server and they must be started before broadcasting. You can set the ‘Start publishing point upon first client request’ checkbox on the Advanced tab of the Edit Publish Point dialog to have it start when the broadcast starts.
Also, a Live Smooth Streaming publishing point must be reset on the server if you wish to broadcast to it multiple times. Each time you start and stop encoding, you must shutdown and restart the publishing point on the server before you can connect to it again.Otherwise, data from the last run will still be on the server and you will encounter errors while broadcasting the next time. This is the most likely source of errors you will receive from the server when using Live Smooth Streaming in Expression Encoder, and your first course of action should always be to shutdown and restart the publishing point on the server before trying to broadcast again.
After you have chosen the publishing point in the Location combo box, click Connect to test your connection to the server. If you have enabled authentication on the server, you will be prompted for your access credentials. If your credentials are accepted and your publishing point is set up properly, then the Connect button will turn green and the status will say Connected. If you encounter any errors while connecting, or your publishing point is invalid, the Connect button will turn red and an error message will show in the status area.
Now that you have chosen your sources, selected a Live Smooth Streaming output format, and chosen your publishing point, you are ready to begin your broadcast. Click the Start button to begin encoding.
There are a few errors that you may encounter while broadcasting. During broadcasting, if Expression Encoder detects that the number of dropped frames exceeds a minimum threshold, it will show an warning informing you that the playback experience may not be optimal. Broadcasting will not be stopped for this warning but the output may not be optimal.
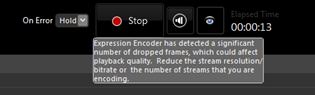
Figure 5: Dropped frames warning
Errors can occur as well if the source device or file cannot send information fast enough to send a full chunk to the server. This usually happens on the lower bit rate streams where the bit rate cannot be written fast enough for the key frame interval which will cause the streams to be out of sync. If this happens, encoding will fail and you will need to increase the bit rate of the lower streams to make sure there is enough data in these chunks.

Figure 6: Bit rate too low error
A third type of error can occur when the source content changes frame rates. This can happen with some live devices like web cams that reduce the frame rate in low light conditions or it can happen in variable frame rate video files. When these types of inputs are used as sources, the chunk lengths of the video stream can vary greatly and cause sync issues with the audio stream during playback for long encodes. To prevent these types of errors make sure the live devices or files can maintain a constant frame rate during broadcasting.
SETTING UP YOUR SILVERLIGHT CLIENT
The third piece in the Live Smooth Streaming ecosystem is the client used to playback a Live Smooth Streaming broadcast. Any number of different clients can be used to view a Live Smooth Streaming broadcast. The Silverlight Media Framework contains a default Silverlight client that you can use to test your streams. If you followed the instructions on the Live Smooth Streaming for IIS 7 tutorial to create and test a publish point, then you already have installed a sample player under %SystemDrive%\inetpub\wwwroot\LiveSmooth (unless you installed the Silverlight Media Framework to a different directory). You can use the default player in this development kit to test out your streams. It includes a graph which displays information such as the current bit rate that is playing, the current bit rate that is downloading, and the current frame rate that is playing. If you wish to use this template to view the streams you are publishing from Expression Encoder 4, then you need to update the mediaSource attribute in the default.html page to point to the publishing point that Encoder is pushing to. Note that the mediaSource attribute is the fully qualified URL that you entered into the Expression Encoder 4 Location combo box, plus the the added tag “/Manifest” at the end. So for example, if in Expression Encoder 4 you entered https://server_name/LiveSmooth/LiveSmoothStream.isml as your publishing point, then the mediaSource attribute in the default.html would be https://server_name/LiveSmooth/LiveSmoothStream.isml/Manifest.
For a more complete client experience, you can also use one of the live media player templates that are included in Expression Encoder 4 SP1. In SP1, we modified a set of our templates to allow the controls to appear based on the publishing output you select to give user full control over the playback. In the Live Broadcasting project, you should see the new Templates panel next to the Output panel on the right hand side. If you do not see this panel, select it from the Windows menu. Since live broadcasting is different than generating templates in on-demand project, you will need to pre-generate your template to the location where your users can see it. To set up a live template for broadcasting:
1. Import your live/files sources and select your output format from the Encode panel.
2. Select the output format you want to publish to from the Output panel. If you select a publishing point, enter the URL to push the broadcast.
3. On the Templates panel, select the template you want to use and then click the Generate button. This will pull up the Generate Template dialog.
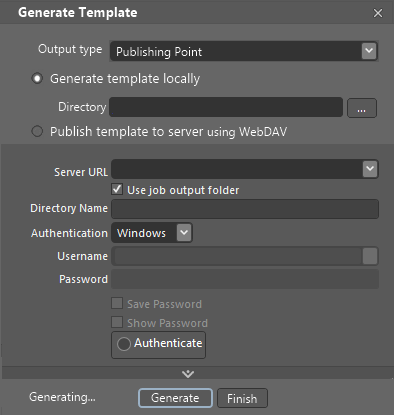
Figure 7: Generate Template dialog |
4. On this dialog, you can generate multiple templates for different types of broadcasts for each output type selected.
5. Select the output type you want to generate a template for and select the location you want to publish to and click Generate.
The template files will be generated in this location and the <MediaSource> will be hooked up to the output type URL. Once you are finished generating the templates you need, click Finish and you are now ready to broadcast directly to the Silverlight template.
TUNING YOUR BROADCAST
Live Smooth Streaming encoding is a very computationally-expensive process, and requires a fast machine to get good results. For example, you cannot encode 12 720p streams on a dual core laptop. More memory, faster CPU’s, and more cores will all enable you to encode more streams at higher qualities. To encode at 720p quality levels, you are also going to need to make sure that these cores are fast. Having 8 cores running at 2.0GHz is good configuration, but having 4 cores at 3.0+GHz is better, especially if you want to encode at 720p. Often, it will take experimenting with encoding settings to find out what a particular machine can handle. Pay attention to the number of dropped frames while encoding, as Expression Encoder will drop frames when it detects that it cannot achieve the current encoding settings. Dropping frames is usually a sign that your machine is not fast enough to encode using your current settings. Reducing the number of streams, lowering the bit rate of individual streams, and reducing the output resolution of each stream will all result in better performance.
The Expression Encoder team has created a tool that can allow you to test your hardware's ability to broadcast live IIS Smooth Streaming. It allows you to select a file type and an Expression Encoder live preset to test against. It also has additional options to specify the failure tolerance or you can let the tool can generate the optimal streams during the test. Then Expression Encoder will iteratively run the file though a different IIS Smooth Streaming broadcast scenarios and will complete when the output meets the failure tolerance requirements. Once finished, you can save the generated preset so that it can be used with the Encoder. It is recommended that you use different file types to determine a more accurate prediction on your hardware’s capabilities since decoding different codecs can affect broadcasting.
You can download this tool from the Expression Gallery website.
PROTECTING YOUR OUTPUT
In Expression Encoder 4, you can also encrypt your output IIS Smooth Streaming broadcast using Microsoft PlayReady technology. You will need to have a PlayReady license server or provider set up to obtain a KeySeed which will allow the server to decode and send a license to the client during playback. On the Output panel, check the ‘Digital Rights Management’ checkbox to enable the feature.
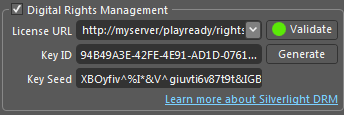
Figure 8: Digital Rights Management
In this section, you will need to enter:
- License URL - the URL to the server that will provide the license. This URL should point to https://[server name]/playready/rightsmanger.asmx. Click the Validate button to verify the URL is correct.
- Key ID: This field is a unique GUID to identify the broadcast. Clicking Generate will create a new GUID automatically.
- Key Seed: This string should be the base64 encoded string provided by the license server to be used to encrypt the streams. The Key Seed is used to encrypt the content and has to match the server’s Key Seed so the server can provide the correct license to decrypt the content.
Silverlight handles the licenses request and downloads during playback on the client. You can use any of the Expression Encoder templates to playback encrypted content.
ADDITIONAL INFORMATION
Here are some sites where you can find more information about Expression Encoder 4 and Live Smooth Streaming:
The Expression Encoder Team Blog is a great place to stay up to date with the latest information about encoder releases and tips and tricks on using Encoder. If you have any questions about using Expression Encoder 4, the Expression Encoder forum is a great place to start. Here, you can connect directly with the Encoder team and other users to ask questions, request features, and get help with any problems you might be having.
The IIS Media website has a wealth of information about Live Smooth Streaming. Here, you will find instructions on setting up your server, sample content, comparisons against competing formats, and case studies about other companies using Live Smooth Streaming technology.
If you are interested in developing your own media player to consume Live Smooth Streaming content, then the Silverlight Media Framework is the first place you should look.
There is also a white paper from the IIS team on how to set up live IIS Smooth Streaming in Expression Encoder to stream to Apple Devices.