Brush Transforms and Keyboard Modifiers
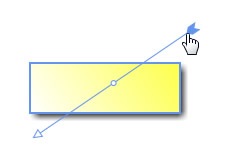
You probably already know that you can use the Brush Transform tool to transform the fill, stroke, opacity mask, or any other brush that is applied to an object. When you click on the Brush Transform tool with an object with, let's say, a gradient brush applied, a brush transform arrow will appear. You can select the brush transform arrow and easily use your mouse cursor to move, scale, and rotate the brush transform arrow to modify your object's gradient fill:
While using your mouse is straightforward, you do not have a lot of precision. There are transforms that you may want to do such as set the gradient rotation to exactly 45 degrees, scale the brush transform arrow equally, and more.
Luckily, such transforms are possible using your mouse cursor and the Alt and Shift keys on your keyboard. Those two keys, among a few others, are known as keyboard modifiers because you use them in conjunction with other keys or mouse clicks. In this post, I will briefly describe common transforms that you can perform to your brush transform arrow using those keyboard modifiers and your mouse cursor.
Scaling Perfectly Outward/Inward
When you are scaling your transform arrow, unless you have perfect mouse control, your scaling will usually be accompanied by some rotation. To scale perfectly outward/inward with no rotation, hold down your Shift key while clicking and dragging your brush transform arrow endpoint:
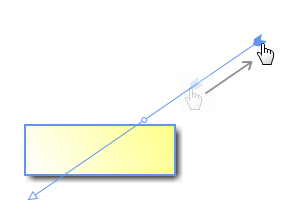
Notice that even though our brush transform arrow was originally in a rotated state, when scaling up with the Shift key pressed, the scaling grew perfectly outward.
Rotating in Fixed Intervals
When you rotate your brush transform arrow, you are free to set any rotation angle you want. There will be times, though, where you would like to rotate your brush transform to a common fixed value such as 45 degrees, 90 degrees, etc. In those cases, hold down your Shift key while rotating:
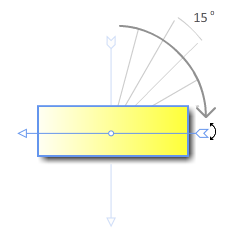
When holding down your shift key while rotating, you rotate in fixed intervals of 15 degrees. Be sure to note that it is not fixed intervals of 15 degrees relative to your original rotation angle. It is an absolute 15 degrees in a Cartesian plane starting at 0 degrees and ending at 360. If your transform originally had a rotation of 80 degrees, when increasing your rotation angle, your first interval will occur at 90 degrees and then increase by 15 degrees afterwards.
Transforming Both Endpoints Symmetrically
Any alteration you make to your brush transform's endpoint using your mouse cursor affects only that particular endpoint. If you want to symmetrically move both of the end points, you can do that by holding down your Alt key while manipulating any single end point:
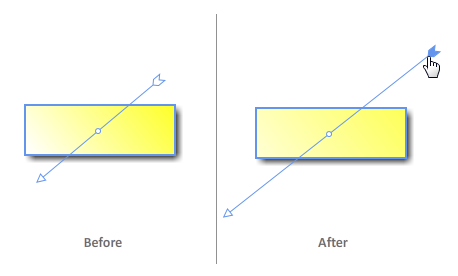
This time, notice that even though you scaled out only one of the endpoints, both of the end points grew outward.
Wrap Up
As you can see, a combination of the Alt and Shift modifier keys along with your mouse cursor allows you to more precisely control how you can transform your brushes. With radial gradients, the behavior is also the same, so don't feel as if you are limited to applying these tips to linear gradients only.
While this post focused primarily on the brush transform arrow, the above techniques apply to more general transforms also. For example, scaling an object by holding down both your Shift and Alt keys allows you to evenly scale an object outward without adding any rotation. Exploring some of those scenarios will be saved for another post!
Cheers!
Kirupa Chinnathambi