Quick N Dirty Tutorial: Making Nice Explosion Sprites
When I was working on the alpha blending posts, I found myself in need of a texture to demonstrate how additive blending could be used to make an explosion effect. When I worked on a shooter a few years back I learned a little bit about how to do that, but couldn't really remember the specifics. So, I bugged an artist friend of mine, Michael Clark, and asked him how to do it. I saved the chat log, and I've been meaning to clean it up into a proper tutorial, but I just never had the time. Anyway, here's a really really rough edit of the chat log. Maybe I'll get around to cleaning it up eventually - or maybe someone else can work from this and post better instructions?
These instructions are for Photoshop but you should be able to accomplish something similar with Paint.Net. If I remember correctly, to use this technique you'll have to download a plugin to do more complex gradients.
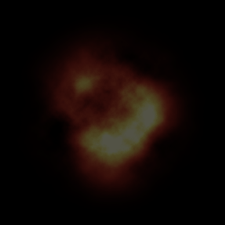
For reference; the end goal should look something like the image below. I know it looks really dark, but that's OK. Remember we're layering a whole bunch of them together with additive blending. You can check out the particle samples (2D and 3D) to see how this looks in practice.
So, enough ado - here's the chat log. Again, sorry this isn't the greatest quality... but hopefully it's better than nothing.
Talented Artist: first make a 512x512 image or whatever. then hit D to pick black and white as your default colors.
Talented Artist: then filter-render-clouds
Talented Artist: then ctrl-shift-L for auto levels
Talented Artist: then filter-render-difference clouds
Talented Artist: then ctrl-shift-L for auto levels.
Talented Artist: if you don't have some white bits in the middle then hit ctrl-i to invert.
Talented Artist: now make a new layer
Talented Artist: select the gradient tool and select circular gradient and make a circular gradient with a white middle and a black edge. you want the radius to be 2-3 pixels less than the size of the texture, and centered.
Talented Artist: set the blending mode of the gradient layer to multiple
Talented Artist: hit ctrl-L and adjust the levels so you get a nice slope - put a point in the middle or so and move it up some so that you brighten the gradient a bit. You'll have to play around with the control points a bit. Make sure the outside of the circle doesn't become visible.
Talented Artist: now make a new adjustment layer(in the layer palette click the middle button on the bottom, the one that looks like a circle thats half black half white) and make a gradient map layer
Talented Artist: double click the black and white gradient in the window that pops up and make a gradient that...
Talented Artist: okay have you made custom gradients beforeMe: once or twice
Talented Artist: okay basically you want to make a gradient that is like black at the 0.0 mark, dark red at the 0.75 mark, orangey-yellow at the .5 mark, and yellow-white at the 1.0 mark. You'll probably wind up needing to tweak this.
Me: explain what you mean by orangeyred
Talented Artist: one sec
Talented Artist: the orangey color was 231,188,85
Talented Artist: and the yellow white is 253 255 213Talented Artist: also this whole thing might need to be tweaked and have like a solid black at 20% opacity laid over it to darken it.
That's it! So, does your explosion sprite look anything like mine? And more importantly, are there any brave souls out there willing to try this out and turn it into a proper tutorial?