Searching External Data in SharePoint 2010 Using Business Connectivity Services
Business Connectivity Services (BCS) are a set of services and features that provide a way to connect SharePoint solutions to sources of external data and to define external content types that are based on that external data. The search services in SharePoint 2010 are able to index the external data using the external content type and show meaningful results to the searchers of the external data. BCS is based on its predecessor, Business Data Catalog, with enhancements in several key areas, including support in SharePoint Designer.
This blog is inactive.
New blog: EricWhite.com/blog
Blog TOCThis is an MSDN article written by Bob McClellan. It will be published sometime in the near future. After it is published, I will update this post to point to that article. This article was driven by Juan Balmori Labra, with technical reviews by Nitin Ved, Josh Teitelbaum, Russell Palmer, Rolando Jimenez, and Juan Balmori Labra.
Table of Contents
Step-by-Step Example of Searching External Data
Using Associations for Master/Detail Relationships
Explanation of the BCS Model XML
Modifying the External Content Type to Support Incremental Crawls
Using the Same External Content Type for an External List
Overview
This article will examine how to use SharePoint Designer to define an external content type (ECT) and how to set up a search crawl that includes that external data. You will then see how to reduce crawl times for large amounts of data by using incremental crawls. All of this will be done using SharePoint Designer, SharePoint Central Administration and some editing of XML.
Before beginning, you should have the following:
- Access to SharePoint 2010 Central Administration, including the search service and the business data connectivity service.
- Access to SharePoint Designer.
- A SharePoint 2010 web application with a site collection. For more information, see Create a site collection (Office SharePoint Server). You can probably use Sharepoint - 80 for these examples.
- Access to Microsoft SQL Server. You can use the same instance of SQL Server that SharePoint uses.
- A sample database for Microsoft SQL Server (AdventureWorks will be used in these examples. See Sample Databases for Microsoft SQL Server 2008R2 to install.)
These examples will be more meaningful if you have some general understanding of SQL queries and views. Previous experience with XML will also be helpful. Even without that experience, you should be able to successfully complete all the examples.
Step-by-Step Example of Searching External Data
In this section, I will show you how to quickly set up a connection to external data using SharePoint Designer to define an external content type (ECT). Then you will see how to configure the search service to index that data and show results in a way that is useful to the end user. The general steps are as follows:
- Verify that the web application has connections to the proper services.
- Create a profile page site and a search site.
- Configure the Business Data Connectivity Service.
- Create the External Content Type.
- Configure the Search Service and index the external data with a crawl.
- Test the search.
As you work through the specific steps that follow, you will be using four main areas:
- Business Data Connectivity in SharePoint 2010 Central Administration
- Search in SharePoint 2010 Central Administration
- SharePoint Designer
- The search site that you will be creating
I suggest that once you have started working in one of those areas that you keep that window open. For example, once you have a window open for Business Data Connectivity, open a new window to configure the search service.
The first step is to verify that the web application has a connection to the necessary services. If any necessary services are not connected, you must connect them.
Procedure: Verifying the Web Application Connections
Start SharePoint 2010 Central Administration.
Click Manage web applications under the Application Management heading.
Select the web application you will be using for these examples (e.g. Sharepoint - 80).
Click Service Connections in the ribbon.
Figure 1. The Web Applications ribbon

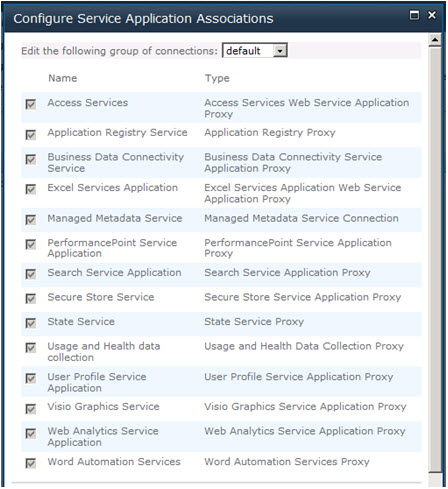
You need to have checks by Business Data Connectivity Service and a search service, like Search Service Application. Make note of which search service the web application uses so that you are configuring the correct one. (For example, you may have the FAST Query SSA instead.) If one or both are not checked, check them and click OK. If you cannot check them, use the drop down at the top to change from default to custom first.
Figure 2. Dialog for Web Applications connections
The next step is to configure the Business Data Connectivity Service. You will need to set the permissions and set a host site for profile pages. Profile pages are used to show the detailed information about an external data record. The search service will link its results to the appropriate profile page. If you do not set up a profile page, then the search results will contain a useless link. Each profile page will show the data for a particular external content type, so you need a different page for each type. You could host these pages on any site, but it is usually better to create a separate site, or even a separate site collection for those pages so that they are not stored with regular site content. These instructions will show how to create the site within an existing site collection.
Procedure: Creating a site for profile pages
- Open the site collection you will be using with Internet Explorer.
- On the Site Actions drop-down, click New Site.
- Select the Blank Site template.
- In the right pane, click the More Options button.
- Type "Search Results Details" in the Title box.
- Type "ProfilePages" in the URL name box.
- In the Navigation section, click the No radio button for Display this site on the top link bar of the parent site?
- Click Create.
The URL that you see is the one you will use for the next step. For example, if the URL for the profile page site is "https://server1/ProfilePages/default.aspx" then you will specify the location of the profile pages as "https://server1/ProfilePages" as the host URL.
Procedure: Configuring the Business Data Connectivity Service
Start SharePoint 2010 Central Administration.
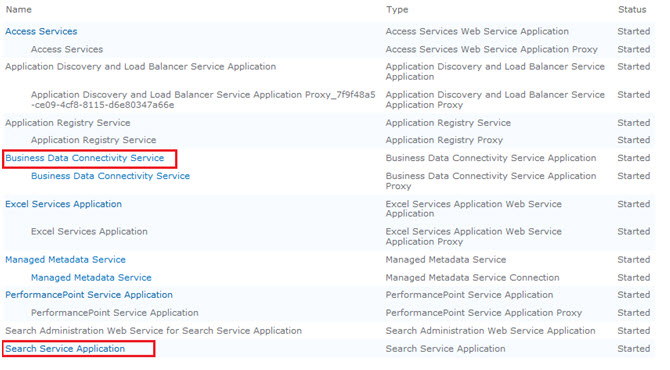
Click Manage service applications under the Application Management heading.
In the Name column, click on Business Data Connectivity Service.
Figure 3. Manage Service Applications list
Click on the Edit tab.
In the ribbon, click on Configure in the Profile Pages group.
In the Host SharePoint site URL box, enter the full URL for the site you just created for profile pages.
Figure 4. Configuring the ECT profile page host
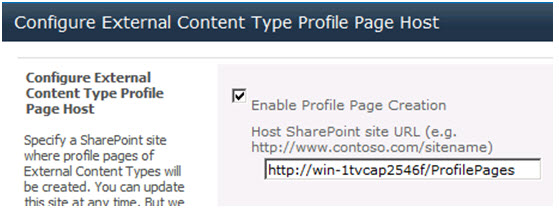
Click OK.
In the ribbon, click Set Metadata Store Permissions in the Permissions group.
If the account you will be using is not shown in the dialog, type the account name in the text box next to the Add button.
Click Add.
In the bottom list, check all of the check boxes (Edit, Execute, Selectable In Clients and Set Permissions).
Check the box for Propagate permissions to all BDC Models, External Systems and External Content Types in the BDC Metadata Store.
Click OK.
You must also create a simple search site for testing.
Procedure: Creating a Basic Search Site
- Open the site collection you will be using with Internet Explorer. (Make sure you have navigated back to the original site collection and that you are not still viewing the site you created for the profile pages.)
- On the Site Actions drop-down, click New Site.
- Select the Basic Search Center template.
- In the right pane, type "BCS Search" for the Title and "BCSSearch" for the URL name.
- Click Create.
Next, you will create an external content type (ECT) for the product and description view in the AdventureWorks database. The ECT can be created in the root of the site collection or any of the sites in that collection, including the one you just created. The ECT will be connected to SQL Server as an external system. Then you will define two basic operations to make the ECT usable by the search service. The Read List operation is used to get the full list of records from the ECT. The Read Item operation is used to get a specific record from the ECT. Both operations require that you specify the field that uniquely identifies each record.
Procedure: Creating the External Content Type
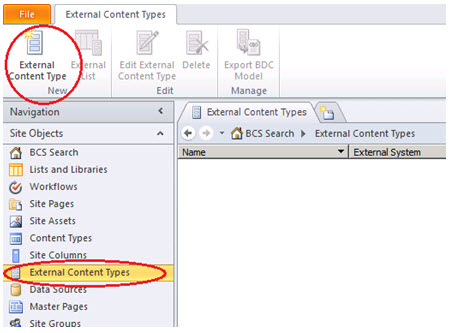
On the Site Actions drop-down for the BCS Search site that you just created, click Edit in SharePoint Designer. (Notice that you should now have three of the four windows open that I mentioned previously. Only the search service has not been opened yet.)
In the Navigation pane, click External Content Types.
In the New group of the ribbon, click External Content Type.
Figure 5. Creating a new External Content Type
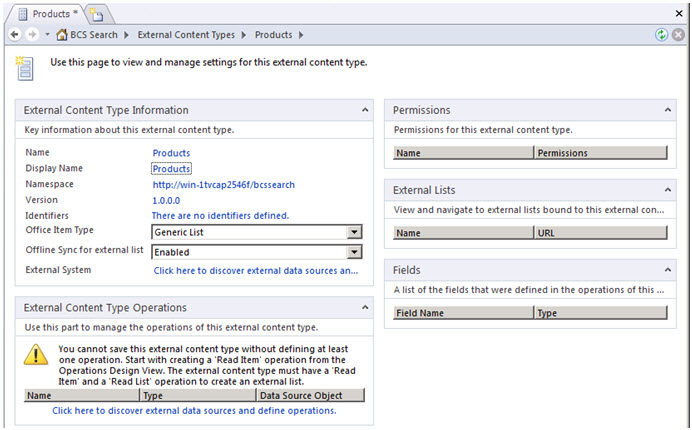
In the External Content Type Information group, next to Name, click New external content type. Type "Products" and then tab.
Figure 6. Summary view of an External Content Type
Next to External System, click Click here to discover external data sources and...
Click on the Add Connection button.
In the External Data Source Type Selection dialog, choose SQL Server in the drop down.
Click OK.
In the SQL Server Connection dialog, type "localhost" in the Database Server box.
Figure 7. SQL Server Connection dialog
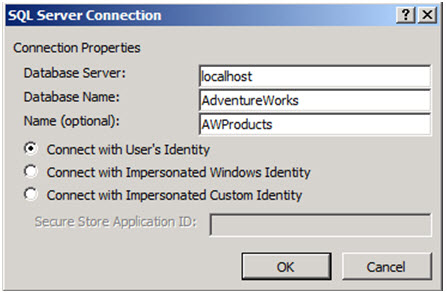
Enter "AdventureWorks" for the Database Name box.
Enter "AWProducts" for the Name (optional) box.
Click OK.
Note: This connection will use the search service account to connect to the database. In a production configuration, you may want to use one of the impersonated identities so that database access is controlled independently from that account.
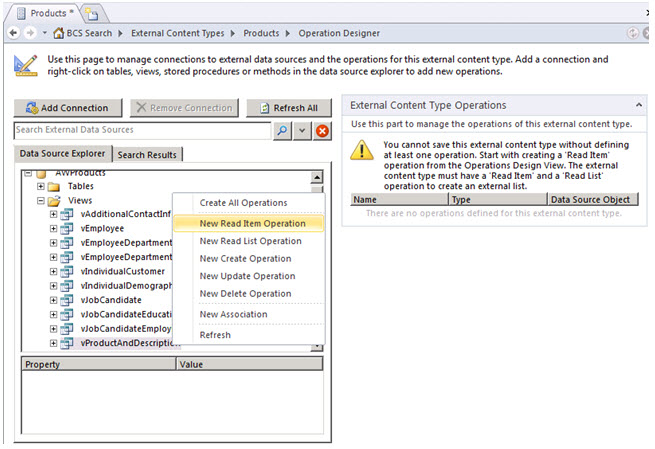
Click on the expansion symbol next to AWProducts.
Click on the expansion symbol next to Views.
Right-click on vProductAndDescription to open a pop-up menu and click New Read Item Operation.
Figure 8. Data Source Explorer for an External Content Type
Click the Next > button at the bottom of the Read Item dialog.
On the Input Parameters page, click ProductID in the Data Source Elements pane.
Figure 9. Read Item dialog
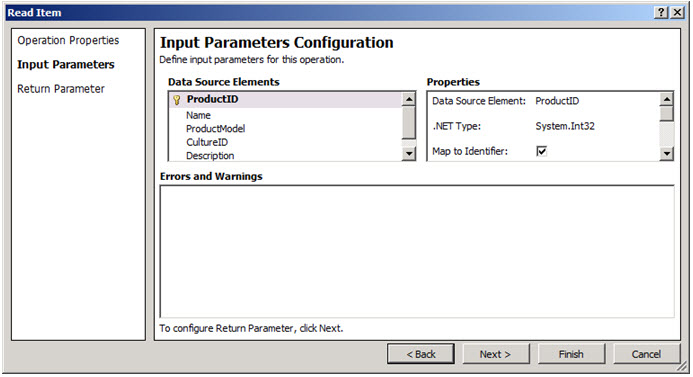
In the Properties pane, check the box for Map to Identifier.
Click the Next > button.
On the Return Parameter page, click ProductID in the Data Source Elements pane.
In the Properties pane, check the box for Map to Identifier.
Click the Finish button.
Right-click on vProductAndDescription to open a pop-up menu and click New Read List Operation.
Click the Next > button at the bottom of the Read List dialog.
Click the Next > button.
On the Return Parameter page, click ProductID in the Data Source Elements pane.
In the Properties pane, check the box for Map to Identifier.
Click the Finish button.
In the ribbon, click on Summary View.
In the Fields group, click on Name in the list.
In the ribbon, click on Set as Title.
Figure 10. Completed External Content Type
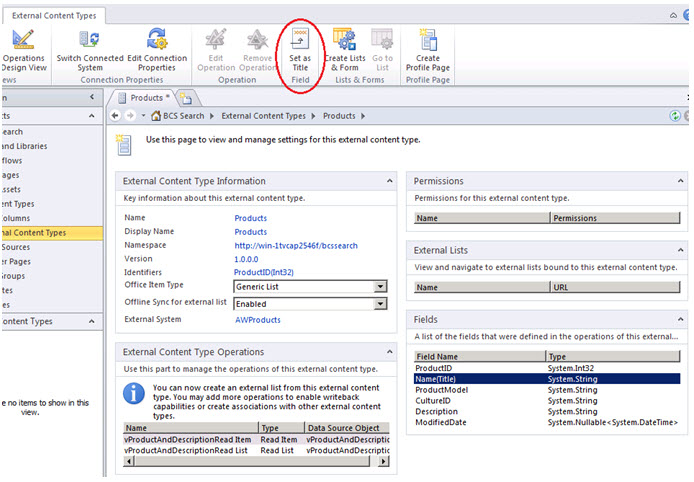
Right-click on the Products tab and click Save on the pop-up menu. (You can also use the disk icon above the File tab or Ctrl-S, if you prefer.)
In the ribbon, click Create Profile Page.
Toward the end of creating the ECT, you set the field that will be used as the title. That is the value that will appear as the link in the search results. If you don't specify a title, the search results will show cryptic text as the title that is likely to be confusing to the end user.
Now you need to configure the search service to use this ECT while crawling and indexing. The search service uses Content Sources to identify and control the content it needs to search. You will also need to set the account to use for the crawl operation. This account should be the same as the one you used to set permissions in the Business Data Connectivity service and it must have read access to the AdventureWorks database.
Note: In a production configuration, a new account should be created and used only to control permissions for the search service.
Procedure: Configuring the Search Service
Start SharePoint 2010 Central Administration. (If you open this as a new window, then you will now have a separate window for the fourth main area.)
Click Manage service applications under the Manage Applications heading.
In the Name column, click on Search Service Application (or the search service that is connected to your site collection).
Click the link to the right of Default content access account to change the account that will be used for crawling. Set it to the same account that you used to set permissions in the Business Data Connectivity service.
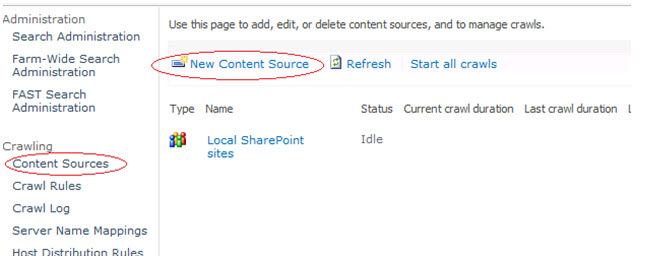
In the navigation pane, under the Crawling heading, click Content Sources.
Click New Content Source.
Figure 11. Content Source configuration in the search service
Type "AWProductSearch" in the Name box.
Click on the Line of Business Data radio button.
Click on the Crawl selected external data source radio button.
Check the box next to AWProducts.
Figure 12. New Content Source dialog
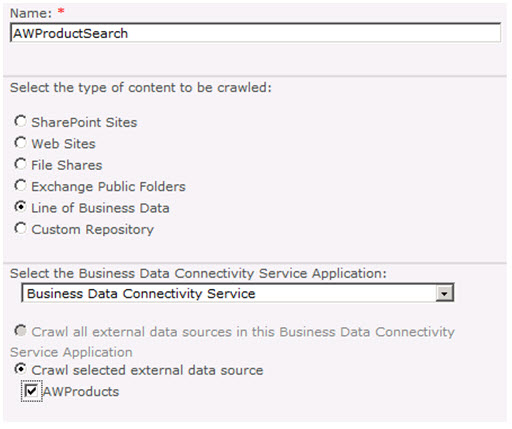
Check the box next to Start full crawl of this content source.
Click OK.
The search service is now crawling through the new data to create search indexes for that content. It should be done in a few minutes, but if this view had millions of records, the crawl would take significantly longer. You can click on the Refresh link to update the status. When the status is "Idle," the search crawl is done.
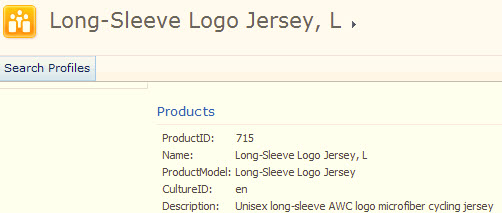
Procedure: Testing the Search
Open the "BCS Search" site you created earlier.
Type "Jersey" in the search box and then Enter.
Click on any of the results titles to see the profile page for that item.
Figure 13. Profile page from the search results
Now you have a basic search working with external data. Next you will see how to control the appearance of the profile page and the results of the search.
Customizing Search Results
There are two simple modifications you can make to the search using SharePoint Designer. First, you can change the fields that appear on the profile page and their descriptions by modifying the Read Item operation. For example, the descriptions "ProductID" and "ProductModel" are not particularly user-friendly. Also, the CultureID field is not particularly useful.
If you have kept SharePoint Designer open, you can skip the first two steps below.
Procedure: Changing the Fields Shown on the Profile Page
- In SharePoint Designer, click External Content Types in the navigation pane.
- In the list, click on Products to edit that ECT.
- In the External Content Type Operations group, double-click on the Read Item operation.
- Click Next > twice.
- In the Return Parameter page, uncheck the box by CultureID.
- Click on ProductID.
- In the Properties pane, type "ID" in the Display Name box.
- Click on ProductModel.
- In the Properties pane, type "Model" in the Display Name box.
- Click Finish.
- Click on the disk icon to save the ECT.
- In the ribbon, click Create Profile Page.
- Click Yes on the warning dialog.
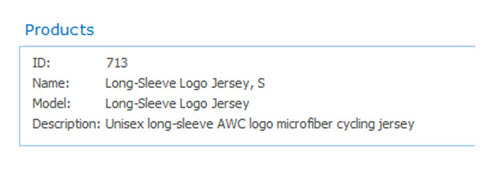
You can test the results by going to the search site and looking at one of the profile pages. This change was only to the profile page, so there is no need to perform another crawl. Obviously, the changes you can make through the ECT are limited. If you want more advanced customizations, you can edit the page directly and change it as you wish. (For example, you cannot remove the identifier field from the operation, but you could remove it from the profile page manually.) Be aware that if you ever create that profile page from the ECT later, it will overwrite those direct changes.
Figure 14. Modified profile page
The second change you can make is to adjust the Read List operation to exclude some fields from the search indexing. In this step, you will remove the description from the indexing. Before you start that step, try a search for the word "microfiber." You should get some matches on that word in the descriptions. Now you will remove the Description field from the Read List operation and see that it is no longer indexed.
Procedure: Changing the Field Values Indexed for Search
- In SharePoint Designer, in the External Content Type Operations group, double-click on the Read List operation.
- Click Next > twice.
- In the Return Parameter page, uncheck the box by Description.
- Click Finish.
- Click on the disk icon to save.
The ECT has been changed, but now the search index needs to be updated by running a full crawl. Whenever you modify an ECT, its internal ID is changed. The content source needs to be recreated, otherwise it will get errors trying to find that old ID.
Procedure: Updating the Search Index for a Modified External Content Type
- In the search service configuration in SharePoint Central Administration, click on Content Sources in the navigation pane under the Crawling heading.
- Click on the drop-down button for the AWProductSearch content source. Click Delete.
- Click Yes to delete.
- Click New Content Source.
- Type "AWProductSearch" in the Name box.
- Click on the Line of Business Data radio button.
- Click on the Crawl selected external data source radio button.
- Check the box next to AWProducts.
- Check the box next to Start full crawl of this content source.
- Click OK.
When the crawl is complete, go back to the search site and try searching for "microfiber" again. There will now be no matches. You can still search for "Jersey" and click on one of the "Long-Sleeve Logo Jersey" items to see that the description with the word "microfiber" can be viewed in the profile page, but it has now been excluded from the search results.
Using Associations for Master/Detail Relationships
Business Connectivity Services also allows you to define a master/detail (aka parent-child) relationship between two ECTs. The resulting profile page for the master ECT will automatically be generated with a list of the detail records for that particular master record. Our interest here is how the search service handles this type of association.
To try this out, you will create an association from the detail ECT (Product) to the master ECT (ProductModel). Then you will create a new content source in the search to see how the results are generated for those. Then you will see how to modify the configuration to give a much simpler and more useful set of results by treating the detail records as attachments to the master record.
Procedure: Creating an Association in an External Content Type
In the Navigation pane in SharePoint Designer, click External Content Types.
On the New section of the ribbon, click External Content Type.
In the External Content Type Information group, next to Name, click New external content type. Type "ProductModel" in the box. (This change will be replicated to the Display Name text.)
In the External Content Type Information group, next to Display Name, click ProductModel. Type "Model" in the box. (This label will appear on the profile page.)
Next to External System, click Click here to discover external data sources and...
Click on the Add Connection button.
In the External Data Source Type Selection dialog, choose SQL Server in the drop down.
Click OK.
In the SQL Server Connection dialog, enter "localhost" for the Database Server.
Enter "AdventureWorks" for the Database Name box.
Enter "AWModel" for the Name (optional) box.
Click OK.
Click on the expansion symbol next to AWModel.
Click on the expansion symbol next to Tables.
Right-click on ProductModel (you will probably have to scroll down to find this table) to open a pop-up menu and click New Read Item Operation.
Click the Finish button.
Right-click on ProductModel to open a pop-up menu and click New Read List Operation.
Click the Finish button.
In the ribbon, click on Summary View.
In the Fields group, click on Name in the list.
In the ribbon, click on Set as Title.
Save the ECT by clicking on the disk icon.
In the Navigation pane in SharePoint Designer, click External Content Types.
On the New section of the ribbon, click External Content Type.
In the External Content Type Information group, next to Name, click New external content type. Type "ProductDetail" in the box. (This change will be replicated to the Display Name text.)
Next to External System, click Click here to discover external data sources and...
Right-click on Product (in Tables within AWModel) to open a pop-up menu and click New Read Item Operation.
Click the Finish button.
Right-click on Product to open a pop-up menu and click New Read List Operation.
Click the Finish button.
Right-click on Product to open a pop-up menu and click New Association.
Type "Products" in the box for the Association Display Name. (This will change the label for the detail records in the profile page for the master record.)
Click the Browse button.
Figure 15. Choosing the External Content Type for an Association
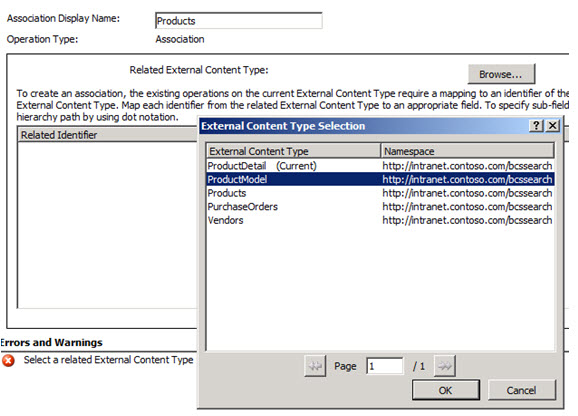
Click ProductModel to select it.
Click OK.
Click Next > .
In the Data Source Elements pane on the Input Parameters page, click ProductModelID to select it.
In the Properties pane, check the box for Map to Identifier.
Click Next > twice.
In the Data Source Elements pane on the Return Parameter page, uncheck all of the fields except for ProductID, Name, ProductNumber, ListPrice, and ProductModelID.
If you used the top check box to uncheck all the fields, you will need to set the identifier again. Click ProductID in the Data Source Elements pane and then check Map to Identifier in the Properties pane.
Click ProductID and change the text for the Display Name to "ID."
Click ProductNumber and change the text for the Display Name to "Product Number."
Click ListPrice and change the text for the Display Name to "List Price."
Figure 16. Return Parameter page for association
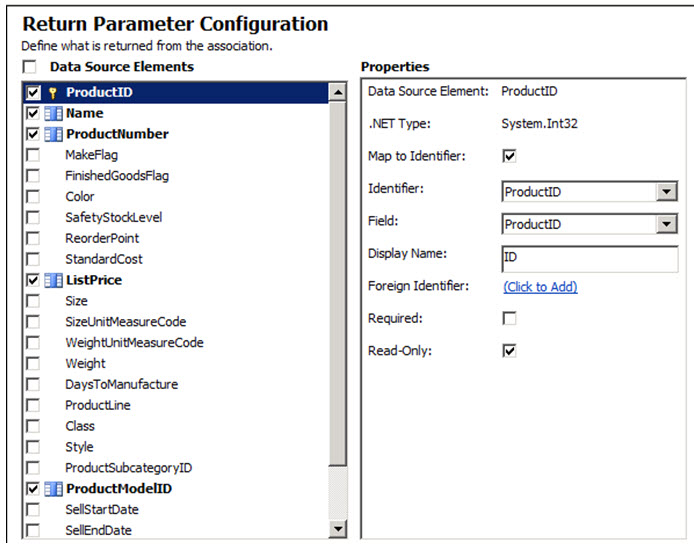
Click the Finish button.
In the ribbon, click on Summary View.
In the Fields group, click on Name in the list.
In the ribbon, click on Set as Title.
Save the ECT using the disk icon.
In the ribbon, click Create Profile Page.
Click the Model tab to see the first ECT.
In the ribbon, click Create Profile Page.
You probably noticed that I had you create a new named connection for the same AdventureWorks database. The reason is that a content source in the search will crawl all ECTs defined with the same data source. If you want to be able to completely control when those different ECTs are crawled and how they are crawled, you will need to create different data sources so that you can also create different content sources for search.
You may also have noticed that you did not have to set the identifiers for these ECTs. SharePoint Designer automatically detects the primary key field for tables, but not for views.
The associated ECTs are ready. Now you need to create a new search content source to index them. It also helps to delete the old content source, so that you can see the results of the new indexing only.
Procedure: Crawling and Indexing the Associated ECTs
- In the search service configuration in SharePoint Central Administration, click on Content Sources in the navigation pane under the Crawling heading.
- Click on the drop-down button for the AWProductSearch content source. Click Delete.
- Click OK to delete.
- Click New Content Source.
- Type "AWModelSearch" in the Name box.
- Click on the Line of Business Data radio button.
- Click on the Crawl selected external data source radio button.
- Check the box next to AWModel.
- Check the box next to Start full crawl of this content source.
- Click OK.
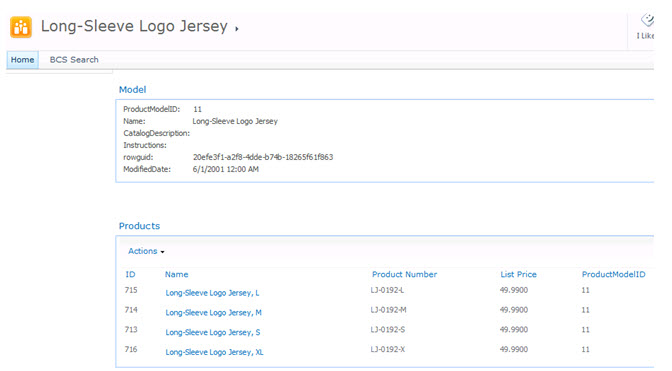
When the crawl is done (click Refresh to update the status), you can search for "Jersey" and you will see results for both the Master (Model) and Detail (Product). The model results do not have sizes (e.g. S, M, L) and the link for them includes the words "ProductModel" instead of "ProductDetail." Click on one of those and you will see the master/detail view that is created by the association. Although this search works, it isn't pretty and the search is not indexing information in the detail. You can see matches for the detail, but they are not based on the master record. For example, if you search for "Dissolver," you will only see the detail in the results. To make these results better, you will first eliminate the detail records from the search, then modify the ECT to "attach" the detail record information to the master record. The first change is one you have already done before, but now you will remove all the fields that can be indexed.
Figure 17. Profile Page for a Master/Detail Association
If you have left the tabs open for the ECTs you just defined, skip the first two steps.
Procedure: Changing the Field Values Indexed for Search
- In SharePoint Designer, click External Content Types in the navigation pane.
- In the list, click on ProductDetail to edit that ECT.
- In the External Content Type Operations group, double-click on the Read List operation.
- Click Next > twice.
- In the Return Parameter page, uncheck the boxes for all of the fields in the Data Source Elements pane, except for ProductID and ProductModelID. (If you use the check box to uncheck all fields, you will need to check Map to Identifier for ProductID.)
- Click Finish.
- Save the ECT using the disk icon.
Follow the usual steps to run a full crawl after changing the model. Remember to delete the existing content source and then create a new one. Now when you search for "Dissolver," there should be no results. You will now modify the model so that the associated data is attached to the master during search indexing. This change is not supported by SharePoint Designer, so you will need to modify the model in its XML form. To do so, you will need to export the model to an XML file, edit it and then import the changed file.
Procedure: Exporting the BCS Model to an XML file
- In SharePoint Designer, click External Content Types in the navigation pane.
- In the list, click AWModel next to ProductDetail to select that ECT.
- In the ribbon, click Export BDC Model.
- In the Export BDC Model dialog, type "ProductDetail" in the BDC Model Name box.
- Click OK.
- Change the Save as type to All Files.
- Choose a destination folder for the file.
- Change the File Name box to "ProductDetail.xml"
- Click Save.
You can use any XML editor to change this file. I use SharePoint Designer by finding the file in a file browser and then selecting Edit with Microsoft SharePoint Designer from the right-click popup menu. You could also drag the file into SharePoint Designer or even edit it with Notepad.
Modify the XML file to add the highlighted line shown below. Be sure you are in the MethodInstances element for the association rather than the ones for the Read List or Read Item methods.
<MethodInstances>
<Association Name="ProductNavigate Association"
Type="AssociationNavigator"
ReturnParameterName="ProductNavigate Association"
DefaultDisplayName="Products">
<Properties>
<Property Name="AttachmentAccessor" Type="System.String"></Property> <Property Name="ForeignFieldMappings" ...>
</Properties>
Save the change and then follow the steps below to import the model with the change.
Procedure: Importing an XML file to Update a BCS Model
- In the BDC service configuration in SharePoint Central Administration, click on the Edit tab.
- In the View section of the ribbon, select External Content Types from the drop-down list.
- Click on the drop-down menu for ProductDetail and click Delete.
- Click OK.
- In the BDC Models section of the ribbon, select Import.
- In the BDC Model File box, type your XML file name or click the Browse button to browse for it.
- Click the Import button. You may see one or two warnings, but there should be no errors.
- Click OK.
Note: When you exported the model, you chose a name for it that also happens to be the same as the External Content Type. Although the model and ECT may seem like the same thing, they are not. If you had to import that same model file again, you would get an error saying that there is a duplicate model, even if you had deleted the ECT. Whenever you are importing the same model a second time, you must delete the model instead of the ECT to avoid that error.
Follow the usual steps to recreate the AWModelSearch content source and run a full crawl. Now when you search for" Dissolver," you should get the desired results. You can also try searching for "Jersey" and see that it only returns the shows the model records in the results.
Explanation of the BCS Model XML
You made a modification to the XML version of the BCS Model in the last section. This section will explain most of the elements of that XML file. Feel free to skip down to the next section about incremental crawls, if you are not that interested in these details. This information is not necessary to complete the examples. It will help if you are looking at an actual model XML file while reading through this.
The top-level element is the Model. It has a Name attribute that will appear as the name of the model when you import it. LobSystems is a child of Model. It may contain one or more LobSystem child elements. The LobSystem element has a Name attribute that is used to easily identify the external data source. It also has a Type attribute for the type of data source. For these examples, the Type is "Database."
The actual connection information for that data source is defined as Property elements in the LobSystemInstance element, which is a child of LobSystemInstances. LobSystemInstances is a child of LobSystem. Property elements are very common in the BCS Model. Many of the elements allow a Properties element that contains one or more Property elements. A Property element has a Name attribute that identifies the property and a Type attribute that identifies the .Net type of the value for that property. The value then appears in the body of that Property element. Some of the property names for LobSystemInstance are shown in the table below.
Table 1. Properties for LobSystemInstance
Name |
Type |
Example Value |
AuthenticationMode |
System.String |
PassThrough |
DatabaseAccessProvider |
System.String |
SqlServer |
RdbConnection Data Source |
System.String |
localhost |
RdbConnection Initial Catalog |
System.String |
AdventureWorks |
RdbConnection Integrated Security |
System.String |
SSPI |
RdbConnection Pooling |
System.String |
True |
ShowInSearchUI |
System.String |
<anything> |
You might have noticed that all the properties that start with "RdbConnection" are regular connection string values for an SQL database. Any value that appears in a connection string can defined in this list of properties by prefixing it with "RdbConnection." The last property listed, ShowInSearchUI, doesn't have value. Even though it is defined as a string, just having the property is all that is needed for the model to know that the LobSystemInstance should appear in the user interface.
Another child of LobSystem is Entities. Although it may contain one or more Entity children, you will generally see models with just one entity. The Entity is equivalent to a single External Content Type. There are several attributes for an Entity, including the Name and the DefaultDisplayName. The properties for an Entity element are shown in the table below.
Table 2. Properties for Entity
Name |
Type |
Example Value |
Title |
System.String |
Name |
DefaultAction |
System.String |
View Profile |
The Title property defines the field that will be used as the title in the search results. The DefaultAction property refers to an Action element by name. That action will be used as the link from the search results. In these examples, that action is always set to open a URL for a profile page.
Some child elements for an Entity are AccessControlList, Identifiers, AssociationGroups, Actions and Methods.
The AccessControlList element may contain one or more AccessControlEntry elements that have a Principal attribute with the user name that will be given access. The child elements are Right elements that define the access rights for the principal. Each Right element has a BdcRight attribute that can be Edit, Execute, SetPermissions or SelectableInClients.
The Identifiers element contains an Identifier element with a Name attribute for the field name that is an identifier for the entity and a TypeName attribute that contains the .Net data type of the identifier.
The AssociationGroups element is used to define associations between ECTs. The Actions element contains an Action element, usually to open a profile page. These are easily defined by SharePoint Designer, so I won't say much about them here.
The Methods element contains one or more Method elements. Each Method element has a Name attribute that uniquely identifies the method for this entity. It also has an AccessControlList element that is identical to the one in the Entity element. The properties for a Method element are shown in the table below.
Table 3. Properties for Model
Name |
Type |
Example Value |
RdbCommandType |
System.String |
System.Data.CommandType ... |
RdbCommandText |
System.String |
SELECT [ProductID], [ProductModelID] FROM [Production].[Product] |
BackEndObjectType |
System.String |
SqlServerTable |
BackEndObject |
System.String |
Product |
Schema |
System.String |
Production |
The RdbCommandText is very important since it allows you to greatly customize the SQL query used for your data. For example, if you don't have the ability to create a view on a particular database, you could still modify that text to do joins within the command text as long as the return parameters matched. The BackEndObjectType can be SqlServerView if the RdbCommandText refers to a view instead of table.
FilterDescriptors is a child of the Method element. It may contain one or more FilterDescriptor elements. SharePoint Designer supports the creation of filters in its user interface, but they are not generally that useful for search methods where you have control over the SQL query. There is one filter, SynchronizationCookie, that will be shown in the next section.
Parameters is a child of the Method element. It may contain one or more Parameter child elements. The Parameter element has a Name attribute that uniquely identifies the parameter and Type attribute that can be In, InOut or Return. There can only be a single parameter for each Method that is a Return type. The number and types of parameters are determined by the operation that the method implements. Many of these operations can be defined by SharePoint Designer, so it is easiest to create the operation there and then edit as necessary. Two of the operations that cannot be defined by SharePoint Designer, ChangedIdEnumerator and DeletedIdEnumerator, will be defined in the next section.
The parameter is actually defined by the child TypeDescriptor element. This element has attributes for the Name, TypeName, and IdentifierName. Some elements have simple types and are defined by a single TypeDescriptor element. Others can be very complex with nested TypeDescriptors and TypeDescriptor elements and additional properties. Some of the properties for the TypeDescriptor element are shown below.
Table 4. Properties for TypeDescriptor
Name |
Type |
Example Value |
Size |
System.Int32 |
25 |
RequiredInForms |
System.Boolean |
true |
Decimal Digits |
System.Int32 |
4 |
For the most part, you should be able to copy and edit the parameters that are defined by SharePoint Designer.
The last important child of the Method element is MethodInstances. It contains a MethodInstance element that defines the type of operation. The Type attribute may be Finder, SpecificFinder, AssociationNavigator, IdEnumerator and others. The ReturnParameterName attribute must refer to the name of the attribute that defines the return value for the operation. The Default attribute will usually be "true" since you will only define one method for each operation. If there were more than one Finder, for example, this would specify which one would be used by default. The Name attribute identifies the MethodInstance and the DefaultDisplayName will be used whenever that operation name is displayed. The MethodInstance element has some important properties as shown in the table below.
Table 5. Properties for TypeDescriptor
Name |
Type |
Example Value |
RootFinder |
System.String |
<anything> |
AttachmentAccessor |
System.String |
<anything> |
LastModifiedTimeStampField |
System.String |
ModifiedDate |
The RootFinder marks the Finder method that the search crawler will use to enumerate all of the top level rows that should be crawled. There should be only one Finder method that is marked as the RootFinder. The AttachmentAccessor property was discussed in the previous section and the LastModifiedTimeStampField property is discussed in the next section.
If you want to see more documentation of the BCS Model, see the links in the Additional Resources section.
Modifying the External Content Type to Support Incremental Crawls
It's easy enough to run full crawls all the time for the numbers of records in these examples, but it doesn't work so well if you want to index a million records. Once the ECT and search is set up for that kind of volume, it is much better to run incremental crawls to find any changes since the last crawl and then update just those in the search index. SharePoint search supports two approaches for handling incremental crawls on external content types. There are advantages and disadvantages to each, but first you need to understand how they function.
Timestamp-based Incremental Crawls
In this approach, you define a field that contains the last modified timestamp for each record. If that timestamp is newer than the last crawl, then the indexes for that record are updated. For this example, you will be modifying the ECT based on a view, but first you will need to add the last modified date to the view in the AdventureWorks database.
Procedure: Modifying the vProductAndDescription View to Add the Modified Date
- Start SQL Server Management Studio.
- In the Connect to Server dialog, select Database Engine as the Server type.
- Type "localhost" in the Server name box.
- Click Connect.
- Expand the Databases item in the Object Explorer group.
- Right-click on the AdventureWorks item and click New Query.
- Execute the ALTER VIEW statement as shown below.
ALTER VIEW [Production].[vProductAndDescription]
WITH SCHEMABINDING
AS
SELECT
p.[ProductID]
,p.[Name]
,pm.[Name] AS [ProductModel]
,pmx.[CultureID]
,pd.[Description]
,CASE WHEN p.ModifiedDate > pm.ModifiedDate THEN p.ModifiedDate ELSE pm.ModifiedDate END AS ModifiedDate
FROM [Production].[Product] p
INNER JOIN [Production].[ProductModel] pm
ON p.[ProductModelID] = pm.[ProductModelID]
INNER JOIN [Production].[ProductModelProductDescriptionCulture] pmx
ON pm.[ProductModelID] = pmx.[ProductModelID]
INNER JOIN [Production].[ProductDescription] pd
ON pmx.[ProductDescriptionID] = pd.[ProductDescriptionID];
This adds one new field to the view. For this example, the ModifiedDate is the most recent modified date from Product or ProductModel. If you also wanted to include ProductDescription in that expression, you would just need to add another case to determine which of the dates is most recent.
Procedure: Adding the ModifiedDate to the ECT Operations
In SharePoint Designer, click External Content Types in the navigation pane.
In the list, click on Products to edit that ECT.
In the External Content Type Operations group, double-click on the Read Item operation.
Click Next > twice.
In the Return Parameter page, check the ModifiedDate field in the Data Source Elements pane.
Click Finish.
In the External Content Type Operations group, double-click on the Read List operation.
Click Next > twice.
In the Return Parameter page, check the ModifiedDate field in the Data Source Elements pane.
In the Properties pane, check the box next to Timestamp Field.
Figure 18. Setting the Timestamp Field

Click Finish.
Save the ECT by clicking on the disk icon.
By checking the box for the Timestamp Field, you have set that field to be used by the search service to determine if the record has changed since the last crawl. Internally, the XML will now have a LastModifiedTimeStampField property that specifies the ModifiedDate field. If you exported the model for Products and searched for the property, you would find it in the MethodInstances properties for the Read List method.
You can now follow the usual steps to create the AWProductSearch content source and run a full crawl. As before, you may want to delete the AWModelSearch to avoid seeing results from both sources. When the full crawl is done, start an incremental crawl. When the incremental crawl has completed, you can now see if it worked.
Procedure: Examining the Results of the Incremental Crawl
- In the search service configuration in SharePoint Designer, click on Crawl Log under Crawling in the left pane.
- Click Crawl History at the top.
You should see that the full crawl had something like 296 successes and the incremental crawl had only 2 successes. Since no records had changed, the incremental crawl did not have to re-index the records.
If you want to test the modified date, make a change to one or more of the records that includes updating the ModifiedDate field to the current date/time and then run another incremental crawl. The successes will be higher than 2 (3 if you change just one record), but not nearly as high as 296. The query below shows an example of that sort of change.
UPDATE Production.Product
SET Name='Classical Vest, M',ModifiedDate=GETDATE()
WHERE ProductID=865
Changelog-based Incremental Crawls
In this approach, SharePoint search stores a token or cookie that we designate to track changes since the last crawl. In this case, the cookie will be a single timestamp from the last time that a crawl was started. If there have been any changes since that time, then only the modifications are updated in the index. This process requires two new operations to be defined for the ECT, one for changed records and one for deleted records. These must be created manually because SharePoint Designer does not have a way to create them. (If you look at the ECT in SharePoint Designer, they will be shown in the External Content Type Operations list, but you will not be able to edit them.) As before, you will need to export the BCS model in order to edit the XML directly.
Procedure: Exporting the BCS Model to an XML file
- In SharePoint Designer, click External Content Types in the navigation pane.
- In the list, click AWProducts next to Products to select that ECT.
- In the ribbon, click Export BDC Model.
- In the Export BDC Model dialog, type "Products" in the BDC Model Name box.
- Click OK.
- Change the Save as type to All Files.
- Choose a destination folder for the file.
- Change the File Name box to "Products.xml"
- Click Save.
In order to implement these two operations, you will need two SQL queries. One will return the records changed after a particular timestamp and the other will return the records deleted after a particular timestamp. For the product table, I will use the DiscontinuedDate to indicate that a record has been effectively deleted and should no longer appear in search results. If the DiscontinueDate field is null, it is still active. The DiscontinuedDate from the Product table will need to be added to the view just like the ModifiedDate was added previously, though there is no need to look at the ProductModel record, so it's a simple added field (p.DiscontinuedDate).
Here are the new methods that you will need to add to the BCS model for the Products ECT within the Methods element. They both use a SynchronizationCookie filter type to track the last run date and time. The SQL query must return the appropriate set of changed or deleted record IDs and also update the last run date and time. The key SQL is highlighted in the XML for these two operations below.
<Method IsStatic="false" Name="GetChangedProductIds">
<Properties>
<Property Name="RdbCommandType" Type="System.Data.CommandType, System.Data, Version=2.0.0.0, Culture=neutral, PublicKeyToken=b77a5c561934e089">Text</Property>
<Property Name="RdbCommandText" Type="System.String">
if @LastRunDate != CAST('1900-1-1' as datetime)
BEGIN
SELECT [ProductID] FROM [Production].[vProductAndDescription] WHERE [ModifiedDate] > @LastRunDate
END
SET @LastRunDate=CURRENT_TIMESTAMP
</Property>
<Property Name="BackEndObjectType" Type="System.String">SqlServerView</Property>
<Property Name="BackEndObject" Type="System.String">vProductAndDescription</Property>
<Property Name="Schema" Type="System.String">Production</Property>
</Properties>
<AccessControlList>
<AccessControlEntry Principal="contoso\administrator">
<Right BdcRight="Edit" />
<Right BdcRight="Execute" />
<Right BdcRight="SetPermissions" />
<Right BdcRight="SelectableInClients" />
</AccessControlEntry>
</AccessControlList>
<FilterDescriptors>
<FilterDescriptor Name="LastRunDate" Type="InputOutput">
<Properties>
<Property Name="SynchronizationCookie" Type="System.String">ChangedItemCookie</Property>
</Properties>
</FilterDescriptor>
<FilterDescriptor Name="FilterDescriptor" Type="Timestamp" />
</FilterDescriptors>
<Parameters>
<Parameter Name="@LastRunDate" Direction="InOut">
<TypeDescriptor Name="LastRunDateTypeDescriptor" TypeName="System.DateTime" AssociatedFilter="LastRunDate">
<Interpretation>
<NormalizeDateTime LobDateTimeMode="Local" />
</Interpretation>
</TypeDescriptor>
</Parameter>
<Parameter Direction="Return" Name="ChangedProductIds">
<TypeDescriptor TypeName="System.Data.IDataReader, System.Data, Version=2.0.0.0, Culture=neutral, PublicKeyToken=b77a5c561934e089" IsCollection="true" Name="ChangedProductIds">
<TypeDescriptors>
<TypeDescriptor TypeName="System.Data.IDataRecord, System.Data, Version=2.0.0.0, Culture=neutral, PublicKeyToken=b77a5c561934e089" Name="ChangedProductIdElement">
<TypeDescriptors>
<TypeDescriptor TypeName="System.Int32" ReadOnly="true" IdentifierName="ProductID" Name="ProductID">
<Properties>
<Property Name="RequiredInForms" Type="System.Boolean">true</Property>
</Properties>
</TypeDescriptor>
</TypeDescriptors>
</TypeDescriptor>
</TypeDescriptors>
</TypeDescriptor>
</Parameter>
</Parameters>
<MethodInstances>
<MethodInstance Name="GetChangedPrimaryKeysInstance" Type="ChangedIdEnumerator" ReturnParameterName="ChangedProductIds" />
</MethodInstances>
</Method>
<Method IsStatic="false" Name="GetDeletedProductIds">
<Properties>
<Property Name="RdbCommandType" Type="System.Data.CommandType, System.Data, Version=2.0.0.0, Culture=neutral, PublicKeyToken=b77a5c561934e089">Text</Property>
<Property Name="RdbCommandText" Type="System.String">
if @LastRunDate != CAST('1900-1-1' as datetime)
BEGIN
SELECT [ProductID] FROM [Production].[vProductAndDescription] WHERE [DiscontinuedDate] > @LastRunDate
END
SET @LastRunDate=CURRENT_TIMESTAMP
</Property>
<Property Name="BackEndObjectType" Type="System.String">SqlServerView</Property>
<Property Name="BackEndObject" Type="System.String">vProductAndDescription</Property>
<Property Name="Schema" Type="System.String">Production</Property>
</Properties>
<AccessControlList>
<AccessControlEntry Principal="contoso\administrator">
<Right BdcRight="Edit" />
<Right BdcRight="Execute" />
<Right BdcRight="SetPermissions" />
<Right BdcRight="SelectableInClients" />
</AccessControlEntry>
</AccessControlList>
<FilterDescriptors>
<FilterDescriptor Name="LastRunDate" Type="InputOutput">
<Properties>
<Property Name="SynchronizationCookie" Type="System.String">DeletedItemCookie</Property>
</Properties>
</FilterDescriptor>
<FilterDescriptor Name="FilterDescriptor" Type="Timestamp" />
</FilterDescriptors>
<Parameters>
<Parameter Name="@LastRunDate" Direction="InOut">
<TypeDescriptor Name="LastRunDateTypeDescriptor" TypeName="System.DateTime" AssociatedFilter="LastRunDate">
<Interpretation>
<NormalizeDateTime LobDateTimeMode="Local" />
</Interpretation>
</TypeDescriptor>
</Parameter>
<Parameter Direction="Return" Name="DeletedProductIds">
<TypeDescriptor TypeName="System.Data.IDataReader, System.Data, Version=2.0.0.0, Culture=neutral, PublicKeyToken=b77a5c561934e089" IsCollection="true" Name="DeletedProductIds">
<TypeDescriptors>
<TypeDescriptor TypeName="System.Data.IDataRecord, System.Data, Version=2.0.0.0, Culture=neutral, PublicKeyToken=b77a5c561934e089" Name="DeletedProductIdElement">
<TypeDescriptors>
<TypeDescriptor TypeName="System.Int32" ReadOnly="true" IdentifierName="ProductID" Name="ProductID">
<Properties>
<Property Name="RequiredInForms" Type="System.Boolean">true</Property>
</Properties>
</TypeDescriptor>
</TypeDescriptors>
</TypeDescriptor>
</TypeDescriptors>
</TypeDescriptor>
</Parameter>
</Parameters>
<MethodInstances>
<MethodInstance Name="GetDeletedPrimaryKeysInstance" Type="DeletedIdEnumerator" ReturnParameterName="DeletedProductIds" />
</MethodInstances>
</Method>
Although these methods appear very long, they are actually pretty simple and similar. The filter is defined to pass in the last run date, though it is really a timestamp containing both date and time. The return parameter is defined as a set of records containing just a ProductID. The MethodInstance elements define these methods as the changed record and deleted record operations.
The SQL code is also similar. Both check to see if the "LastRunDate" timestamp is valid. If so, they return all the modifications since that date and time. Then the timestamp is updated to the current date and time so that the cookie will be stored with the new value. The changed record method compares the ModificationDate to the last timestamp and the deleted record method compares the DiscontinuedDate.
There is one other change that should be made to correctly implement this approach. The SQL for the Read List operation should be updated to be sure that no deleted records will be included in a full crawl, as shown below.
<Property Name="RdbCommandText" Type="System.String">
SELECT [ProductID],[Name],[ProductModel],[CultureID],[Description]
FROM [Production].[vProductAndDescription]
WHERE [DiscontinuedDate] IS NULL
</Property>
Make these changes to the Products model, and you might also want to remove the LastModifiedTimeStampField property to verify that the new methods are doing the job. Import the modified model using the BDC service configuration in SharePoint Central Administration.
Procedure: Importing an XML file to Update a BCS Model
- In the BDC service configuration in SharePoint Central Administration, click on the Edit tab.
- In the View section of the ribbon, select External Content Types from the drop-down list.
- Click on the drop-down menu for Products and click Delete.
- Click OK.
- In the BDC Models section of the ribbon, select Import.
- In the BDC Model File box, type your XML file name or click the Browse button to browse for it.
- Click the Import button. You may see one or two warnings, but there should be no errors.
- Click OK.
Now you can try it out by recreating the content source for search and then making changes to the records, starting the incremental crawl and searching to see the results.
If the database really needs to delete records, rather than just mark them as "deleted," you will need to use another approach to keep track of deletions. The easiest is to create a new table for deleted IDs and add a trigger to the original table that adds records to the new table whenever they are deleted. The table of deleted records could store just IDs and a timestamp. If your incremental crawls are run on a schedule, then you could also schedule a SQL job to delete older records from the table.
Comparing the Two Approaches
The timestamp-based approach is much simpler to implement, but the changelog-based approach is much more efficient. The timestamp-based approach requires that the search service to store the timestamps for every record and then compare them all every time it does an incremental crawl. The changelog-based approach only requires the search service to store a single timestamp. In addition, when the search service requests the changes, it only processes the records that have changed. If you have a very large number of records, then the changelog-based approach will save a lot of time and storage. If you have very few records, then the incremental crawls aren't really necessary. If you aren't sure which approach to use, you can try the timestamp-based approach first. Then, if it seems to be too slow or be taking too much disk storage, try switching to the changelog-based approach. However, if you do not have any control over the database, you may be forced to use the approach that works with the existing schema.
What Ever Happened to IDEnumerator?
If you have used SharePoint search with external data since the Business Data Catalog was introduced in SharePoint 2007, you would have used IDEnumerator instead of the Read List operation. The IDEnumerator method still works for searches, but it is not supported directly in SharePoint Designer. One of the uses of IDEnumerator was also to allow for very large external lists that otherwise would be throttled by the site settings. The search crawlers are not constrained by the throttle settings, so there is no need to use "segmenting" techniques. If you already have an ECT with IDEnumerator defined, you can use it for search as well. For new ECT definitions, it is quicker to use the Read List operation in SharePoint Designer.
Using the Same External Content Type for an External List
The use of ECTs for external lists is not really within the scope of this paper, but you might be tempted to use the same ECTs for both. Just remember that many of the customizations for search could also affect the appearance of the external list. Also, you could easily have to deal with throttling limits that could interfere with the efficiency of the search crawls. In general, it is probably better to use different ECTs for these purposes unless your data is very simple and less than a thousand records.
Additional Resources
For more information, see the following resources:
Enterprise Search administration
Business Data Connectivity services administration
Business Connectivity Services Schema Reference
Stereotyped Operations Supported By BDC
The Notion of Associations and the External Item Picker