Introduction to HealthVault Development #12: More than one person…
WeightTracker has gotten popular, and we have a new scenario. Our users would like us to extend our application so that they can easily enter weights for each member of the family.
This will require us to delve a bit more deeply into users, records, and authentication, and we’ll also explore the HealthVault shell a bit more…
Accounts and records
HealthVault separates the concept of accounts and records. An account is associated with a specific set of credentials, and a record contains the health information for a specific person.
It’s not uncommon for an account to have access to more than one record. A person might have access to their own record and the records of their children, spouse, or parents.
What data does your application use?
HealthVault supports two ways of dealing with records.
A single-record application – which is what WeightTracker is right now – is intended to work with only one person’s data (ie one record) at a time. The platform keeps track of which record the application is using, and when writing code, you just need to use PersonInfo.SelectedRecord.
A single-record application can switch between records by redirecting the user back to the HealthVault shell to choose the new record, and authorize it if necessary.
The alternate way of dealing with applications is to work with multiple records simultaneously.
We do this by adding the following entry to our web.config:
<add key="WCPage_IsMRA" value="true"/>
And we also need to tell the shell that we’re an MRA application whenever we ask it to do something. We do this in AuthorizeEmotion.aspx.cs, and we’ll modify the code there to the following:
string TargetQuery = "appid=cee3e0fc-03c6-40b4-9550-a151901b4a27&onopt1=Opt_Emotion&ismra=true";
Now, we can go back to the HealthVault PPE shell, create a second record, make sure our existing record no longer allows WeightTracker to use it (via the “sharing” tab). And when we run WeightTracker, we’ll see the following:
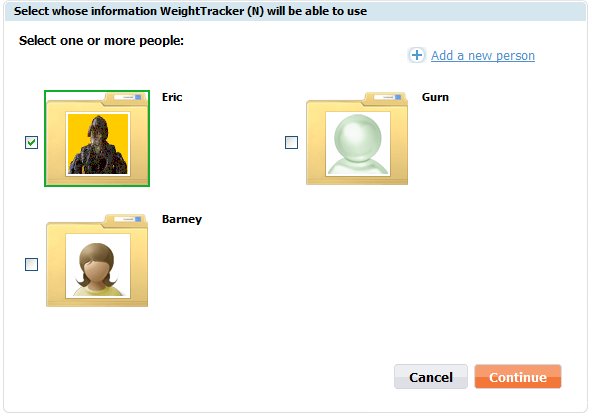
Note that there are now checkboxes next to the records. We select all of them, hit “continue”, and then we will need to authorize the application to access each record.
Displaying the list of authorized records
The list of records that the application is authorized is stored in PersonInfo.AuthorizedRecords. We’ll add a dropdown control to default.aspx:
Welcomes
<asp:DropDownList ID="c_dropDownCurrentRecord" runat="server" Width="262px" OnSelectedIndexChanged="c_dropDownCurrentRecord_SelectedIndexChanged" AutoPostBack="True" />
<br /><br />
and remove the references to c_labelUser from the code.
We will use the drop-down list to display the current list of authorized records and to select the one that we want. We’ll add the following code, and call PopulateRecordDropDown() at the beginning of Page_Prerender().
protected void c_dropDownCurrentRecord_SelectedIndexChanged(object sender, EventArgs e)
{
foreach (Guid recordId in PersonInfo.AuthorizedRecords.Keys)
{
if (recordId.ToString() == c_dropDownCurrentRecord.SelectedValue)
{
PersonInfo.SelectedRecord = PersonInfo.AuthorizedRecords[recordId];
}
}
}void PopulateRecordDropDown()
{
c_dropDownCurrentRecord.Items.Clear();foreach (Guid recordId in PersonInfo.AuthorizedRecords.Keys)
{
HealthRecordInfo healthRecordInfo = PersonInfo.AuthorizedRecords[recordId];ListItem listItem = new ListItem(healthRecordInfo.Name, recordId.ToString());
if (recordId == PersonInfo.SelectedRecord.Id)
{
listItem.Selected = true;
}c_dropDownCurrentRecord.Items.Add(listItem);
}
}
We then need to update our height code to deal with cases where the height isn’t there (or perhaps you already did this…)
Height height = GetSingleValue<Height>(Height.TypeId);
if (height != null)
{
if (height.Value.DisplayValue != null)
{
c_labelHeight.Text = height.Value.DisplayValue.ToString();
}
else
{
c_labelHeight.Text = height.Value.ToString();
}
}
and
string bmiString = String.Empty;
if (height != null)
{
double bmi = weight.Value.Kilograms / (height.Value.Meters * height.Value.Meters);
bmiString = String.Format("{0:F2}", bmi);
}
After all of that, if you run the application, is should now allow you to select between the records. However, we still need to save the information about which record is current.
Saving the current record
To store the identifier of the current record, what we would like is a storage place that is associated with the person using the application rather than the a specific record. HealthVault provides that through the GetApplicationsSettings() and SetApplicationSettings() methods on the application connection. We could use those directly by putting some XML in there and then pulling it out, but we’re going to encapsulate that in a class. Here’s what we need to do:
First, we’ll create a new class named “WeightTrackerApplicationSettings”.
using System;
using System.Data;
using System.Configuration;
using System.Web;
using System.Web.Security;
using System.Web.UI;
using System.Web.UI.WebControls;
using System.Web.UI.WebControls.WebParts;
using System.Web.UI.HtmlControls;
using System.Xml;
using System.Xml.XPath;
using System.Text;using Microsoft.Health;
public class WeightTrackerApplicationSettings
{
private Guid _selectedRecordId;public Guid SelectedRecordId
{
get { return _selectedRecordId; }
set { _selectedRecordId = value; }
}public void LoadFromHealthVault(AuthenticatedConnection authenticatedConnection)
{
IXPathNavigable settingsNavigable = authenticatedConnection.GetApplicationSettings();
if (settingsNavigable == null)
{
return;
}XPathNavigator navigator = settingsNavigable.CreateNavigator();
XPathNavigator appSettingsNode = navigator.SelectSingleNode("app-settings");
XPathNavigator selectedRecordNode = appSettingsNode.SelectSingleNode("selected-record-id");
string value = selectedRecordNode.Value;
_selectedRecordId = new Guid(value);
}public void SaveToHealthVault(AuthenticatedConnection authenticatedConnection)
{
XmlDocument document = new XmlDocument();XmlElement nodeWeightTrackerSettings = document.CreateElement("app-settings");
document.AppendChild(nodeWeightTrackerSettings);XmlElement nodeSelectedRecordId = document.CreateElement("selected-record-id");
nodeWeightTrackerSettings.AppendChild(nodeSelectedRecordId);
nodeSelectedRecordId.InnerText = _selectedRecordId.ToString();authenticatedConnection.SetApplicationSettings(document);
}
}
Then, we add the code to load in the settings at the beginning of Page_Prerender():
_weightTrackerApplicationSettings.LoadFromHealthVault(AuthenticatedConnection);
and modify our methods:
protected void c_dropDownCurrentRecord_SelectedIndexChanged(object sender, EventArgs e)
{
foreach (Guid recordId in PersonInfo.AuthorizedRecords.Keys)
{
if (recordId.ToString() == c_dropDownCurrentRecord.SelectedValue)
{
PersonInfo.SelectedRecord = PersonInfo.AuthorizedRecords[recordId];_weightTrackerApplicationSettings.SelectedRecordId = recordId;
_weightTrackerApplicationSettings.SaveToHealthVault(AuthenticatedConnection);
}
}
}void PopulateRecordDropDown()
{
c_dropDownCurrentRecord.Items.Clear();foreach (Guid recordId in PersonInfo.AuthorizedRecords.Keys)
{
HealthRecordInfo healthRecordInfo = PersonInfo.AuthorizedRecords[recordId];ListItem listItem = new ListItem(healthRecordInfo.Name, recordId.ToString());
if (recordId == PersonInfo.SelectedRecord.Id)
{
listItem.Selected = true;
}c_dropDownCurrentRecord.Items.Add(listItem);
}
}
That stores the currently selected record away and then restores it when the page starts up.
Next Time
Next time, we’ll display values from multiple records.