Writing UI logic and a lot more
This post will discuss where UI logic is written in the EP 2009 and how you interact with your X++ code from the UI logic. I consider UI logic code that implements logic that handles user input and interaction mostly using event handlers. Often times the UI logic will manipulate the presentation as a result of the user interaction as well as the data loaded. In EP 4.0 this code was written in the Web Form using control event handlers and event handlers on the form data sources located on the form.  If you have been reading the previous posts you know that in EP 2009 we no longer use the Web Form and have instead moved to ASP.NET user controls as our presentation layer.
ASP.NET user controls are based on the code-behind model. The bulk of the UI is defined declaratively using markup and design time tools in Visual Studio and the UI logic is written in the so called code-behind file. For instance a button control declared in markup would have its click event handler written in the code-behind file using e.g. C#.
Enough talk. Let’s write some UI logic. For that purpose I will build on the Customer grid used in this post. The source code is available here. To demonstrate how  to write UI logic I will use the new toolbar control (AxToolBar) that is included in the set of controls for EP 2009. The toolbar control is a Sharepoint specific control that is used for navigation in EP as well as performing actions. The toolbar will render an AX web menu in the AOT as a toolbar with the top level sub-menus in the menu shown as drop downs. The example uses a new AX web menu called SampleCustomers. It is created in the AOT just like 4.0 using Web Action and URL menu items.
Side Note: The Microsoft Dynamics UX team created some guidelines for the Web menu structure used on the toolbar for the 2009 release. The menu is grouped into 3 menus on the toolbar called New, Actions and Related Information. Under New menu items that create new records are placed, Actions contain menu items that interact with the selected record and Related Information contains menu items that will navigate to other pages with related information for the currently selected record.
When rendered on the toolbar it will look like the following screenshot. As you would expect the toolbar will security trim the menu items based on the AX users permissions. In addition you can see from the screenshot of the toolbar and a grid rendered in Sharepoint that the toolbar has a notion of the currently selected item in the grid. The action menu item Delete selected item will as it indicates delete the currently selected item in the grid.
But how does the toolbar now which item is selected? That is actually a big topic which I will cover in later posts but the short answer here is through web part connections and something we call External Context. Huh? So far I have already been talking about the toolbar control, how did it make into a web part? Well actually we have two sides to the same toolbar story in EP 2009. There is a stand alone toolbar control (AxToolBar) which is present in the Visual Studio toolbox under the Dynamics AX tab and then there is a Dynamics ToolBar Web Part that is present in the web part gallery in Sharepoint after EP has been insalled. The toolbar web part simply renders an AxToolBar. The reason for shipping the web part was that the UX team requested a toolbar that would span the entire content area across multiple web parts. Embedding the toolbar control in a user control would not solve that problem since the toolbar would only span the content area of that toolbar and not across other web parts on that page (for this example it does not really matter if I had embedded the toolbar directly in the user control together with the AxGridView control in Visual Studio or not since we only have that one web part on the page).
Anyway the way to enable this sort of interaction is as I said through web part connections. To do this you put the page in edit mode and then via the web part settings you connect the User Control web part with the Toolbar web part. Read more here. By setting up connections you also get the ability customize the behavior of the menu items on the toolbar at runtime. The toolbar comes with an object model that enables runtime customization of the menu items like hiding, disabling, changing default behavior etc. The customizations are performed via event handlers that are written in code-behind like of your user control. subscribe to the toolbar events in your user controls code-behind.
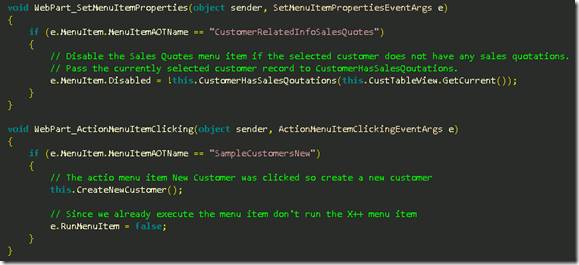
In this example I want to disable the Sales Quotation menu item under Related Information if the selected customer in the grid does not have any sales quotations and I want to create a new customer when the user clicks New customer under New. So in code behind I subscribe to two events – SetMenuItemProperties and ActionMenuItemClicking on the containing web part like so:
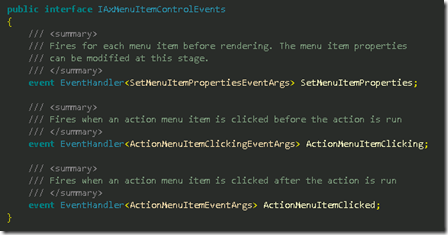
But why am I subscribing to toolbar events on the user control web part when the toolbar is contained in another web part? After connecting the two web parts the user control will detect that the other toolbar is a Dynamics Toolbar Web Part and subscribe to the toolbar events. When the toolbar fires its events the User Control Web Part will be notified and then in turn bubble up the events through the same set of event handlers that are exposed on the interface IAxMenuItemControlEvents. So by virtue of the fact that the web parts are connected your event handlers will be called.
Side Note: IAxMenuItemControlEvents is implemented by the AxToolBar control and the User Control web part’s base class AxBaseWebPart. Actually this interface is implemented by every control in EP 2009 which renders menu items.
Proxy Calls
The code for the event handlers is fairly straightforward. There are a few things I want to mention though. The implementation of CustomerHasSalesQoutations will do a so called proxy call to some logic implemented on an X++ class. The proxy is a strongly typed wrapper for the X++ class on which the X++ method is implemented. The nice thing here is that the class is strongly typed so you can use it in your code-behind without having to deal with casting and calling methods by strings, which is the case if you use the BC.NET object model directly. It is worth mentioning that there is no magic here. In the end a standard call is made to BC.NET API’s to actually execute the X++ code. That can be further evidenced by the use of AxSession in the proxy call. The type of AxSession is of type ISession which contains an adapter (AxaptaAdapter) for the actual BC.NET AX session object Axapta. For every proxy call you need to pass an AxaptaAdapter so the proxy call can call into AX via BC.NET. You can read more about how to generate proxies here.
Base User Control
But where is the AxSession property implemented? It is implemented in the base class of the user control. Take a look at the code-behind for the user control. The Ax WebUserControl inherits form an AxBaseUserControl which in turn inheirts from the ASP.NET class UserControl. So the AxWebUserControl inherits from another user control, but the AxBaseUserControl has no UI (markup). The purpose of the AxBaseUserControl is to encapsulate common logic that is reusable across user controls. So to reuse the code you can make your user control inherit from AxBaseUserControl. The purpose of this pattern is to workaround the fact that there is no support for writing managed helper classes in AX 2009, so the only way to create reusable helper-type logic in EP 2009 is by implementing the code in helper user control like AxBaseUserControl. The AxBaseUserControl has to exposes two helpful and often used properties. One of them being the already mentioned protected ISession AxSession and the other being the protected AxBaseWebPart WebPart which provides easy access at runtime to the web part that contains the user control.
Conclusion
I have covered the basic parts on how to write UI logic in EP 2009 using the code-behind model provided by ASP.NET user controls. Doing so I covered core concepts like the toolbar control and how to manipulate menu items during run time, performing proxy calls to X++ logic and how to group common logic in helper user controls. There is a whole lot more to writing UI logic in EP 2009 and more issues will be covered in future posts. For now have a look at the code, which is available here. Run it and set some breakpoints to see the flow and the runtime values.


