Creating Views in WCF WebHttp Service with T4
This is part nine of a twelve part series that introduces the features of WCF WebHttp Services in .NET 4. In this post we will cover:
- Learning the basics of T4 (Text Template Transformation Toolkit)
- Using T4 to create views in WCF WebHttp Services for text-based content
Over the course of this blog post series, we are building a web service called TeamTask. TeamTask allows a team to track tasks assigned to members of the team. Because the code in a given blog post builds upon the code from the previous posts, the posts are intended to be read in-order.
Downloading the TeamTask Code
At the end of this blog post, you’ll find a link that will allow you to download the code for the current TeamTask Service as a compressed file. After extracting, you’ll find that it contains “Before” and “After” versions of the TeamTask solution. If you would like to follow along with the steps outlined in this post, download the code and open the "Before" solution in Visual Studio 2010. If you aren’t sure about a step, refer to the “After” version of the TeamTask solution.
Note: If you try running the sample code and see a Visual Studio Project Sample Loading Error that begins with “Assembly could not be loaded and will be ignored…”, see here for troubleshooting.
Getting Visual Studio 2010
To follow along with this blog post series, you will need to have Microsoft Visual Studio 2010 and the full .NET 4 Framework installed on your machine. (The client profile of the .NET 4 Framework is not sufficient.) At the time of this posting, the Microsoft Visual Studio 2010 Ultimate Beta 2 is available for free download and there are numerous resources available regarding how to download and install, including this Channel 9 video.
Step 1: Downloading the T4 Editor for VS 2010
In part eight of this blog post series we created the DirectoryService class to expose information about the resource collections (tasks and users) of the TeamTask service. In this part we’re going to extend the DirectoryService class to expose the same information as an HTML help page similar to the automatic help pages exposed for the task and user collections themselves. To create this TeamTask resources help page and populate it with the resource collection information we’ll be using the text template features of Visual Studio 2010.
Text templates are a part of T4, the Text Template Transformation Toolkit that comes with VS2010. Originally, text templates were used for code generation, but with the introduction of the Preprocessed Text Template item in Visual Studio 2010, they can now also be used for runtime text generation.
A T4 text template is simply a file with a .tt extension that contains text and fragments of C# (or VB) code that can be executed to generate some output text. Just to give you an idea of what a T4 text template looks like, here is a simple template that will generate a greeting:
<#@ template language="C#" #>
Hello, my name is <#= this.Name #>.
<#+
public string Name { get; set; }
#>
In the steps that follow we will discuss the control block syntax of T4 templates like this one. For now, just understand that if the Name property of this template were set to “XYZ”, then the output of transforming this template would simply be the string: “Hello, my name is XYZ.”
While VS2010 does include text template items, it doesn’t include an editor for these text templates. Obviously, trying to write a T4 text template without syntax highlighting and intellisense isn’t fun. But not to worry—a free T4 editor add-in for Visual Studio 2010 is already available online. Our first step will be downloading and installing the T4 Editor add-in through the Visual Studio Extension Manager.
In Visual Studio 2010, open the Extension Manager from the main menu bar using “Tools”—>”Extension Manager”.
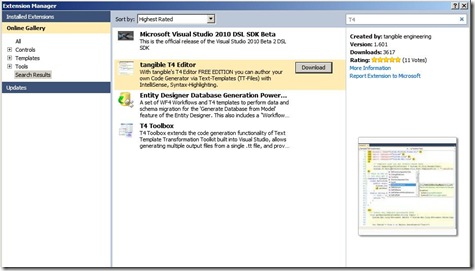
On the left-hand side of the Extension Manager, select the “Online Gallery”. In the “Search Online Gallery” textbox in the upper right-hand corner enter “T4”. At the time of this writing, the following extensions were available that matched the “T4” search:
Click on the “Download” button for the tangible T4 Editor and follow the prompts. Note: If you have not done so already you might need to enable the loading of per-user extensions. There will be a link below the template selection area if this is the case. Follow this link to enable the loading of per-user extensions. You may need to restart Visual Studio. Note: If downloading and installing the editor fails with the message, “The extension manifest is invalid.”, you’ll need to manually download the .vsix extension file from the Visual Studio Gallery webpage here and follow the troubleshooting steps given in the “Discussions” tab of the page.
Helpful Tip: While we will cover the basics of writing T4 text templates, there are more extensive resources available. The documentation on MSDN can be found here. Oleg Sych also has a number of detailed articles on his blog that are worth checking out. |
Step 2: Creating the TeamTask Resources Help Page
We want our TeamTask Resources help page to look just like the automatic help pages for the task and user collections, so we’ll start the TeamTask service and browse to the tasks help page to download the source HTML. We’ll then copy the source HTML into a T4 text template.
In the next step we’ll remove the task operation information from the HTML and add T4 code blocks that will insert the resource collection information from the DirectoryService when the template is transformed at runtime.
If you haven't already done so, download and open the “Before” solution of the code attached to this blog post.
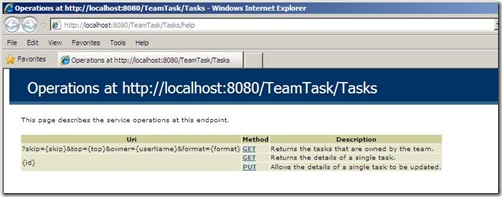
Start without debugging (Ctrl+F5) to start the TeamTask service. In the browser of your choice, navigate to https://localhost:8080/TeamTask/Tasks/help. In Internet Explorer, the help page will be displayed as shown below:
Retrieve the source HTML for the tasks help page. In Internet Explorer 8, you can do this by selecting “Page”—>”View Source” from the command bar.
Select all (Ctrl+A) of the source HTML and copy (Ctrl+C) it. Next we’ll create a text template into which we will paste this HTML.
In the “Solution Explorer” window of Visual Studio, right click on the TeamTask.Service project and select “Add New Item…”. On the left-hand side of the “Add New Item” window select “Visual C#”—>”General” from the tree-view control. In the filtered list of item templates choose the “Preprocessed Text Template”. Note: There is also a “Text Template” items that isn’t preprocessed but it can’t be used for runtime text generation so we aren’t interested in it.
For the template name enter “ResourceCollectionView” and then click “Ok”. This will add the ResourceCollectionView.tt text template to the solution.
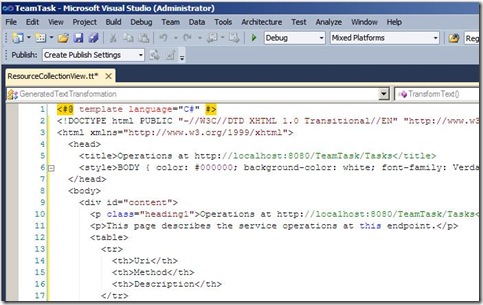
The newly created ResourceCollectionView text template will include a processing directive indicating that the template code language is C#. Under this processing directive, paste (Ctrl+V) the source HTML from the tasks help page like so:
Step 3: Implementing the TeamTask Resources Help Page
We’ve created the ResourceCollectionView text template and pasted in the tasks help page HTML as a starting point. Next we’ll need to alter the HTML to return the resource collection information instead of the task operations information. But before we begin making changes to the HMTL in our text template, let’s first cover the basics of T4 text templates.
First, there are processing directives. Processing directives begin with “<#@” and end with “#>”. We’ve already seen the template directive. It was included in our newly created template and was used to specify that the language for the code blocks will be C#. We’ll also need to use the import directive, which works just like the “using” keyword in C#.
Second, there are control blocks. There are three types of control blocks: standard control blocks, expression control blocks, and class feature control blocks.
Standard control blocks begin with “<#” and end with “#>”. They allow you to use the standard control keywords form C# (or VB) in a text template: for, foreach, if, switch, etc. The simple greeting text template in step one didn’t use a standard control block, but we’ll see one used in this step.
Expression control blocks begin with “<#=” and end with “#>” (notice the equals sign in the syntax). Expression control blocks contain code that evaluates to a string that is injected into the generated text output. The simple greeting text template in step one used the expression control block “<#= this.Name #>” to inject the value of the Name property into the generated text output.
Lastly, class feature control blocks begin with “<#+” and end with “#>” (notice the addition sign in the syntax). Class feature control blocks allow you to add methods, properties, fields and nested classes to your template. The standard control blocks and expression control blocks can then make use of these methods, properties, fields, etc. The simple greeting text template in step one used a class feature control block to add the Name property to the text template.
Now, with this basic understanding of T4 text templates, let’s implement the TeamTask Resources help page.
We’ll start by adding an import processing directive for the System.Collections.Generic namespace because we’ll be using the generic List type in the template. After the “<#@ template language=”C#”#>” processing directive insert the following line:
<#@ import namespace="System.Collections.Generic" #>
Next we’ll add a class feature control block that will provide the name of the service, the base URI of the service and a list of resource collection exposed by the service. Insert the following control block at the very end of the template:
<#+
public string ServiceName { get; set; }
public string BaseUri { get; set; }
public List<ResourceCollection> ResourceCollections { get; set; }
#>Now we’ll be able to use the ServiceName, BaseUri and ResourceCollections properties within expression and standard control blocks of the template. Note: Class feature control blocks must always be placed at the end of the template.
Under the <head> element of the HTML, replace the current <title> element with the following:
<title>Resources at <#= this.BaseUri #></title>
Notice that we are using an expression control block to insert the base URI of the service into the content of the HTML title tag.
Under the <div id=”content> element in the HTML, replace the two <p> elements with the following":
<p class="heading1">Resources at <#= this.BaseUri #></p>
<p>This page describes the resources of the <#= this.ServiceName #> service.</p>Again, we are using expression control blocks to insert the base URI and name of the service into the generated text output when the template is transformed at runtime.
Lastly, replace the entire <table> element in the HTML with the following:
<table>
<tr>
<th>Uri</th>
<th>Resource</th>
<th>Description</th>
</tr>
<# foreach (var resource in this.ResourceCollections)
{ #>
<tr>
<td><#= resource.Uri #></td>
<td title="<#= resource.HelpUri.ToString() #>">
<a rel="operation" href="<#= resource.HelpUri.ToString() #>"><#= resource.Name #></a>
</td>
<td><#= resource.Description #></td>
</tr>
<# } #>
</table>Notice that we are using a foreach loop within a standard control block. When the template is transformed, a table row element will be generated for each ResourceCollection instance in the ResourceCollections property.
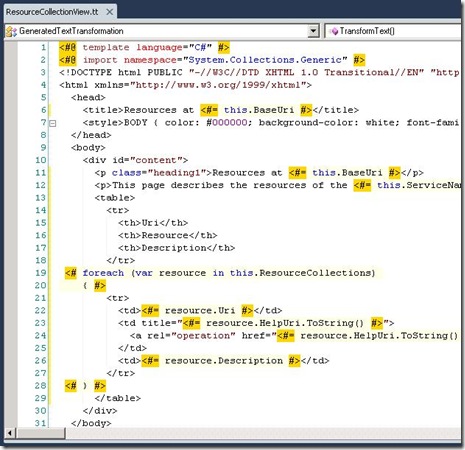
We’re now done with our TeamTask Resources help page text template. In the Visual Studio T4 editor it should look like so:
Helpful Tip: We happened to create an HTML page with the ResourceCollectionView text template but T4 text templates can be used to generate any text output. Therefore they could be used to generate custom text formats or even XML/JSON if you needed complete control over how your data was serialized in the response message. |
Step 4: Exposing the TeamTask Resource Help Page
Now that we have our TeamTask resources help page, we need to extend the DirectoryService class that we created in part eight of this blog post series to return the help page when client’s prefer an HTML format. Only then will users of the TeamTask service be able to view the TeamTask Resources help page in the browser.
Open the DirectoryService.cs file from the TeamTask.Service project in the code editor.
Within the switch statement of the GetDirectory() operation, add an additional case like so:
case "*/*":
case "APPLICATION/XHTML+XML":
case "TEXT/HTML":
ResourceCollectionView htmlView = new ResourceCollectionView();
htmlView.ServiceName = "TeamTask";
htmlView.ResourceCollections = resourceCollections;
htmlView.BaseUri = request.UriTemplateMatch.RequestUri.ToString();
return WebOperationContext.Current.
CreateTextResponse(htmlView.TransformText());Because we used a preprocessed text template, the template is actually available to us as a CLR type. We can create an instance of the template, set the ServiceName, BaseUri and ResourceCollections properties and then transform the template to generate the output text within our service operation. Note: At times you may find that you need to manually force the T4 engine to reprocess the template and generate the CLR type a new. This can be done by selecting "Build"-->"Rebuild Solution" from the Visual Studio menu bar.
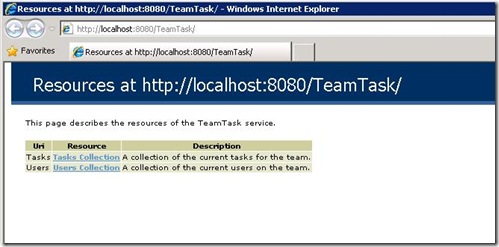
To see the TeamTask resources help page in the browser, start without debugging (Ctrl+F5) and navigate to https://localhost:8080/TeamTask/. In Internet Explorer, the new resources help page will look like the following:
Helpful Tip: If you haven’t already noticed, the ResourceCollectionView text template as well as the DirectoryService and ResourceCollection classes don’t have any dependencies on the TeamTask service. Therefore, they can all be easily used as is in your own WCF WebHttp Services. |
Helpful Tip: It is also possible to use an ASP.NET webpage in a manner similiar to how we've used T4 text templates. To hook up an .aspx page you'd call the CreateTextResponse(Action<TextWriter>) overload from the WebOperationContext and then call the ASP.NET method HttpServerUtility.Execute(string, TextWriter) within the action, passing in the textwriter. Of course there are tradeoffs with using .aspx pages. T4 is light-weight, can be used in any hosting scenario and is fairly easy to learn. ASP.NET pages can only be used in IIS when ASP.NET compability mode is enabled in WCF but they give you the advantage of dynamic compilation and the ability to write responses directly to the output stream instead of buffering them within a string as with T4.
Next Steps: Conditional GET and Etag Support
With this discussion on how to use T4 text templates in a WCF WebHttp Service, we’ve now demonstrated three different methods of generating responses in a given format. In part four of this blog post series we covered the automatic and explicit format support for XML and JSON. This is by far the simplest method to use as you simply return a given type from your service operation and let the WCF infrastructure handle the serialization. In part eight of this blog post series we explored the Create*Response() API that makes it possible to create messages in custom text or binary formats as well as XML, JSON and ATOM. And now we’ve shown how integrating T4 text templates into a WCF WebHttp Service can give you complete control over any text-based response.
In parts ten and eleven of this blog post series we’ll explore the new ETag support in WCF WebHttp Services for .NET 4 that makes it easier to utilize the caching capabilities built into HTTP. In part ten we’ll demonstrate how to employee conditional GET with a WCF WebHttp Service, allowing the service to inform clients that they already have the current state of a resource without sending a full response. In part eleven we’ll show how ETags can enable optimistic concurrency with updates to ensure that clients don’t unknowing update data that has changed since they last retrieved it.
Randall Tombaugh
Developer, WCF WebHttp Services
