Using Routes to Compose WCF WebHttp Services
This is part six of a twelve part series that introduces the features of WCF WebHttp Services in .NET 4. In this post we will cover:
- Composing multiple WCF WebHttp Services into a single web service
- Using ASP.NET routes with WCF WebHttp Services
Over the course of this blog post series, we are building a web service called TeamTask. TeamTask allows a team to track tasks assigned to members of the team. Because the code in a given blog post builds upon the code from the previous posts, the posts are intended to be read in-order.
Downloading the TeamTask Code
At the end of this blog post, you’ll find a link that will allow you to download the code for the current TeamTask Service as a compressed file. After extracting, you’ll find that it contains “Before” and “After” versions of the TeamTask solution. If you would like to follow along with the steps outlined in this post, download the code and open the "Before" solution in Visual Studio 2010. If you aren’t sure about a step, refer to the “After” version of the TeamTask solution.
Note: If you try running the sample code and see a Visual Studio Project Sample Loading Error that begins with “Assembly could not be loaded and will be ignored…”, see here for troubleshooting.
Getting Visual Studio 2010
To follow along with this blog post series, you will need to have Microsoft Visual Studio 2010 and the full .NET 4 Framework installed on your machine. (The client profile of the .NET 4 Framework is not sufficient.) At the time of this posting, the Microsoft Visual Studio 2010 Ultimate Beta 2 is available for free download and there are numerous resources available regarding how to download and install, including this Channel 9 video.
Step 1: Refactoring the TeamTask Service into Resources
So far the TeamTask service that we’ve been implementing over the past five blog posts has had a manageable number of operations. The service exposes an operation for retrieving a list of tasks, another for updating a single user and a third for updating a single task. All of these operations are implemented within a single class—the TeamTaskService class.
There is nothing necessarily wrong with this single service class design. However, as we add more operations, our TeamTaskService class will continue to grow and we’ll end up with one large monolithic class. As has been shown time and time again, monolithic entities tend to be difficult to maintain and they make code reuse problematic. If we intend to continue adding functionality to the TeamTask service (and we do), we would be well served to start thinking of our service as a collection of resources and refactor our code to reflect this new mentality.
A resource is technically anything with an addressable state. In HTTP, a given resource is addressable because it has an associated URI and its current state is represented in the response from an HTTP GET request.
However, using a more informal mental model of a resource as just a “thing” can be helpful. It’s pretty easy to divide our TeamTask service into “things”. Our “things” happen to be tasks and users. We’ll start by refactoring our single TeamTaskService class into two separate service classes that will better represent our resources: a TaskService and a UserService.
If you haven't already done so, download and open the “Before” solution of the code attached to this blog post.
Rename the TeamTaskService.cs file to “TaskService.cs” by right-clicking on it in the “Solution Explorer” window (Ctrl + W, S) and selecting “Rename” from the context menu. A dialog box should appear asking if you want to rename all references in the project to the code element “TeamTaskService”. Select “Yes”.
In the “Solution Explorer” window select the newly renamed TaskService.cs file and press Ctrl+C, Ctrl+V to create a copy of the TaskService.cs file in the TeamTask.Service project. The new file should be named “Copy of TaskService.cs”.
Rename the “Copy of TaskService.cs” file to “UserService.cs” by right-clicking on it in the “Solution Explorer” window and selecting “Rename” from the context menu.
Open the UserService.cs file in the code editor. Because this file is actually a copy of the TaskService.cs file, it will contain a second definition of the TaskService class. Rename the class to “UserService”, making sure NOT to update references throughout the project.
In the UserService.cs file, delete the GetTasks() and UpdateTask() operations since they apply to tasks.
Likewise, in the TaskService.cs file, delete the GetUser() operation as it applies to users and not tasks.
Helpful Tip: The concept of a resource is central to the set of architectural constraints that make up REST. We won’t be discussing the theory behind REST but there are plenty of articles, wiki entries, and books that discuss REST in depth. That said, the remainder of the posts in this blog series will demonstrate how to build web services that are more RESTful in nature with WCF WebHttp Services in .NET 4. |
Step 2: Adding Routes for our Task and User Services
We now have two separate service classes: a TaskService class that contains all of the task related operations and a UserService class that contains all of the user related operations. Having two separate service classes means that we now need a mechanism to indicate which service class should handle a given incoming request. Routes happen to be this mechanism.
Routes provide a mapping from a base address path to a service class. Originally an ASP.NET feature, routes can be used with WCF WebHttp Services when ASP.NET compatibility mode is enabled. We’ve actually been using routes all along. We just weren’t using the feature in an interesting way since we only had a single route that mapped an empty string path to the now-defunct TeamTaskService class.
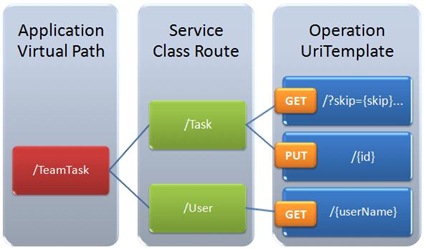
For the TaskService class, we will register the route path “Tasks”. This means that only requests with a URI base address of the form “https://<baseAddress>/Tasks” will be handled by the TaskService. Likewise, we will map the route path “Users” to the UserService class.
A benefit of using routes is that we can now simplify the UriTemplates associated with our service operations. If you look at the UriTemplates used with the TaskService operations, you’ll notice that they both begin with a “Tasks” path segment. Likewise, the single operation on the UserService class begins with a “Users” path segment. We’ll cut these first path segments from our UriTemplates since our routes will now have this “routing” information.
Before the refactoring we had really collapsed the “routing” information in our URIs into the “operation” information of the UriTemplates. With the refactoring, we rectify this issue. The diagram below shows the improved scheme for mapping from request URIs to service operations:
Routes are registered in the Global.asax file. If you’ve worked with ASP.NET before, you may be familiar with the Global.asax file. It provides the capability to respond to application-level events. In this case, we want to respond to the application start event, which will occur when IIS receives the very first request to the TeamTask service. It is in the handler for the application start event that we will register our routes for the TaskService and UserService classes.
Open the Global.asax file in the code editor. You should find that the RegisterRoutes() method has a single route registered like so:
private void RegisterRoutes()
{
RouteTable.Routes.Add(new ServiceRoute("",
new WebServiceHostFactory(), typeof(TaskService)));
}Note: If the service type being registered in your code is of type TeamTaskService, then the references to TeamTaskService were not correctly updated when the class was renamed to “TaskService” in step one.
Replace the the RegisterRoutes() method with the following implementation:
private void RegisterRoutes()
{
WebServiceHostFactory factory = new WebServiceHostFactory();
RouteTable.Routes.Add(new ServiceRoute("Tasks", factory,
typeof(TaskService)));
RouteTable.Routes.Add(new ServiceRoute("Users", factory,
typeof(UserService)));
}This new implementation adds two ServiceRoute instances to the Routes collection of the static RouteTable. The first ServiceRoute instance provides a mapping from the route path “Tasks” to the TaskService class and the second instance provides a mapping from the route path “Users” to the UserService class.
Open the TaskService.cs file in the code editor and remove the "Task" path segments from the UriTemplate values on the GetTasks() and UpdateTask() operations like so:
[WebGet(UriTemplate =
"?skip={skip}&top={top}&owner={userName}&format={format}")]
public List<Task> GetTasks(int skip, int top, string userName, string format)and,
[Description("Allows the details of a single task to be updated.")]
[WebInvoke(UriTemplate = "{id}", Method = "PUT")]
public Task UpdateTask(string id, Task task)Open the UserService.cs file in the code editor and remove the "User" path segments from the UriTemplate values on the GetUser() operation like so:
[WebGet(UriTemplate = "{userName}")]
public User GetUser(string userName)
Helpful Tip: Routes in ASP.NET can actually include variables much like UriTemplates. However, be aware that in WCF WebHttp Services in .NET 4 only literal route paths are supported, as UriTemplates already provide URI variable support. |
Step 3: Adding the GetTask() Operation
With the refactoring complete, let’s add some new operations to round out the functionality provided by the TeamTask service. We already have the GetUser() operation for retrieving the details of a single user, but we don’t have a similar operation for retrieving the details of a single task. So let’s add a GetTask() operation that will perform this function.
The GetTask() operation will use some of the same logic that the UpdateTask() uses. So we’ll first refactor some of the UpdateTask() method’s logic into private methods and then we’ll implement the GetTask() operation to use these private methods.
Open the TaskService.cs file in the code editor.
In the UpdateTask() method, select the entire “if” block in which the task id is parsed and right-click. In the context menu that appears, select “Refactor”—>”Extract Method”. In the “Extract Method” dialog box that appears, enter “ParseTaskId” as the name for the new method and press enter. The new ParseTaskId() method should look like the following:
private static int ParseTaskId(string id)
{
int parsedId;
if (!int.TryParse(id, out parsedId))
{
throw new WebFaultException<string>(
string.Format(
"The value '{0}' is not a valid task id. The id must be an integer.",
id), HttpStatusCode.BadRequest);
}
return parsedId;
}Also in the UpdateTask() method, select the code within the “catch” block and right-click. In the context menu that appears, select “Refactor”—>”Extract Method”. In the “Extract Method” dialog box that appears, enter “ThrowNoSuchTaskId” as the name for the new method and press enter. The new ThrowNoSuchTaskId() method should look like the following:
private static void ThrowNoSuchTaskId(int parsedId)
{
throw new WebFaultException<string>(
string.Format("There is no task with the id '{0}'.", parsedId),
HttpStatusCode.NotFound);
}Note: Both of these new private methods throw a WebFaultException. The WebFaultException class is new in WCF WebHttp Services in .NET 4. It was discussed in part five of this blog post series.
With the new ParseTaskId() and ThrowNoSuchTaskId() methods, the implementation of the GetTask() operation is straightforward. Copy the following code into the TaskService class:
[Description("Returns the details of a single task.")]
[WebGet(UriTemplate = "{id}")]
public Task GetTask(string id)
{
int parsedId = ParseTaskId(id);
using (TeamTaskObjectContext objectContext =
new TeamTaskObjectContext())
{
var task = objectContext.Tasks.FirstOrDefault(t => t.Id == parsedId);
if (task == null)
{
ThrowNoSuchTaskId(parsedId);
}
return task;
}
}You may notice that the GetTask() operation uses the same UriTemplate as the UpdateTask() operation. The difference between the two operations is the associated HTTP method: the UpdateTask() operation uses a [WebInvoke] attribute with the method set to “PUT” while the GetTask() operation uses a [WebGet] attribute, which is always for HTTP GET requests.
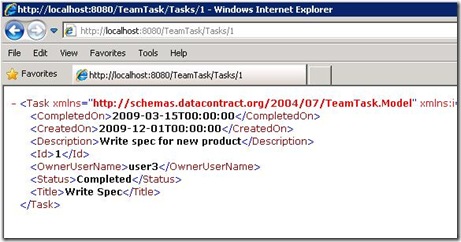
Start without debugging (Ctrl+F5) and use the browser of your choice to navigate to https://localhost:8080/TeamTask/Tasks/1. In Internet Explorer, the single task will be displayed as shown below:
Step 4: Adding the GetUsers() Operation
Lastly, for the sake of completeness we’ll also add a GetUsers() operation that will return a list of users just like the GetTasks() operation returns a list of tasks.
Open the UserService.cs file in the code editor and add the following implementation of the GetUsers() operation:
[Description("Returns the users on the team.")]
[WebGet(UriTemplate = "?skip={skip}&top={top}&manager={userName}")]
public List<User> GetUsers(int skip, int top, string userName)
{
// Set reasonable defaults for the query string parameters
skip = (skip >= 0) ? skip : 0;
top = (top > 0) ? top : 25;using (TeamTaskObjectContext objectContext =
new TeamTaskObjectContext())
{
// Include the where clause only if a userName was provided
var userQuery = (string.IsNullOrWhiteSpace(userName)) ?
objectContext.Users :
objectContext.Users.Where(
user => user.ManagerUserName == userName);return userQuery.OrderBy(user => user.UserName)
.Skip(skip).Take(top).ToList();
}
}The GetUsers() operation is very similar to the GetTasks() operation introduced in the first part of this blog post series. The only difference is that GetUsers() operation provides the ability to filter the list of users by the user’s manager whereas the GetTasks() operation provided the ability to filter by task owner.
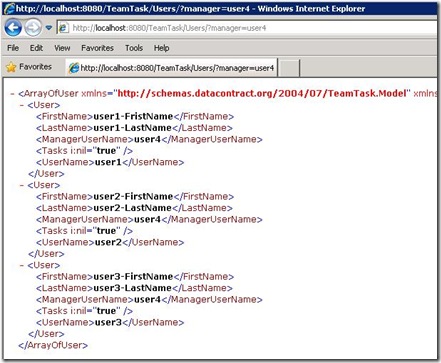
Start without debugging (Ctrl+F5) and use the browser of your choice to navigate to https://localhost:8080/TeamTask/Users?manager=user4. In Internet Explorer, the list of users will be displayed as shown below:
Next Steps: Integrating ASP.NET Output Caching with WCF WebHttp Services
We performed a lot of code refactoring in this part of the blog post series. But by starting to think of the TeamTask service in terms of resources, we’re in a much better position to add features and functionality to the service. Involved in this refactoring was the use of the new ASP.NET routes integration feature introduced with WCF WebHttp Services in .NET 4.
In part seven of this blog post series we’ll take a look at another ASP.NET integration feature introduced with WCF WebHttp Services in .NET 4: declarative output caching.
Randall Tombaugh
Developer, WCF WebHttp Services


